FREE 1 to 3-Day Delivery on Orders $149+ Details

How to Install Teraflex Front Revolver Shackles on your Wrangler

Shop Parts in this Guide
Installation:
1. Jack the front of the vehicle up by the frame so that the axle droops. Secure the frame with jack stands.
2. Unbolt the spring shackles and discard. Retain the 1/2-inch bolts to install the shackles.
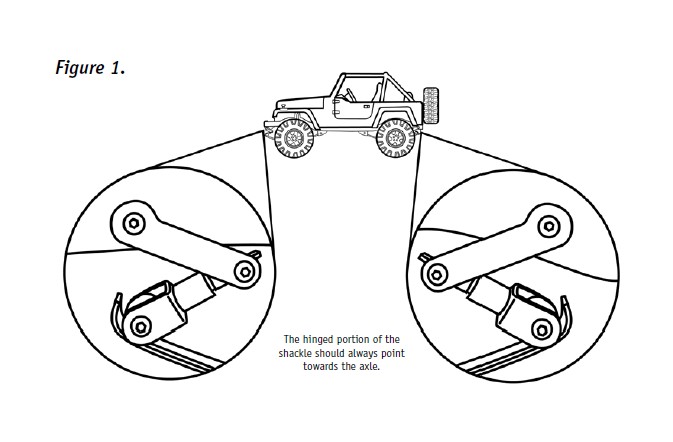
3. Install the shackle so the hinged portion points toward the axle (see figure 1). This applies to shackles installed on both the front and rear of the vehicle. The relief in the yoke should be positioned towards the spring. The hinged portion of the shackle should always point towards the axle. Note: If the frame or spring bushings are rubber, grease the sides of them to make installation easier. Replacing factory bushings with polyurethane is recommended, but not mandatory.
4. Secure the shackles with bolts and locking nuts. When tightened, the bolt should still be able to be rotated slightly using a wrench.
5. Remove the vehicle from the jack stands.
6. Repeat instructions above for the rear shackle application.
Note: If the vehicle has stock springs and shackles, the frame bolts may be installed from the fuel tank side. To remove these bolts, place a floor jack under the gas tank skid plate and loosen the tank mounting bolts on the rear frame cross member and lower the tank approximately two inches. This will give you enough space to remove the frame bolts on the shackle. Reinstall the bolts from the outside of the frame when you install the revolver shackles.
7. Check the shackle’s clearance near the exhaust bracket at the right rear of the vehicle. It may be necessary to tap or bend the mount back toward the fuel tank approximately one inch. Check to make sure the bracket has good clearance from the tank.
8. Check to make sure you have tightened gas tank mounts, shackle bolts, and exhaust bracket. Lower vehicle off jack stands.
The shackles are now installed and ready for use.
Warning:
Brake lines should be correctly extended, shocks should be checked for extended travel length, and the left rear emergency brake cable may need to be modified before using this vehicle. Check the driveshaft for proper clearance as well.
Please check the following items:
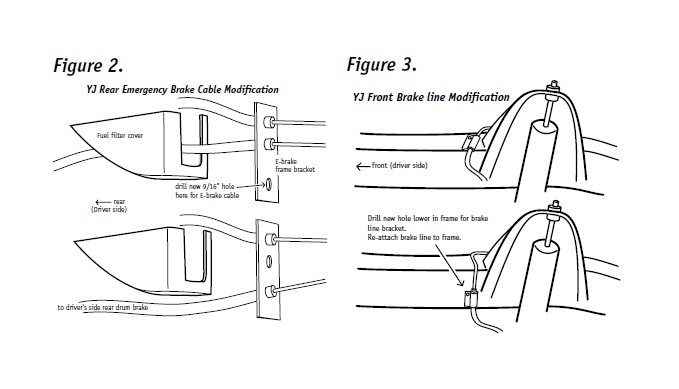
1. On YJ applications modify the location of the left rear emergency brake cable. (See figure 2) Remove brake cable from bracket that pulls both left and right cables. Next push cable back through the frame mount. Pull cable out of the protective cover that guards the fuel filter. Drill a 9/16-inch hole in the frame bracket just below the fuel filter cover and re-install just as before.
2. Check the rear driveshaft, rear shocks, and rear brake lines. Vehicles with aftermarket suspension systems may already have longer shocks; brake lines extensions or longer brake lines; and a transfer case spacer or fixed yoke aftermarket driveshaft. Make sure that the driveshaft will rotate freely in full droop. When using a slip yoke stock drive shaft, make sure that under full droop it has at least a 1-1/4 inch overlap.
Jack the rear of the vehicle up until the shackles just start to open. STOP! Check driveshaft rotation, brake line length and shock travel. If the drive shaft is rotating freely and the shocks and brake lines are not maxed out, lift the vehicle until the rear tires are slightly off the ground or brake lines are tight. If successful in lifting the vehicle until the tires are slightly off the ground, re-check the driveshaft rotation, shock travel, and brake line tension. Please note that shocks may limit your full articulation capability.
3. Lift the front of the vehicle until the shackles start to open. Check shock travel and brake cables. The illustration (figure 3) shows how to modify the front brake lines on YJs. Remove bolt from brake line bracket and carefully pull brake line down until it is about 1 inch above the bottom of the frame. Mark the position where it bolts on, and drill a new hole in the frame. Re-mount the brake line to the frame.
off-road performance of TeraFlex Revolver Shackles:
1. Use sway bar disconnects.
2. Use an aftermarket telescoping track bar.
3. Use front shocks with 10.5 to 12 inches of wheel travel.
4. Use rear shocks with 8 to 10 inches of wheel travel.
5. Use longer brake lines front and rear. Note: Most aftermarket suspensions kits already supply them but check to make sure yours are long enough.
6. Check right side emergency brake cable bracket that it clears the muffler mount. This can be bent to make clearance.
7. Check the 9/16-inch bolts on the fixed end of the springs. Tighten until snug, but you should be able to rotate them slightly with the bolt end.