 FREE 1 to 3-Day Delivery on Orders $149+ Details

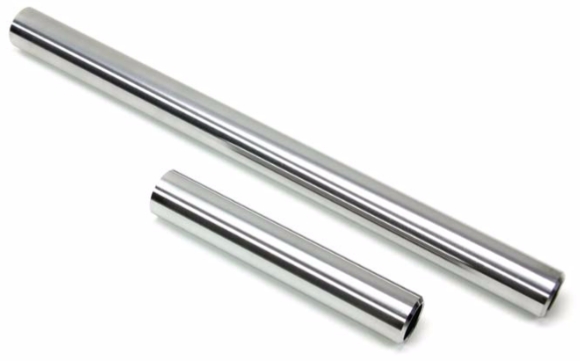
How to Install a Teraflex Front Axle Sleeve Kit w/ Gussets on your Jeep Wrangler
Tools Required
- 8mm, 13mm 12point, 18mm, 19mm, 21mm sockets or wrenches
- 5mm allen
- 3/8”, 1/2” drive ratchets
- Ft-lbs torque wrench
- Center punch
- Powered hand drill
- 1/4”, 1/2” drill bits
- Welder
- Grinder
- Silicon
- Razor blade
- Ball peen hammer
- Floor jack
- Jack stands
- Wheel chocks
- Pry bar
- Black Spray paint
- Safety glasses

Shop Parts in this Guide
Axle sleeve installation:
1. Lift vehicle and support frame with Jack stands.
2. Remove front wheels using a 19mm socket.
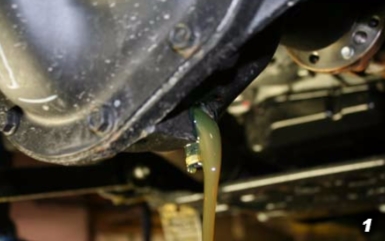
3. Remove drain plug from center section using a 3/8” ratchet and extension. (Photo #1)
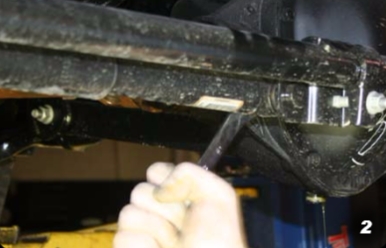
4. While axle is draining remove steering stabilizer from tie rod using 18mm socket. (Photo #2)

5. Remove the tie rod from knuckle using a 21mm socket. Hit the face of the knuckle with a ball peen hammer where the tie rod mounts to the knuckle to loosen the taper and remove tie rod. (Photo #3)
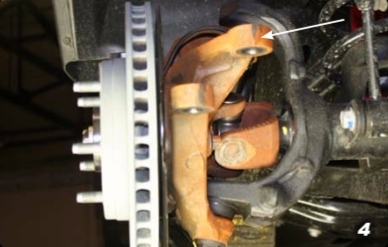
6. Remove the drag link at the knuckle using a 21mm socket and Hit the face of the knuckle with a ball peen hammer. (Photo #4)
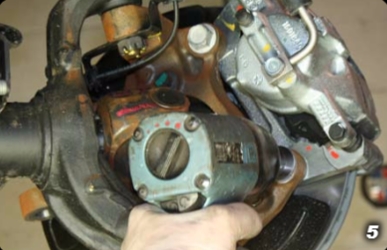
7. Remove brake calipers using a 21mm socket. Make sure to hang the calipers from the frame so that they do not hang from the brake lines. This can damage the brake line. (Photo #5)
8. Remove the rotor.
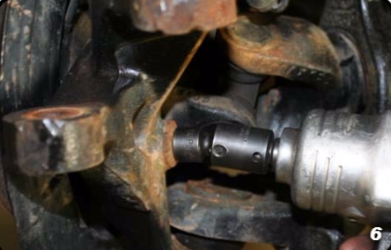
9. Remove the three bolts from the back of the knuckle that hold the unit-bearing and axle shaft in place, using a 13mm 12 point socket. (Photo #6)
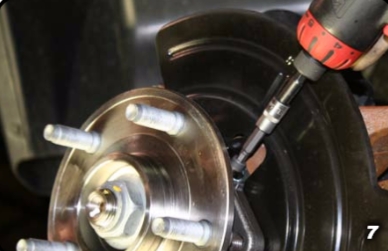
10. Remove the wheel speed sensor using a 5mm allen. (Photo #7)
11. Remove the Axle shafts from the axle housing. You may need to pry on the U-joint ear to release it. (Photo #8)

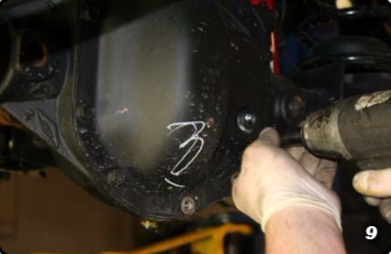
12. Remove the diff cover bolts using a 13mm socket. (TIP leave the top bolt in loose and hit the cover with a dead blow hammer to release the silicon seal) (Photo #9)
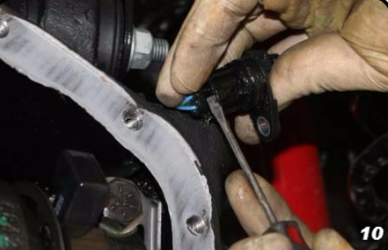
13. For Rubicon models: remove the electrical connector at the top of the housing using an 8mm socket and disconnect the connector from the locker. (Photo #10)
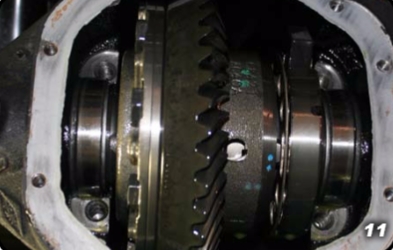
14. Remove the carrier bearing caps using a 19mm socket. (Photo #11)
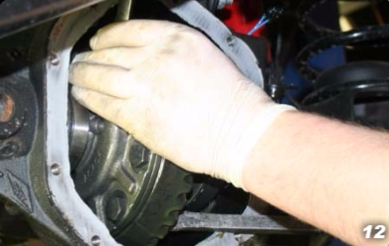
15. Remove the carrier buy placing a 19mm wrench on the ring gear bolts and turning the carrier so the wrench wedges at the top of the housing, then use a pry bar on the ring gear to roll out the carrier. Make sure not to mix up the bearing caps or shims. (Photo #12)
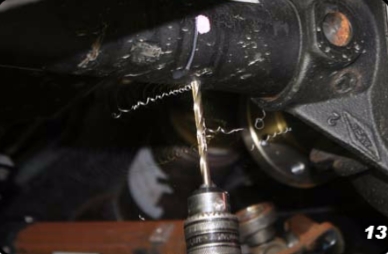
16. After the carrier has been removed, drill pilot holes in the tubes. Use a ¼” drill bit and drill 4 or more holes on the short side and 6 or more on the long tube side. Drill the holes where it is easy drill and easy to weld. (Photo #13)
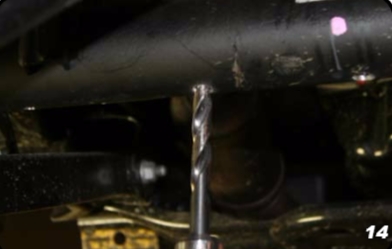
17. After pilot holes are drilled, drill holes out to ½” diameter so you will get good penetration on your plug welds. (Photo #14)
18. After all the holes are drilled blow the metal shavings out of the tubes.
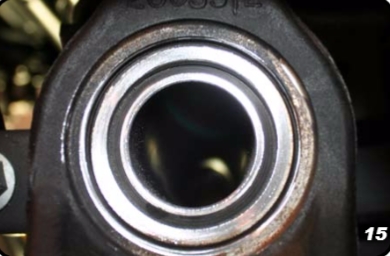
19. Insert the new tube sleeves into the axle with the taper facing out. Make sure that the new sleeve is flush with the
tube on the outside. (Photo #15)
20. Clean and prep all areas that will be welded.
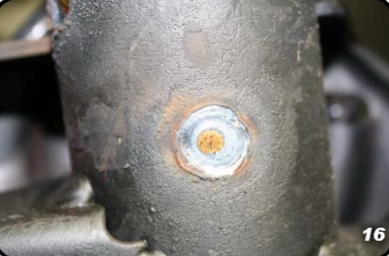
21. Weld in the sleeve using the holes that you drilled, make
sure to do one at a time on each side until they are all welded. (Photo #16)
22. To finish welding the sleeve weld the outside of the sleeve where the taper meets the factory tube by the knuckle.
23. After welding is complete clean out the tubes and or slag on the inside of the new sleeves.
24. Paint all the welded areas.
25. Install the carrier and shims together by hitting it in with a dead blow hammer. Once the carrier is in all the way make sure the shims are also, then install the caps. If
you mixed up the caps there is a stamp on them that correlates to the housing. Install the caps using a 19mm socket. Torque to 80 Ft-lbs.
26. For Rubicon models: Reconnect your locker and bolt the connector back on using the 8mm socket. Torque to 3 Ft-lbs.
27. Make sure all of the old silicon is cleaned off the axle housing and diff cover, use a razor blade, brake clean and a rag to clean of the silicon. Once everything is cleaned re-silicon your diff cover and bolt it back on using a 13mm socket. Torque to 30Ft-lbs.
28. Reinstall your diff drain plug. Torque to 25 Ft-lbs.
29. Install the axle shafts; make sure to grease the spline and seal surface so you do not destroy the seals. Use a 13mm 12 point socket to install the bearing bolts. Torque
to 75 Ft-lbs.
30. Install the wheel speed sensor using a 5mm allen torque to 3Ft-lbs.
31. Install the rotor and brake caliper using a 21mm socket. Torque caliper bolts to 120 Ft-lbs.
32. Install the drag link to knuckle using a 21mm socket. Torque to 63Ft-lbs
33. Install the tie rod to the knuckle using a 21mm socket. Torque to 63Ft-lbs.
34. Install the steering stabilizer to tie rod using a 18mm socket. Torque to 50 Ft-lbs.
35. Install the wheels with a 19mm socket. Torque the wheels to 85-125 Ft-lbs.
36. Fill diff to fill plug using 80w-90w gear oil.
37. Remove jack stands and lower vehicle.

