 FREE 1 to 3-Day Delivery on Orders $149+ Details

How to Install Synergy Adjustable Front Track Bar (97-06 Wrangler TJ) on your Jeep Wrangler
Installation Time
1 hours
Tools Required
- Basic hand tools
- Drill with 9/16” metal cutting drill bit
- 4-1/2” angle grinder with sanding disc or other sanding/grinding tool (Optional for weld on gusset reinforcement in Step 3)
- Welder (Optional for weld on gusset reinforcement in Step 3)

Shop Parts in this Guide

Parts List

General Notes
These instructions are also available on our website: www.synergymfg.com. Check the website before you begin for any updated instructions and additional photos for your reference.
This track bar is a factory style replacement track bar for lifts from 0-4” of lift.
2.0” to 3.0” bump stop spacers will be required if the axle is pushed forward slightly from stock and an aftermarket diff cover is used. The larger diameter of the Synergy track bar and tie rod end will interfere with the diff cover if no bump stop spacer is used. We recommend cycling the suspension to full compression with the track bar installed to ensure no interference is occurring.
Pre-Installation Checklist
Are all the front suspension bushings and joints in good condition? Any single worn part can lead to premature wear of all other parts.
Would this be a good time to rotate your tires?
Replacement Parts
Bushings and tie rod ends are considered wear parts. Under normal conditions and with a vehicle that is well maintained, the components should last many tens of thousands of miles. However, in the case of component wear, the following parts are available from Synergy Manufacturing for replacement:

Installation
1) Remove stock track bar. The frame side mount may require a tie rod separator.
2) Before installing the Synergy track bar the stock axle side track bar mount needs to be modified. Drill out the stock 10mm track bar bolt hole to 9/16”. Any metal cutting 9/16” drill bit will work. Metal is best cut with very slow speeds and higher pressure, so if you have an adjustable speed drill make sure the speed setting is as low as possible.
3) OPTIONAL BUT RECOMMENDED: After drilling out the axle side hole, remove any paint, oil and rust off the face of the track bar mount so the provided track bar gusset can be welded in place. Align the gusset using the 9/16” x 3.0” long bolt provided in the kit and tack into place. Remove bolt and fully weld gusset on. Allow welds to cool and paint any exposed areas of metal to prevent corrosion. See Figure 1.

4) Install the tie rod end side of the Synergy track bar first. Torque castle nut to 55 ft-lbs or more and install cotter pin. Never loosen tie rod end nut in order to fit cotter pin, only tighten.
5) Use the nut tab provided for the axle side of the track bar. Install the 9/16” x 3.0” long bolt at the axle side. Use the provided ½” flat washer under the bolt head. Torque to 80 ft-lbs.

6) Center the axle by turning the adjuster sleeve; counter clockwise will extend the trackbar. Use a 1-1/4” wrench or large crescent to turn the adjuster sleeve. Once you have the axle centered, tighten the pinch bolt to 80 ft-lbs.
a. After tightening the pinch bolt, try to spin the adjuster sleeve. Make sure the pinch bolt has adequately clamped onto the rod end shank so that the adjuster is not movable. If movable, increase torque on pinch bolt but do not exceed 90 ft-lbs
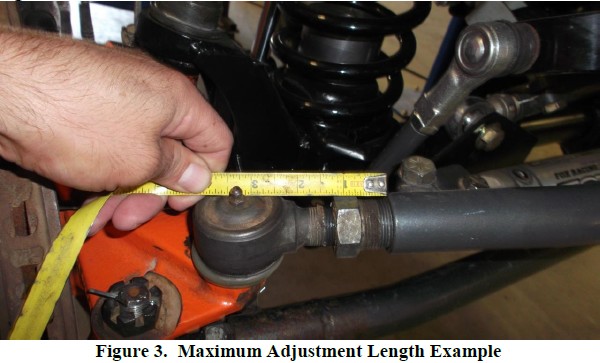
b. NOTE - Do not extend adjuster past 3.25” from end of track bar to center of zerk fitting. See Figure 3.
7) Grease tie rod end and bushing with one pump of grease. DO NOT over grease! One pump is all that is needed in tie rod end.
Post-Installation Checklist
Did you remember to torque all the hardware and install all the cotter pins?
Did you find any worn out parts during the install that should be replaced? Get the new parts on order!
Don’t forget to grease the Tie Rod Ends periodically.
Check all bolt torques after approximately 100 miles.

