 FREE 1 to 3-Day Delivery on Orders $149+ Details

How to Install Smittybilt Textured Black XRC Rear Corner Guards on your 1997-2006 Wrangler

Shop Parts in this Guide
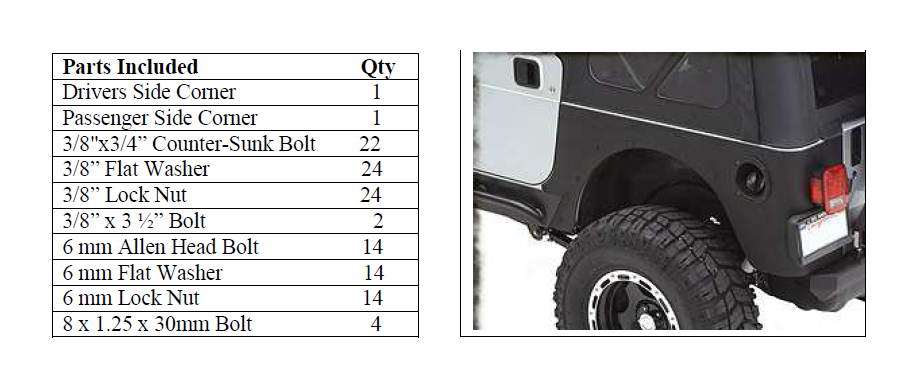
Note: Hardware varies depending on part number ordered/received.
Step 1: Remove your factory or aftermarket rear parts from the vehicle. (Save hardware, some will be re-used.) This includes your fender flares, gas cap, gas cap plastic bezel, rear taillights (You can reach the wire loom plug by reaching up through the underside of each rear corner) license plate bracket, tire stop (YJ,CJ7 only), plastic tailgate hinge covers (late TJ’s only) etc. (If your CJ has rear side turn signals, you will not be able to re-use them)
Step 2: Make sure vehicle is clean. Place masking tape along the top edge of the tub and down along the the back of the door opening. (Fig A) Start by positioning the driver side corner on vehicle by lining up the pre-drilled holes on the corner with the factory holes on the body. (Taillight, gas door, flare, ect. holes.) Use some kind of clamp (Vice, or C-clamp) to hold corner on vehicle. (Fig A)

Step 3: Make sure guard is in correct position and the top edge is parallel with the body tub (Fig B) and the front door cut out is even on back edge of door. (Fig A)
Step 4: With the guard tight against the body and holes lined up, use a marker or scribe to mark the holes. (Fig B)
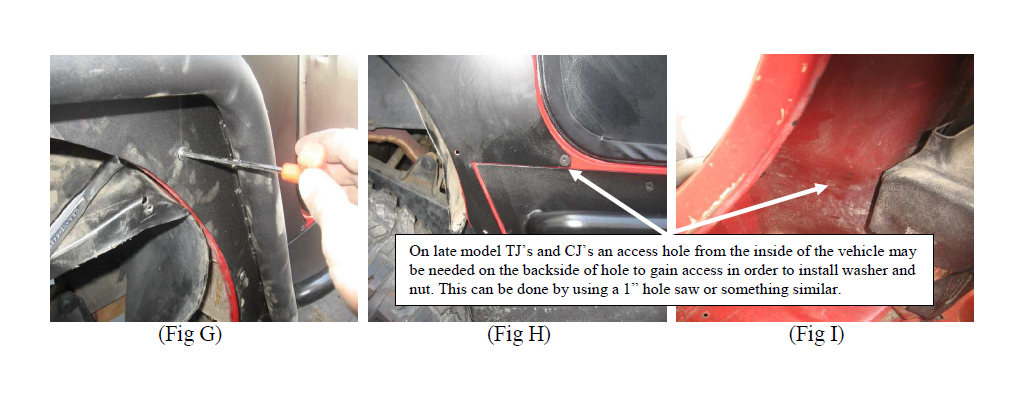
Step 5: Carefully remove guard from vehicle. NOTE: Be sure to check backside of all hole locations for wires or other obstructions. Center punch all marked holes. Drill all holes using a 7/16” drill bit. Make sure to clean off any burrs after drilling, we also recommend using touch up paint or a clear coat to go over any exposed metal. (Fig C) On late model TJ’s an access hole may be needed to install washer and nut on the front lower hole on the corner guard. (Fig H,I) This can be achieved using a 1” hole saw/bit or something similar.
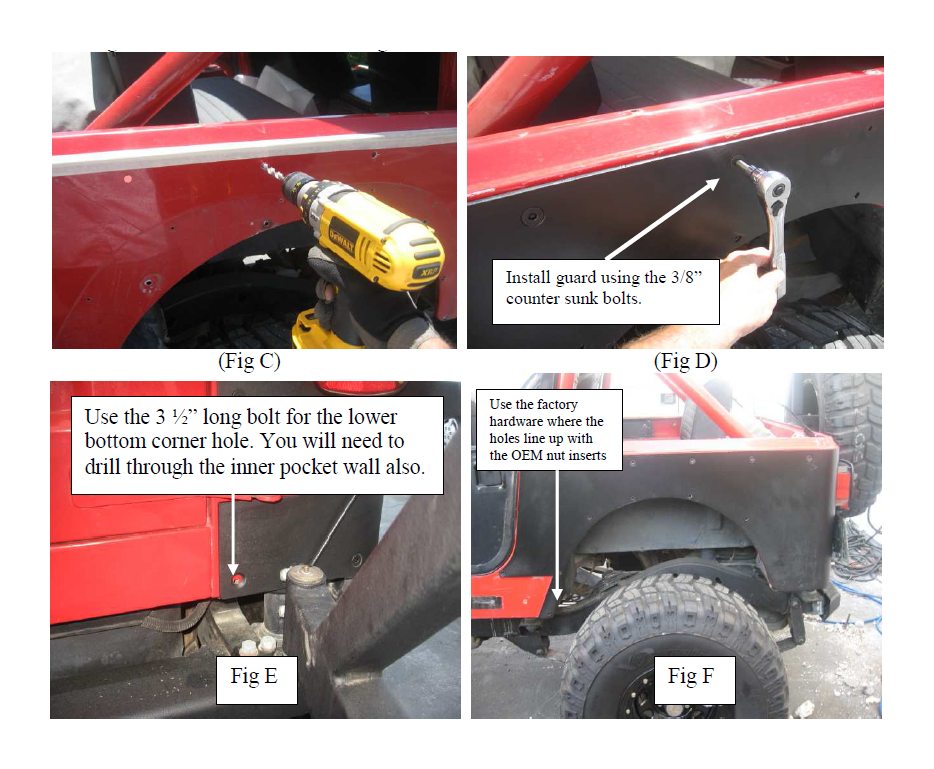
Step 6: Position guard back on vehicle and attach using the included counter sunk bolts. Fig D (It may be easier to clamp the guard on again and then insert bolts) Do not fully tighten at this time. Make sure the pre-drilled holes in the guard for the flares and rear OEM parts line up with the holes in the body. The two long counter sunk bolts go into the lower corner hole next to the tailgate. (1per side) Fig E. NOTE: If any of the holes are slightly off simply open them up using a slightly larger drill bit. Once all bolts are inserted and the remaining holes are lineup, you may tighten completely.
Step 7: Flare Installation (Fig G, H) For ease of installation you can drill out the factory holes to ¼”
FACTORY FLARE- install over the corner guard using the factory hardware.
XRC FLARE – install over the corner guard using the included 6mm Allen head bolts.
NO FLARE- use the included 6mm hardware to secure the edge around the wheel well.
NOTE: If you have factory nut inserts in the lower holes for the flare openings, use the factory hardware.

CARE AND MAINTENANCE
To protect your investment it is recommended to regularly wash and wax this part. Do not use any type of cleaners that contain abrasives that may damage the finish of your part.

