FREE 1 to 3-Day Delivery on Orders $149+ Details

How to Install a Smittybilt Black Textured XRC Rear Corner Guards on your 2007-2014 Wrangler JK

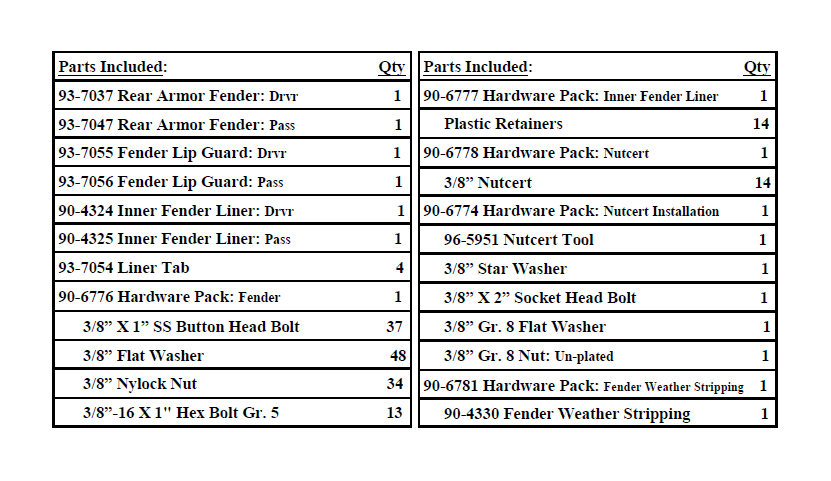
Shop Parts in this Guide
IMPORTANT!: In order to install these fenders you will have to drill holes in the body.
INSTALLATION:
Step 1: Working on one side of the vehicle at a time, unbolt and remove the steps and/or
sliders from the vehicle. Save hardware for reinstallation.
Step 2: Remove the fender flairs and inner fenders from the vehicle.
Step 3: Remove the license plate box from the vehicle.
Step 4: Test fit the license plate template on the vehicle. Be sure the mounting holes and the tailgate line up with the template. Due to factory manufacturing variations, the template may need to be adjusted.
Step 5: Unbolt and remove the tail lights from the vehicle. Save the hardware for reinstallation.
Step 6: Remove the rear bumper from the vehicle if it appears that it will interfere with the installation of the rear fender armor. Save the hardware for reinstallation.
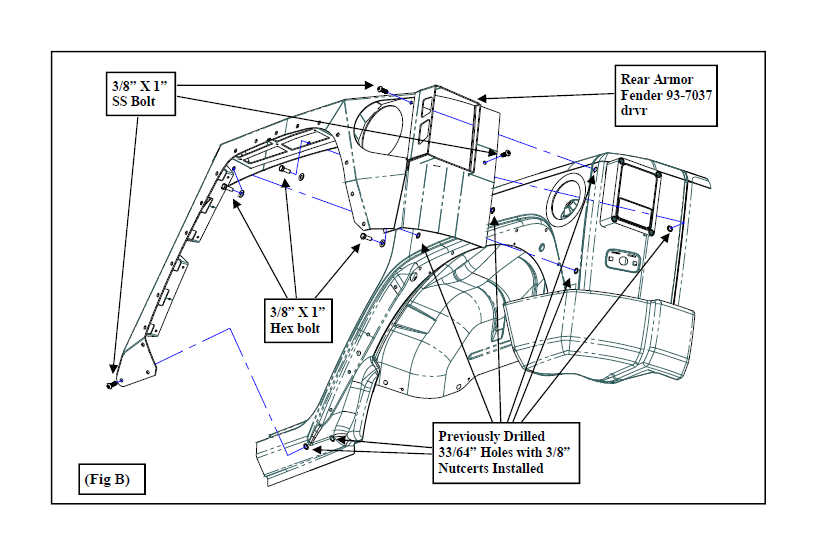
Step 7: Test fit the rear armor fender (93-7037 drvr and 93-7047 pass) using C-clamps around the outside of the panels through the windows. Fig B & C.
IMPORTANT!: Align the upper edge of the armor with the body line. The bottom rear edge of the armor should line up with the radius of the lower edge. The front of the armor should be aligned so that it provides proper clearance for door operation. Fig B & C.
Step 8: Once the armor fender is properly aligned and clamped into place, mark the appropriate holes for drilling. Fig B & C.
NOTE: If you are reinstalling the license plate box to the vehicle, place the supplied drill template on the rear of the driver side fender against the tailgate. Using the holes in the template mark the driver side armor fender for drilling.
Step 9: Remove the armor fender and center punch the previously applied marks for drilling. Carefully drill the fender mounting marks out to 33/64”and the license plate holes to 3/4” and 3/8”. Fig B & C.
IMPORTANT!: DO NOT drill through the interior panels.
Step 10: Install the 3/8” nutcerts into the previously drilled 33/64” holes in the quarter panel.
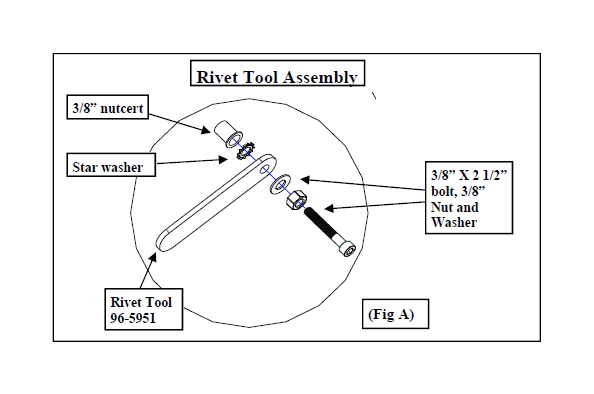
NOTE: If you do not have a professional nutcert installation tool, use the 2 1/2” X
3/8” socket head bolt, 3/8” nut and washer. Install the nutcert into the 1/2” hole on the
vehicle. Thread the nut up as far on the 3/8” bolt as it will go and then follow that with the
washer. Thread the bolt, nut, washer, nutcert tool (96-5951) and star washer assembly into the nutcert. (Fig. A) While holding the 3/8” bolt with an Allen wrench, tighten the nut and washer down against the nutcert. Use the nutcert tool and star washer to keep the nutcert body from spinning while tightening the 3/8” bolt. Once the nutcert is properly installed into the vehicle remove the 3/8” bolt, nut, washer, nutcert tool (96-5951) and star washer .
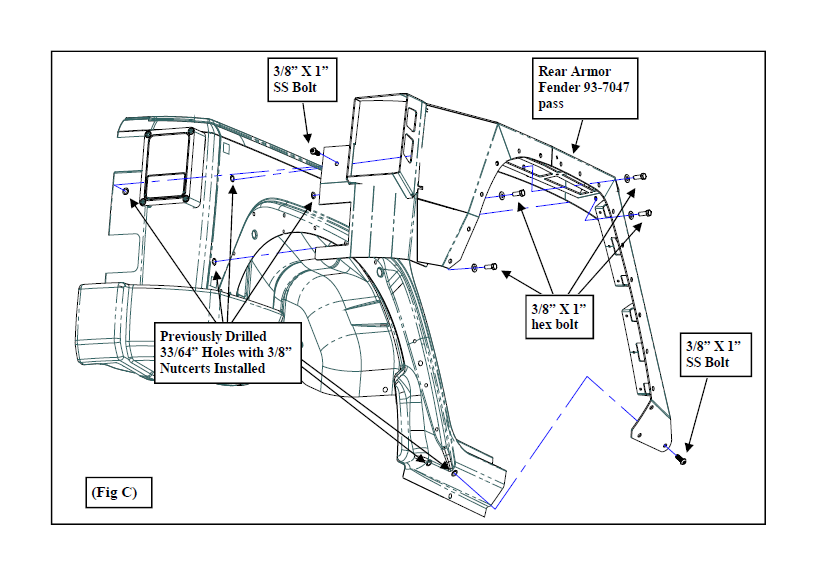
Step 11: Install the supplied fender weather stripping (90-4330) to the upper and front edges of the armor. This will provide a weatherproof seal to the body of the vehicle. Step 12: Reinstall the armor fender (93-7037 drvr and 93-7047 pass), using the clamps, in it’s appropriate position and check the alignment of the nutcerts and the mounting holes in the armor. Slot the holes in the armor if necessary to avoid cross threading the bolts. Fig. B & C.
NOTE: The nutcerts are prone to spinning if not installed properly or cross threaded. Be sure to start the bolts by hand in the nutcerts.
Step 13: Remove the clamps and secure the armor fender using the supplied 3/8” X 1” bolts and hardware. Be sure to start all the bolts by hand to avoid cross threading the bolts. Fig. B & C.
NOTE: Be sure to use the Stainless 3/8” X 1” bolts on the exposed mounting holes.
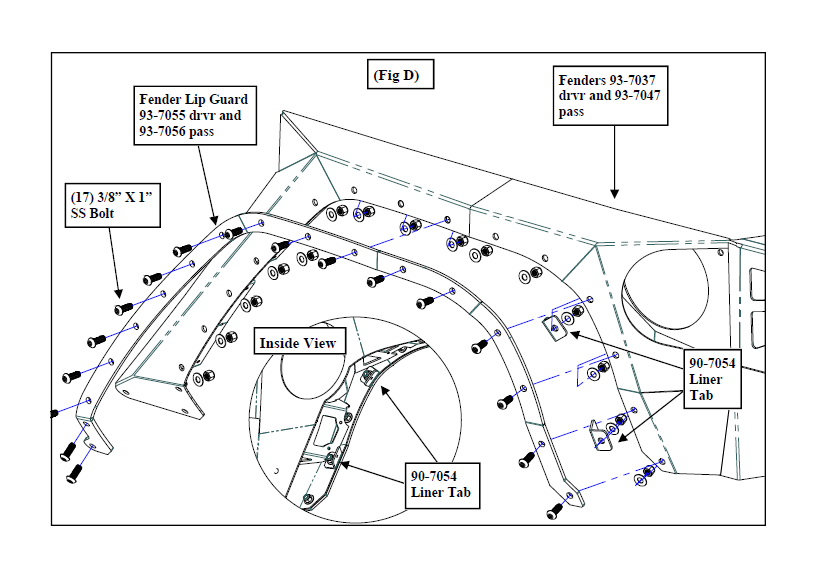
Step 14: Install the fender lip guard (93-7055 drvr and 93-7056 pass) to the outside of the wheel well using the supplied 3/8” X 1” stainless button head bolts. Fig. D.
Step 15: Install the inner fender liner tabs (93-7054) to the (2) rear bolts (2nd up from the
bottom and the 4th up from the bottom). Fig. D.
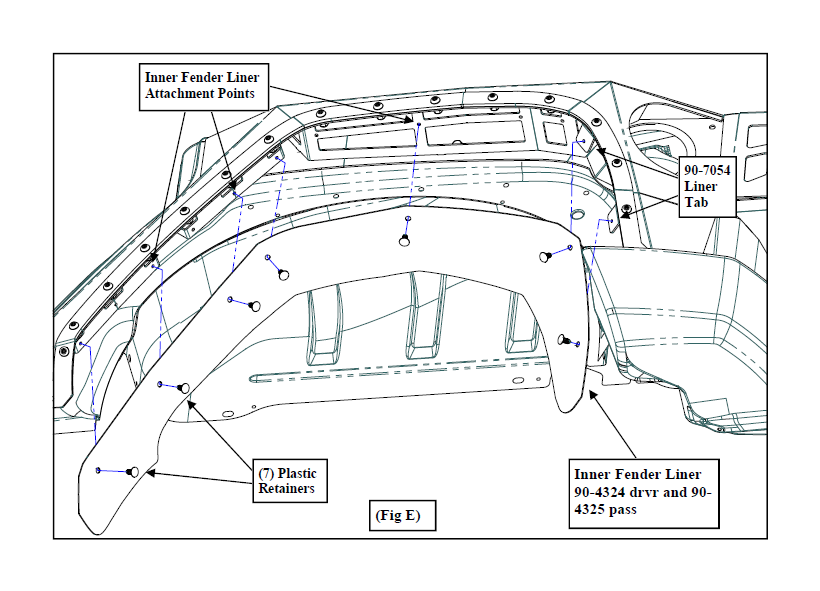
Step 16: Install the inner fender liner (93-4324 drvr and 93-4325 pass) into the armor using the supplied plastic retainers. Start in the middle and work your way to the outside edge. Fig. E.
Step 17: Reinstall the OE tail lights to the tail light bezels on the armor fenders using the previously removed OE hardware.
Step 18: Repeat the previous steps on the remaining side of the vehicle.
Step 19: Reinstall the previously removed rear bumper using the previously removed hardware. Torque according to manufacturers specifications.
Step 20: If you are reinstalling the license plate, route the wiring harness through the armor fender and reconnect the light wiring clip. Install the license plate box to the armor fender using the previously removed OE hardware.
Step 21: Reinstall the steps and/or sliders from the vehicle using the previously removed OE hardware.
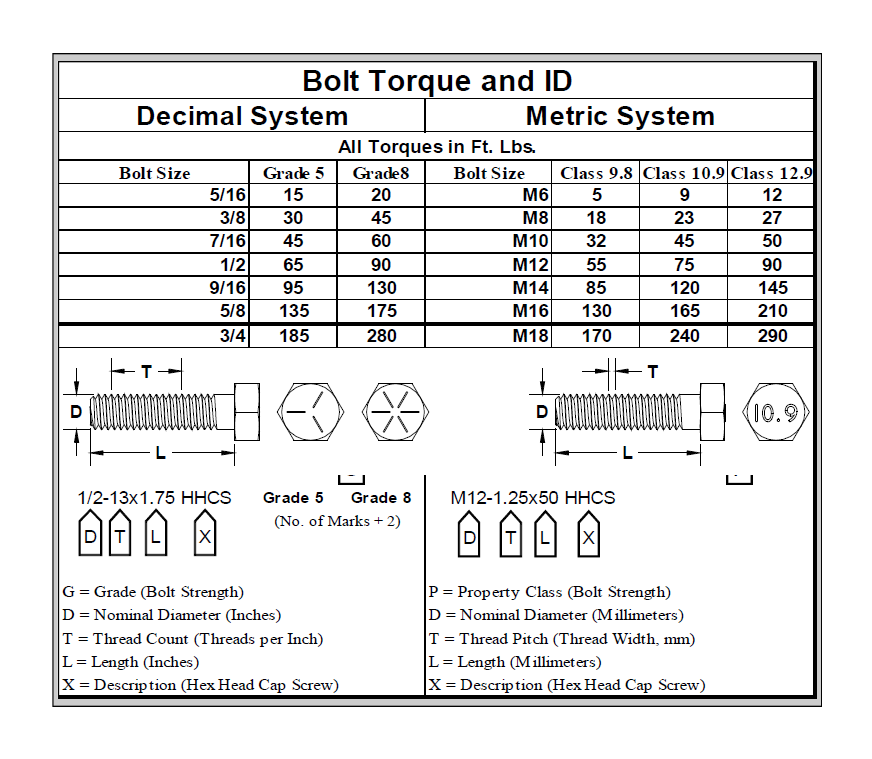
Step 22: Torque all OE hardware according to manufacturers specifications or the supplied hardware according to the torque chart on page 6. Installation is now complete.