 FREE 1 to 3-Day Delivery on Orders $149+ Details

How to Install Smittybilt XRC M.O.D. Full Width End Caps - Textured Matte Black on your 07-18 Jeep Wrangler JK; 2018 Jeep Wrangler JL

Shop Parts in this Guide
INSTALLATION:
Step 1: Working on one side of the vehicle at a time, unbolt and remove the stainless steel side cover plate (*)0-7554 drvr and 90-7555 pass), by removing the (3 per side) 3/8" X 1/2" button head bolts.
Step 2: Unbolt the (2 per side) outer 7/16" X 1 1/4" hex head bolt and 7/16" washers that secure the XRC M.O.D. Bumper to the frame, and set aside.
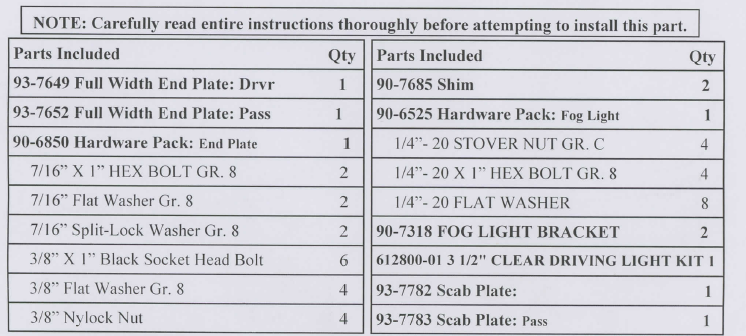
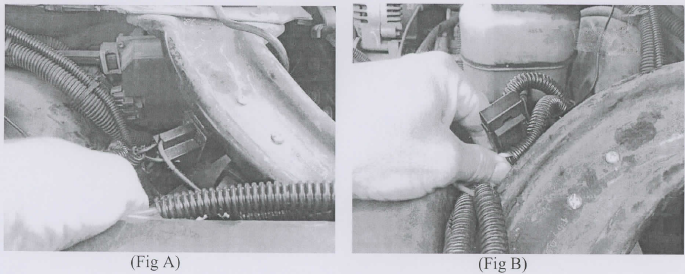
Step 3: Install the full width end plate (93-7649 drvr and 93-7652 pass) to the XRC M.O.D. bumper (93-7534) by inserting the tab of the end plate into the slot of the XRC M.O-.D bumper. (Fig. A)
Step 4: Replace the previously removed (2) 7/16" bolts and washers back into the outer frame holes, but do not tighten at this time.
NOTE: If needed, install the shim plates (90-7685) between the rear of the frame and the front of the end plate tab.
Step 5: Install (1 per side) 7/16" X 1" hex head bolt, lock washer and hardened flat washer upward through the rear tab of the end plate (93-7649 Drvr and 93-7652 pass). (Fig. B)
Step 6: Install the scab plate (93-7782 Drvr and 93-7783 pass) to the end plates and XRC M.O.D. bumper mounting holes. Secure using the (3 per side) 3/8" X 1" black socket head bolts and hardware. (Fig. B)
Step 7: Align end plates (93-7649 Drvr and 93-7652 pass) with the XRC M.O.D. bumper and torque the 7/16" bolts to ft./lbs. (Fig. B)
Step 8: Modify the vehicle wiring harness and fog light connector. IMPORTANT.': DO NOT connect the fog lights wiring harnesses until the bumper is fully installed.
Step 9: Install the bracket (93-7318) to the 2 3 1/2" Clear Driving fog light (612800-01) as a re-placement for the included mounting bracket from clear driving light kit (612800-01).
Step 10: Install the fog lights into the new end plates (93-7649 Drvr and 93-7652 pass) using the supplied ) l/4"-20 XI" bolt and hardware.
Step 11: Repeat the same procedure for the passenger side.
Step 12: Connect the fog light wiring connectors to the connectors on the vehicle. Test, aim & adjust the fog lights at this time.
Step 13: Installation is now complete.

Product cleaning and maintenance instructions
Stainless Steel Finish - Aluminum polish may be used to polish small scratches and scuffs on the finish. Mild soap, window or glass cleaner may be used to clean the finish. Dual state powder coat finish - Mild soap, window or glass cleaner may be used to clean the finish. In order to protect the finish, you may wax your product on a regular basis with pure carnauba automotive wax. Do not use any types of soap, polish or was that contains abrasive that could damage the finish. Textured coated finishes should be cleaned with a mild soap on a damp sponge. Do not apply polish or was that requires to be removed by means of buffing. This type of wax is commonly used at car wash facilities. Chrome Finish - Mild soap, window or glass cleaner may be used to clean the finish. In order to protect the finish you should wax your product on a regular basis with pure carnauba automotive wax. Do not use any types of soap, polish or was that contains abrasive that could damage the finish.
Limited Warranties
Smittybilt's products are covered under the following limited warranties only. Note that the duration of the limited warranty differs according to the material and finish of the product purchased. Subject to the duration and conditions of the limited warranty stated below, Smittybilt warrants to the original retail purchaser that its products are free from defects in material and workmanship. All other warranties and representations express or implied, are hereby disclaimed, including fitness for merchantability and buyer's intended use or purpose. All parts are sold "AS IS" except for the limited warranties granted herein. Buyer assumes all risks as to the selection, suitability and performance of all goods and products selected. This limited warranty does not cover damage or impairment in any part due to misuse, improper installation, accident or contact with on-road or off-road hazards, product modification, improper or inadequate cleaning and/or maintenance. Smittybilt is not responsible for items damaged during shipping. This warranty is not transferable from the original buyer. For the original Buyer to be eligible for the limited warranty coverage, the Buyer must provide proof of purchase. Smittybilt strongly recommends returning the warranty registration card. Customer's remedy hereunder shall be limited only to repair or replacement (at Smittybilt's option) of any defective part(s) returned to Smittybilt at customer's expense. The determination of whether or not a returned part is defective or subject to coverage under the limited warranties stated herein shall be made at Smittybilt's sole discretion.
Duration of Limited Warranty
Limited Lifetime Warranty on Stainless Steel Products -
Smittybilt stainless steel products carry the foregoing limited repair or replacement warranty against workmanship and defects in the material so long as the original purchaser retains the original stainless steel parts.
Limited Five (5) Year / 50,000 Mile Pro-Rata Warranty (whichever occurs first) on Dual-Stage Powder Coating Products -
Smittybilt dual-stage powder coated products carry the foregoing limited repair or replacement warranty for a period of (5) years or 50.000 miles (whichever occurs first) from date of purchase against workmanship and defects in the material, provided that any claim submitted after (2.5) years from date of purchase shall, if accepted, be satisfied by Smittybilt offering customer a credit on the purchase of a replacement product equal to fifty percent (50%) of customer's initial purchase price.
Limited Three (3) Year / 36,000 Mile Pro-Rata Warranty (whichever occurs first) on Chrome Products-
Smittybilt chrome products finished carry the foregoing limited repair or replacement warranty for a period of three (3) years or 36,000 miles against workmanship and defects in the material (whichever occurs first) from the date of purchase.
To assure product quality, Smittybilt reserves the right to change product design, material, specification and finishes without prior notice to customers. This limited warranty gives you specific legal rights and you may also have other rights, which may vary from state to state. Some states do not allow limitations on how long an implied warranty lasts, so the above limitations may not apply as to you. Also, some states do not allow the exclusion or limitation of incidental or consequential damages, so the above limitations or exclusions may not apply to you. Smittybilt reserves the right to discontinue product lines and substitute products, or provide other remedies than those listed in this limited warranty for those discontinued products.
NOTE: Please take time to fill in the information requested below. It is highly recommended to keep this with the instructions and warranty information in a safe location. This will help with any warranty or customer service issues if they should arise. Please write down the DOP# that is located on the outside of the box and or on part or hardware box. (Pictured Below)
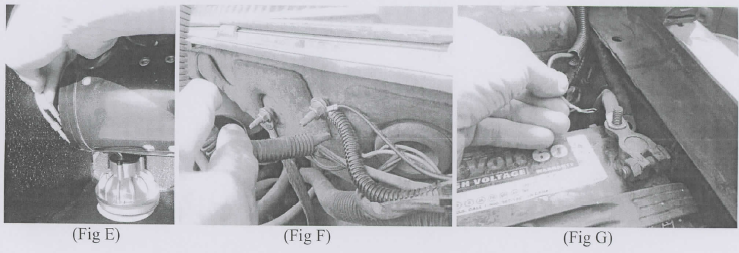
Step 12: Connect the positive wire (A) from the relay to the battery. (Fig G)
Step 13: Installation is now complete. Proceed to test lights.
Troubleshooting
A. Make sure power cable to battery is securely attached.
B. Make sure relay ground and or switch ground is in good location.
C. Check to make sure switch plug is connected securely.
D. Make sure connections to lights are good.
E. If any splicing or extra cuts/connectors were installed double check them.
F. Check fuse.
Caution/Warning
> Do not run any wiring near moving engine parts
> Do not run wires near extreme heat or sharp objects.
> Follow local laws in regards to use of auxiliary lighting.
> Light become hot when on, do not mount near temperature sensitive parts
> Wait to lights cool down before touching or cleaning.
> Always use caution when/if drilling.
> Always use caution and care when working with electrical parts. r- Lights are intended for 12v systems and not 6v or 24v.
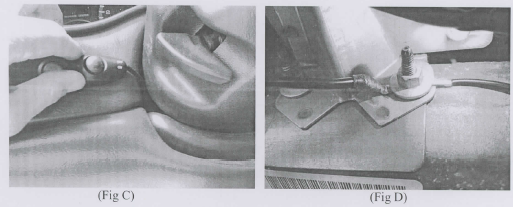
Step 6: Connect the ground wire (G) from the plug to an appropriate ground location (Fig D.)
Step 7: Connect the positive wire (H) from the plug to an accessory power. (It only has power when the ignition is turned on.)
Step 8: Run the light wires (C, D) from the relay to the lights. Step 9: Connect the light wires from the relay to the lights. (Fig E)
Step 10: Connect the ground wire (E) from the relay to an appropriate ground (Fig F)
Step 11: Connect the power wire (A) from the reh>y to the battery (Fig G)
> It is recommended to have lights wired/connected by a certified tech familiar with aftermarket lighting and wiring.
> These instructions are intended as a guideline. Specific installation details may differ from vehicle to vehicle.
> Due to variances in vehicles and accessories some extra modification may be necessary to wiring/installation.
> Mount lights in accordance with the accessories instructions.
Step 1: Disconnect the negative battery terminal.
Step 2: Spread and lay out the wires pointing towards their proper locations, making sure each part will reach its final destination.
Step 3: Find a spot to mount the relay ensuring you're able to mount the positive cable (A) to the battery and ground wire (B) to an appropriate ground. (Fig A) Make sure the fuse is in an accessible location. (Fig B)
Step 4: Run the switch wire and plug (F, G, H) into the cab of the vehicle. Look for and OEM hole that you can use, if not available you will have to drill a hole through your firewall. In some cases you may need to cut wire (F) and reconnect it in order to slide cable through firewall.
Step 5: Attach the plug on the end of the switch cable (B) to the plug on the end of the relay wire (F). Place switch in desired location. (You can use double sided tape to attach) Fig C
Smittybilt aluminum products finished carry the foregoing limited repair or replacement warranty for a period of three (3) years or 36,000 miles against workmanship and defects in the material (whichever occurs first) from the date of purchase.
To assure product quality. Smittybilt reserves the right to change product design, material, specification and finishes without prior notice to customers. This limited warranty gives you specific legal rights and you may also have other rights, which may vary from state to state. Some states do not allow limitations on how long an implied warranty lasts, so the above limitations may not apply as to you. Also, some states do not allow the exclusion or limitation of incidental or consequential damages, so the above limitations or exclusions may not apply to you. Smittybilt reserves the right to discontinue product lines and substitute products, or provide other remedies than those listed in this limited warranty for those discontinued products.
Warning
Rollover and other types of vehicle accidents may result in serious injury or death to you, your passengers and others sharing the road. Smittybilt accessories are decorative and are not intended to reduce or avoid injury or damage in the event of an accident. The weight and location of Smittybilt accessories may affect your vehicles' handling, stability and performance, creating an increased risk of accident or rollover. Before installing any accessory, check state laws and assure that the accessory will not obscure any lights or if terfere with proper operation on your vehicle's safety equipment. Consult your owner's manual and the Smittybilt instructions, or additional safety information. Smittybilt products, nor the warnings contained herein, are not a substitute for your safe driving. Don't drink and drive, always use seat belts and don't drive faster than conditions permit.
Product cleaning and maintenance instructions
Stainless Steel Finish — Aluminum polish may be used to polish small scratches and scuffs on the finish. Mild soap, window or glass cleaner may be used to clean the finish. Dual state powder coat finish Mild soap, window or glass cleaner may be used to clean the finish. In order to protect the finish, you may wax your product on a regular basis with pure carnauba automotive wax. Do not use any types of soap, polish or was that contains abrasive that could damage the finish. Textured coated finishes should be cleaned with a mild soap on a damp sponge. Do not apply polish or was that requires to be removed by means of buffing. This type of wax is commonly used at car wash facilities. Chrome Finish - Mild soap, window or glass cleaner may be used to clean the finish. In order to protect the finish you should wax your product on a regular basis with pure carnauba automotive wax. Do not use any types of soap, polish or was that contains abrasive that could damage the finish. Aluminum Products - Mild soap, window or glass cleaner may be used to clean the finish. In order to protect the finish, you may wax your product on a regular basis with pure carnauba automotive wax. Do not use any types of soap, polish or was that contains abrasive that could damage the finish.
