 FREE 1 to 3-Day Delivery on Orders $149+ Details

How to install a Smittybilt XRC Atlas Front Bumper on your 07-18 Jeep Wrangler JK; 2018 Jeep Wrangler JL
NOTE: Carefully read entire instructions thoroughly before attempting to install this part.
INSTALLATION:
Step 1: Unbolt and remove the OE front bumper and hardware from the vehicle.
NOTE: Be sure to unclip the factory fog light wiring harnesses if equipped
Step 2: Unbolt and remove the OE driving lights from the OE bumper.
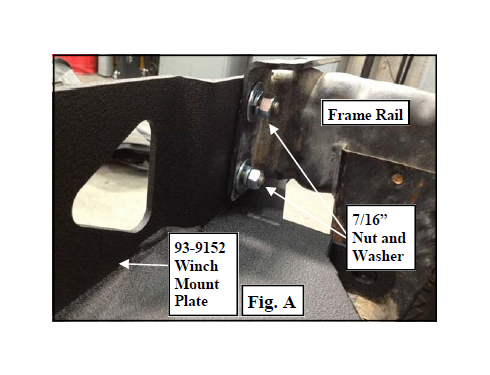
Step 3: Lift the winch mounting plate (93-9152) into place and insert the mounting studs into the holes on the frame horn bumper mounting brackets. Secure using the supplied 7/16” washers and nuts. Do not tighten the 7/16” bolts at this time. (Fig A)
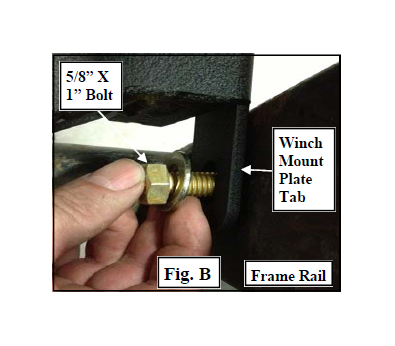
Step 4: Secure the tabs on the winch mounting plate to the inside of the frame rail using the (2) supplied 5/8” X 1” bolts and hardware. (Fig B)
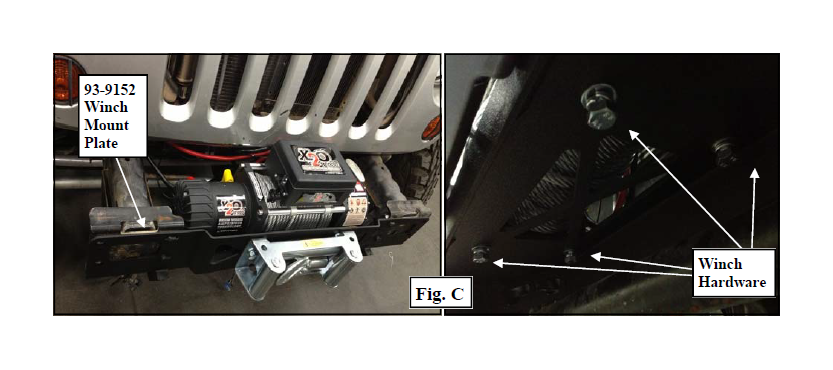
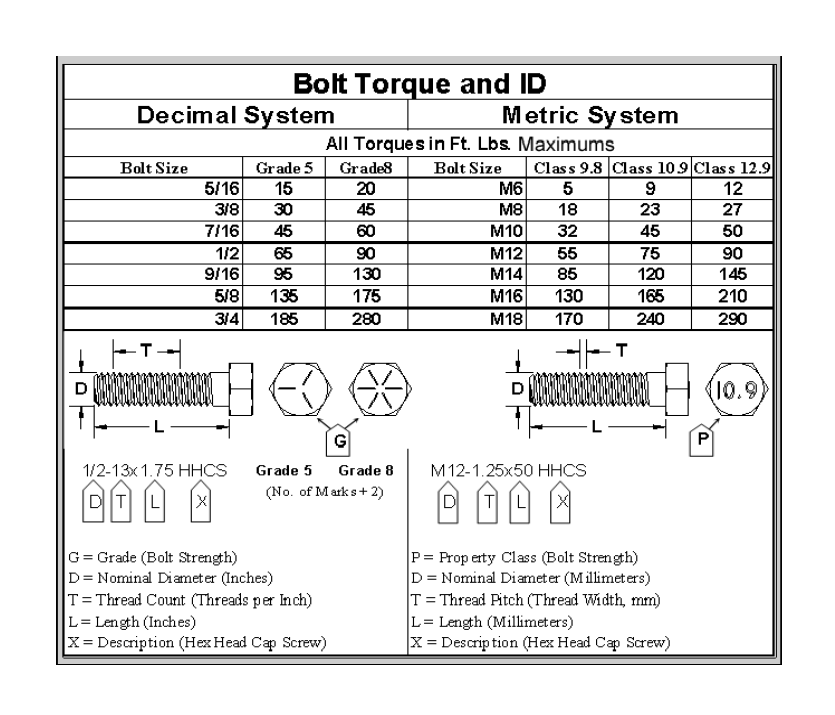
Step 5: Torque winch plate mounting 7/16” hardware to 55 ft./lbs. and the 5/8” hardware to 135 ft./lbs. (Fig C)
NOTE: If installing a winch, do so at this time using the provided hardware from the winch kit.
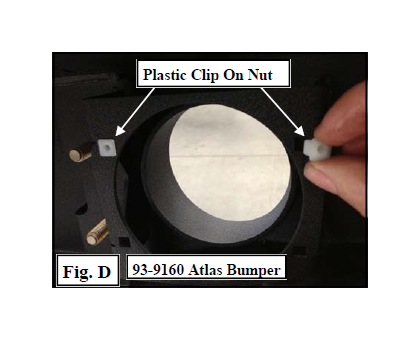
Step 6: Insert the (8) supplied plastic clip on nuts to the mounting holes in the bumper driving light mounting pads. (Fig D)
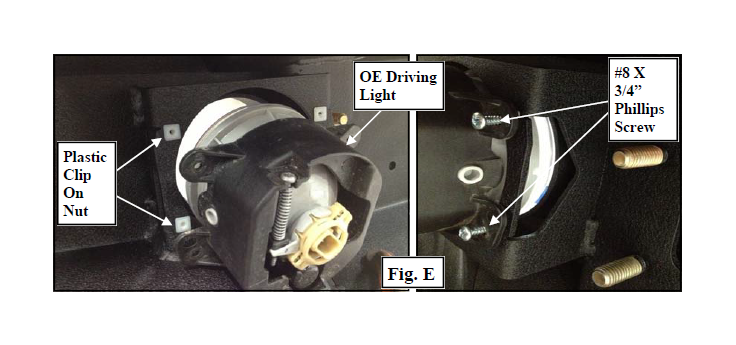
Step 7: Install the OE driving lights to the bumper mounting pads using the (8) supplied #8 X 3/4” Phillips screws. (Fig E)
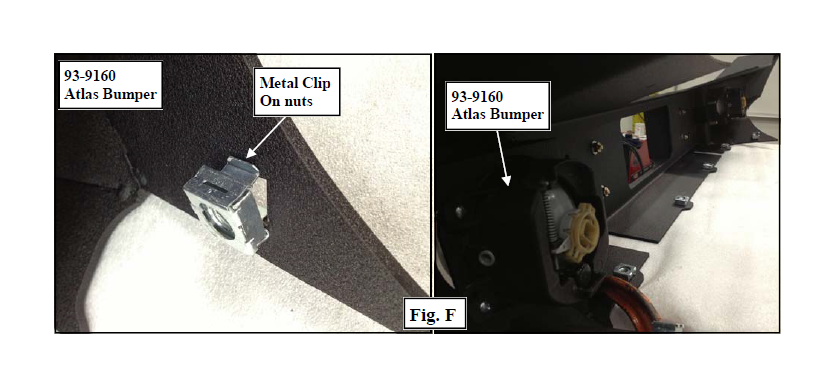
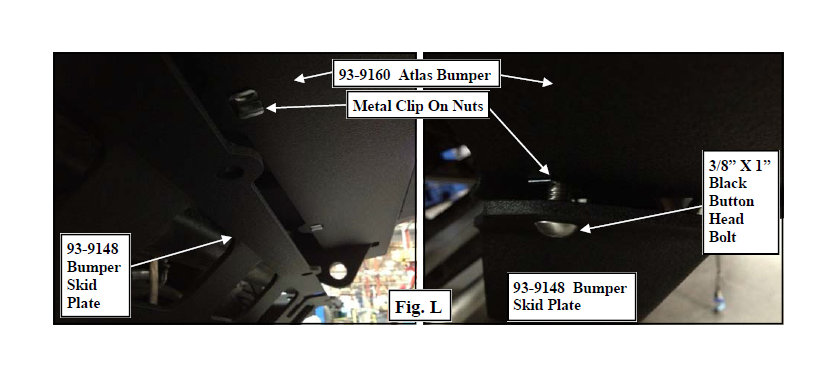
Step 8: Insert the (6) supplied metal clip on nuts into the square lower skid plate mounting holes in the Atlas bumper (93-9160). (Fig F)
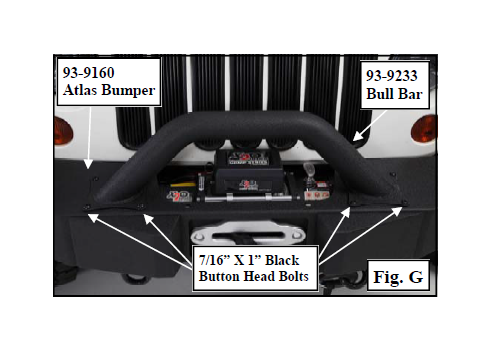
Step 9: Install the bull bar (93-9233), angled toward the vehicle, using the supplied (4 per side) 7/16” X 1” black button head bolts and hardware. (Fig G)
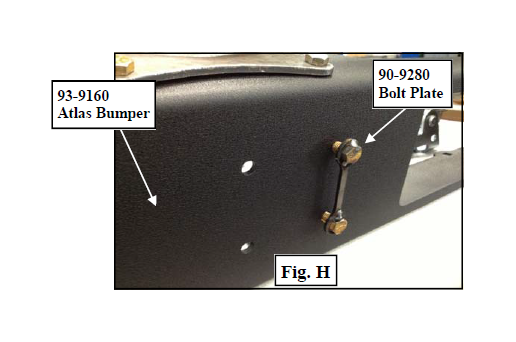
Step 10: Insert the (1 per side) bolt plates (90-9280) into the existing holes in the Atlas bumper (93-9160). Do not install the bolt plate flush with the bumper at this time. (Fig H)
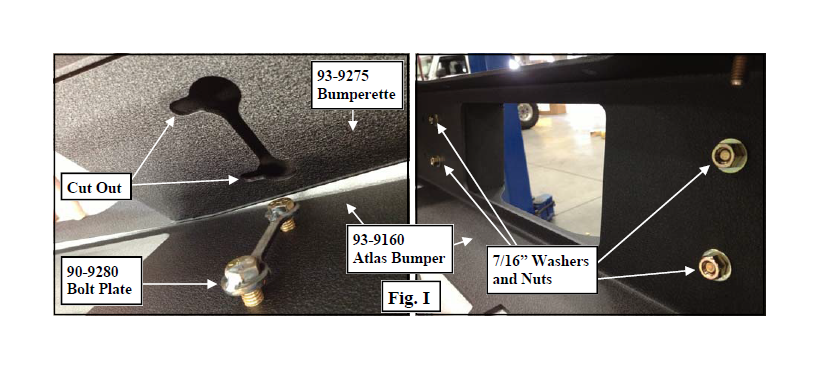
Step 11: Install the bumperette (93-9275) onto the new Atlas bumper (93-9160) over the installed bolt plates (90-9280). Push the bumperette to the side to lock the cut outs into place around the bolt plates. Secure using the (4) supplied 7/16” nuts and washers. (Fig I)
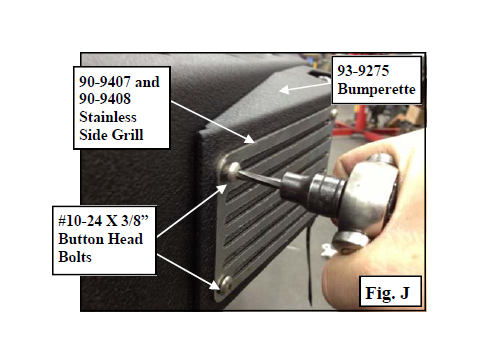
Step 12: Install the stainless side grill (90-9407 drvr and 90-9408 Pass) to the side of the Atlas bumper (93-9160) using the supplied (8) #10-24 X 3/8” stainless button head bolts. (Fig. J)
NOTE: The grill may also be installed directly to the bumper if the bumperette is not used.
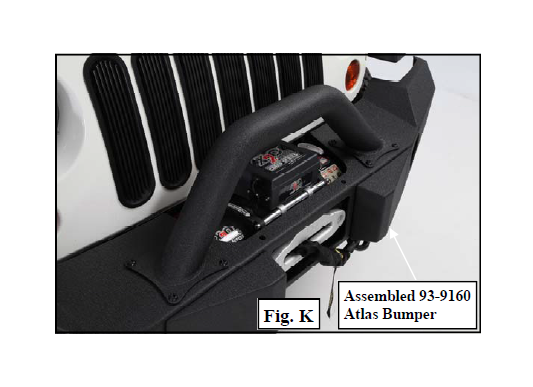
Step 13: NOTE: This step might require 2 people. Raise the assembled Atlas bumper (93- 9160) up into place and align the bumper mounting studs with (2 per side) remaining empty holes on the winch mounting plate (93-9152). Secure using the supplied 7/16” nuts and hardware. Torque bumper mounting 7/16” hardware to 55 ft./lbs. (Fig K)
Step 14: Install the front bumper skid plate (93-9148) to the previously installed metal clip on nuts using the (6) supplied 3/8” X 1” black button head bolts and hardware. Torque bumper mounting 3/8” hardware to 15 ft./lbs. (Fig. L)
Step 15: Install the winch wiring per the manufactures instructions. Carefully route the ( ) lead keeping it clear of sharp metal, areas of excessive heat or any moving parts. Secure the leads using the supplied zip ties.
Step 16: Connect the driving light wiring connectors to the connectors on the vehicle. Test, aim & adjust the fog lights at this time.
Step 17: Installation is now complete. (Fig M)

Product cleaning and maintenance instructions
Stainless Steel Finish – Aluminum polish may be used to polish small scratches and scuffs on the finish. Mild soap, window or glass cleaner may be used to clean the finish. Dual state powder coat finish – Mild soap, window or glass cleaner may be used to clean the finish. In order to protect the finish, you may wax your product on a regular basis with pure carnauba automotive wax. Do not use any types of soap, polish or was that contains abrasive that could damage the finish. Textured coated finishes should be cleaned with a mild soap on a damp sponge. Do not apply polish or was that requires to be removed by means of buffing. This type of wax is commonly used at car wash facilities. Chrome Finish – Mild soap, window or glass cleaner may be used to clean the finish. In order to protect the finish you should wax your product on a regular basis with pure carnauba automotive wax. Do not use any types of soap, polish or was that contains abrasive that could damage the finish
Limited Warranties
Smittybilt’s products are covered under the following limited warranties only. Note that the duration of the limited warranty differs according to the material and finish of the product purchased. Subject to the duration and conditions of the limited warranty stated below, Smittybilt warrants to the original retail purchaser that its products are free from defects in material and workmanship. All other warranties and representations express or implied, are hereby disclaimed, including fitness for merchantability and buyer’s intended use or purpose. All parts are sold “AS IS” except for the limited warranties granted herein. Buyer assumes all risks as to the selection, suitability and performance of all goods and products selected. This limited warranty does not cover damage or impairment in any part due to misuse, improper installation, accident or contact with on-road or off-road hazards, product modification, improper or inadequate cleaning and/or maintenance. Smittybilt is not responsible for items damaged during shipping. This warranty is not transferable from the original buyer. For the original Buyer to be eligible for the limited warranty coverage, the Buyer must provide proof of purchase. Smittybilt strongly recommends returning the warranty registration card.
Customer’s remedy hereunder shall be limited only to repair or replacement (at Smittybilt’s option) of any defective part(s) returned to Smittybilt at customer’s expense. The determination of whether or not a returned part is defective or subject to coverage under the limited warranties stated herein shall be made at Smittybilt’s sole discretion.
