 FREE 1 to 3-Day Delivery on Orders $149+ Details

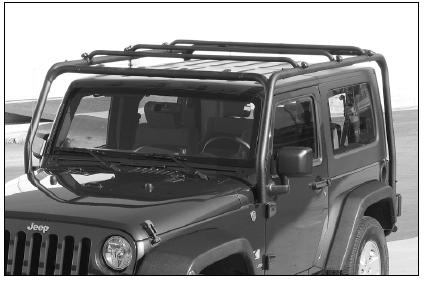
How to Install Smittybilt SRC Roof Rack - 300 lb Rating - Black Textured on your Wrangler

Shop Parts in this Guide
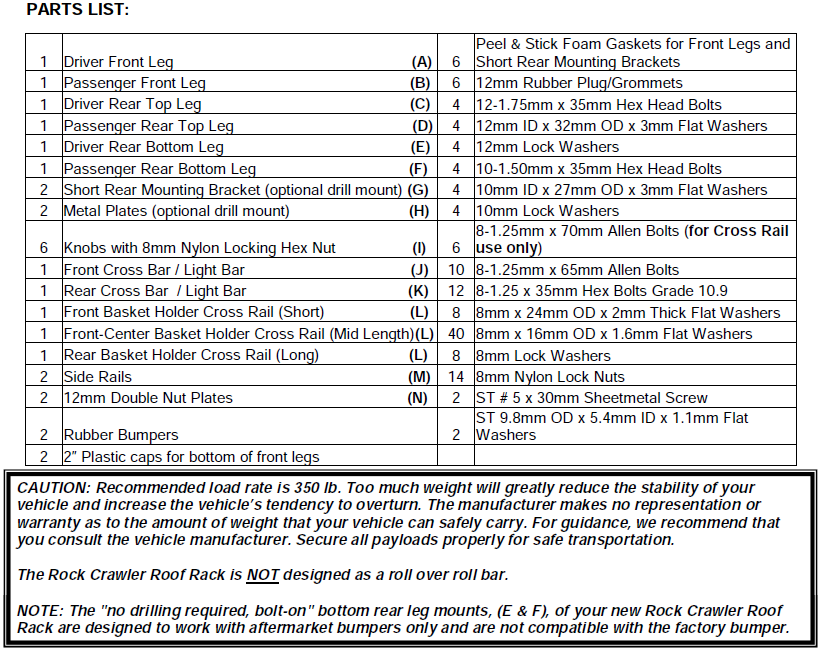
CAUTION: Recommended load rate is 350 lb. Too much weight will greatly reduce the stability of your vehicle and increase the vehicle’s tendency to overturn. The manufacturer makes no representation or warranty as to the amount of weight that your vehicle can safely carry. For guidance, we recommend that you consult the vehicle manufacturer. Secure all payloads properly for safe transportation.
The Rock Crawler Roof Rack is NOT designed as a roll over roll bar.
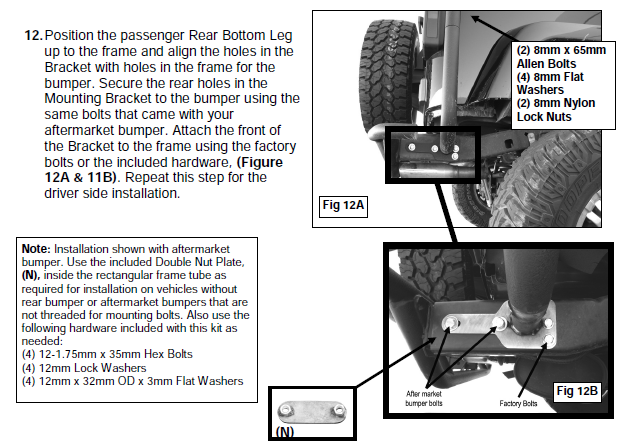
NOTE: The "no drilling required, bolt-on" bottom rear leg mounts, (E & F), of your new Rock Crawler Roof Rack are designed to work with aftermarket bumpers only and are not compatible with the factory bumper.
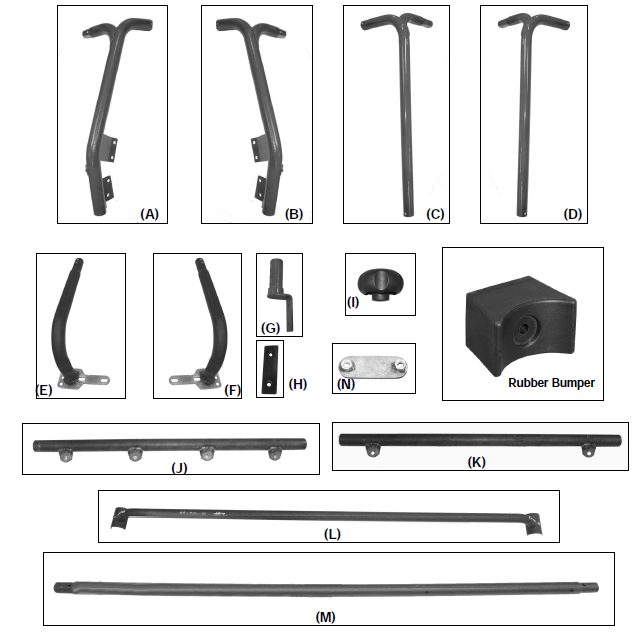
REMOVE CONTENTS FROM BOX. VERIFY ALL PARTS ARE PRESENT. READ INSTRUCTIONS CAREFULLY BEFORE STARTING INSTALLATION. DRILLING IS OPTIONAL.
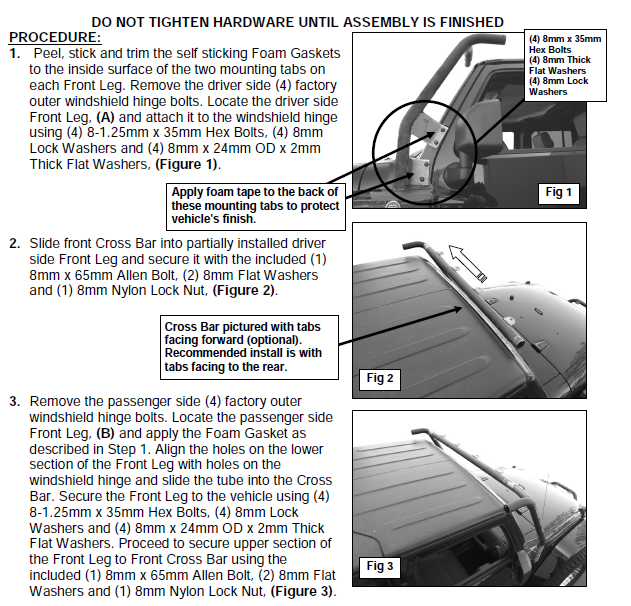
DO NOT TIGHTEN ANY HARDWARE UNTIL THE ROOF RACK IS FULLY ASSEMBLED.
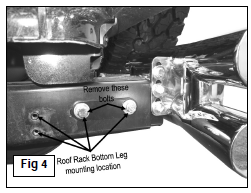
4. Remove the two bolts holding the aftermarket bumper-if equipped, (Figure 4).
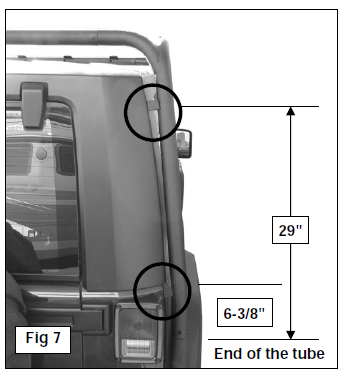
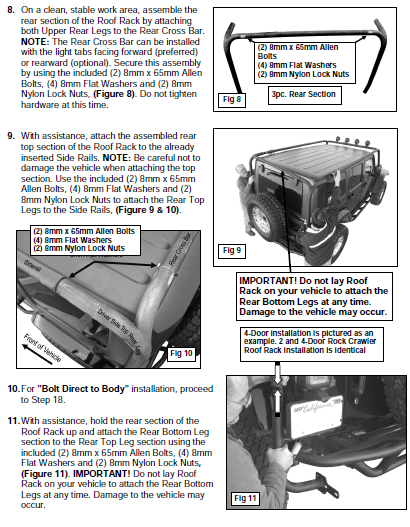
7. To better support the Roof Rack when loaded, (2) Rubber Bumpers are included in the installation kit. The Rubber Bumpers can be installed at a point 29" up from the end of the Rear Leg for vehicles with hard tops or at 6-3/8" for vehicles with hard or soft tops, (Figure 7). Once the location is determined and marked, select the side of the Rear Leg (C,D) facing the vehicle and mark the location. Remove the Rear Leg. Place the Rear Leg on a stable work surface with the side to be drilled facing up. Drill an 1/8" hole into the Rear Leg. Drill only through the side requiring the Rubber Bumper. Do not drill through both sides of the tube. Secure the Rubber Bumper to the Rear Leg with (1) #5 x 30mm Screw and (1) 5mm Flat Washer. Snug but do not over tighten or the Rubber Bumper will be deformed.
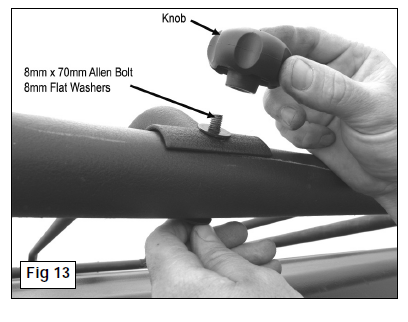
13. NOTE: All Basket Holder Cross Rails are different sizes with the shortest to the front, mid length to the center and the longest to the rear of the Roof Rack. Locate the shortest Cross Rail and position it over the mounting bolt holes toward the front of the Side Rails, (Figure 13).
14. To secure the Basket Holder Cross Rail to Side Rails, insert (1) 8mm x 70mm Allen Bolt with (1) 8mm Flat Washer up through the bottom hole in the Side Rail and through Cross Rail. Place (1) 8mm Flat Washer over the bolt and secure it with the included Plastic Knob, (Figure 13).
15. Repeat steps 12 and 13 for the rest of the Basket Holder Cross Rails.
16. Align Roof Rack properly then tighten all hardware.
17. Do periodic inspections to the installation to make sure all hardware is secure and tight.
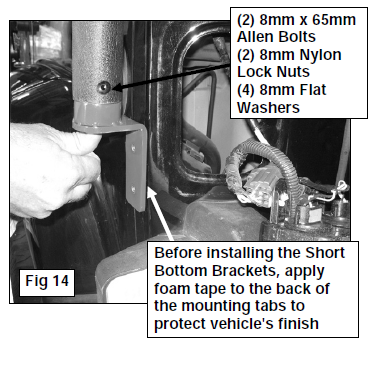
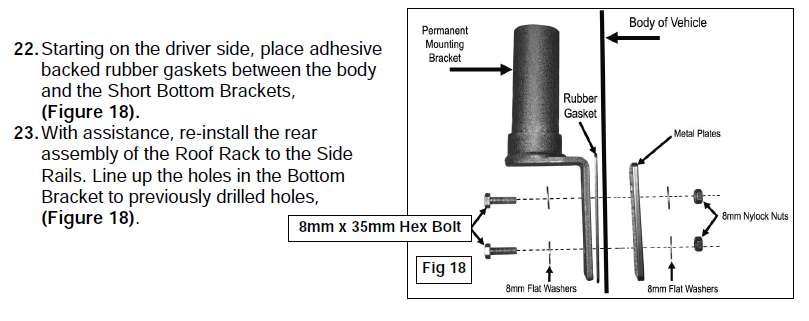
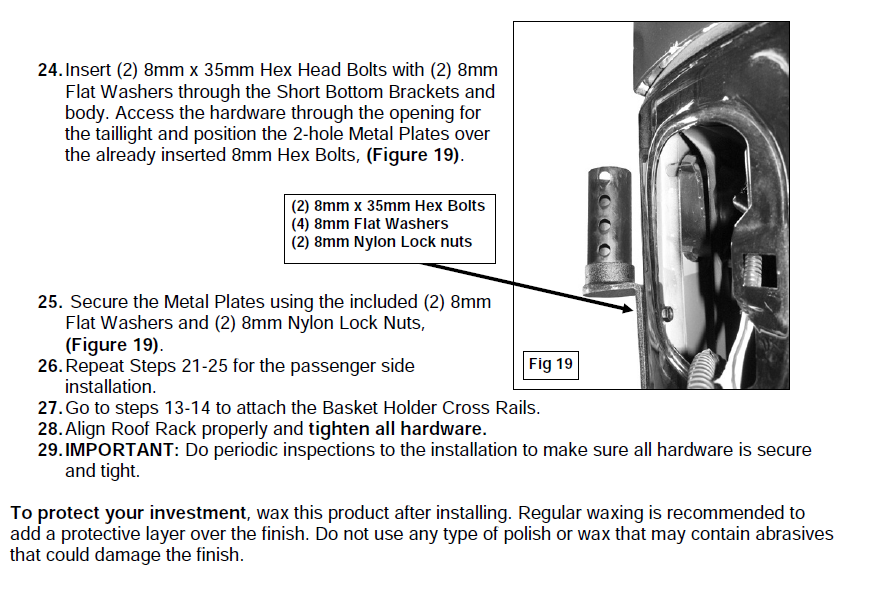
18. Select the (2) Short Bottom Brackets and apply Peel and Stick Foam Gasket Material (G) to the back of the 2-hole mounting tabs. With assistance, hold the rear section of the Roof Rack up and attach the Short Bottom Bracket to the Rear Top Leg Section using the included (2) 8mm x 65mm Allen Bolts, (4) 8mm Flat Washers and (2) 8mm Nylon Lock Nuts (Figure 14). IMPORTANT! Do not lay Roof Rack on your vehicle to attach the Rear Bottom Legs at any time. Damage to the vehicle may occur.
LIMITED WARRANTY
Smittybilt (The Company) warrants to the original purchaser of this product that should the product or any part thereof, under normal use and conditions, be proven defective in material or workmanship within the warranty period of 5 years from the date of purchase, such defect(s) will be repaired or replaced (At the Company’s option) without charge for parts or labor. To obtain repair or replacement within the terms of the warranty, the product is to be delivered with proof of warranty coverage ( e.g. dated bill of sale, receipt), specification of defect, freight pre-paid with Returns Good Authorization Number from Smittybilt to place of purchase. Items returned to Smittybilt without a Returns Authorization Number will be refused and returned to sender at the senders’ expense.
This warranty does not apply to any product or part thereof which, in the opinion of the Company, has suffered or been damaged through altercation, improper installation, mishandling, misuse, neglect accident or acts of nature. THE EXTENT OF THE COMPANY’S LIABILITY UNDER THIS WARRANTY IS LIMITED TO THE REPAIR OR REPLACEMENT PROVIDED ABOVE AND, IN NO EVENT, SHALL THE COMPANY’S LIABILITY EXCEED THE PURCHASE PRICE PAID BY THE PURCHASER FOR THIS PRODUCT.
This warranty is in lieu of all expressed warranties and liabilities. ANY IMPLIED WARRANTIES, INCLUDING ANY IMPLIED WARRANTY OF MERCHANTABILITY SHALL BE LIMITED TO THE DURATION OF THIS WRITTEN WARRANTY. ANY ACTION FOR BREACH OF ANY WARRANTY HEREUNDER INCLUDING ANY IMPLIED WARRANTY OF MERCHANTABILITY MUST BE BROUGHTH WITHIN A PERIOD OF 90 DAYS FROM DATE OF ORIGINAL PURCHASE.IN NO CASE SHALL THE COMPANY BE LIABLE FOR ANY CONSEQUENTIAL OR INCIDENTAL DAMAGES FOR BREACH OF THIS OR ANY OTHER WARRANTY, EXPRESSED OR IMPLIED,WHATSOEVER. No person or representative is authorized to assume for the company any liability other than expressed herein in connection with the sale of this product. Some states do not allow limitations on how long an implied warranty lasts or the exclusion or limitation of incidental or consequential damage, therefore above limitations may not apply to you. This warranty gives the purchaser specific legal rights. The purchaser may have additional rights, which vary from state to state.
Some states do not allow limitations on how long an implied warranty lasts or the exclusion or limitation of incidental or consequential damage, therefore above limitations may not apply to you. This warranty gives the purchaser specific legal rights. The purchaser may have additional rights, which vary from state to state.
