 FREE 1 to 3-Day Delivery on Orders $149+ Details

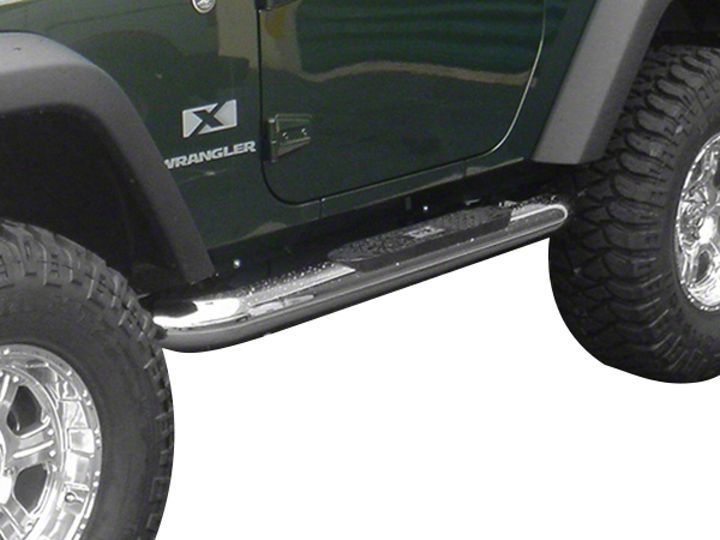
How to Install Rugged Ridge Stainless Steel 4in. Round Nerf Bars on your 2007-2013 Wrangler
Shop Parts in this Guide
- Rugged Ridge 4-Inch Round Nerf Side Step Bars; Stainless Steel (07-18 Jeep Wrangler JK 2-Door)
- Rugged Ridge 3-Inch Round Nerf Side Step Bars; Gloss Black (07-18 Jeep Wrangler JK 2-Door)
- Rugged Ridge 3-Inch Round Nerf Side Step Bars (07-18 Jeep Wrangler JK 2-Door)
- Rugged Ridge 4-1/4-Inch Oval Nerf Side Step Bars; Stainless Steel (07-18 Jeep Wrangler JK 2-Door)
- Rugged Ridge 4-1/4-Inch Oval Nerf Side Step Bars; Black (07-18 Jeep Wrangler JK 2-Door)
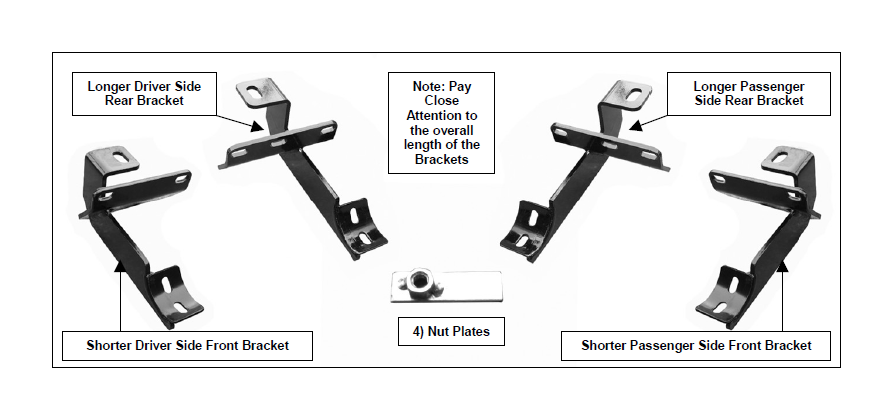
PARTS LIST
1 Driver Side Bar
4 10mm Lock Washers
1 Passenger Side Bar
4 10mm Fender Washers
1 Driver Side Front Mounting Bracket
8 8mm X 25 Hex Bolts
1 Driver Side Rear Mounting Bracket
8 8mm Lock Washers
1 Passenger Side Front Mounting Bracket
8 8mm Flat Washers
1 Passenger Side Rear Mounting Bracket
8 6MM X 25MM Allen Bolts
1 4mm Allen Tool
8 6MM Nylock Nuts
4 10mm X 35mm Hex Head Bolts
8 6.5mm ID x 18mm OD x 1.6mm Flat Washers
4 10mm Nut Plates
8 6.3mm ID x 23mm OD x 3.2mm Flat Washers
PROCEDURE:
1. REMOVE CONTENTS FROM BOX. VERIFY ALL PARTS ARE PRESENT. READ INSTRUCTIONS CAREFULLY.
2. Insert a nut plate into the frame opening on the front driver side with the nut facing up, (Figure 1).
3. Locate two factory holes on the front driver side pinch weld. Attach the Front Driver Side Mounting Bracket to the pinch weld using the included (2) 6-1.00mm x 25mm Allen Bolts, (2) 6mm Nylock Nuts, (2) 6.5mm ID x 18mm OD x 1.6mm Flat Washers (for the out side) and use (2) 6.3mm ID x 23mm OD x 3.2mm Flat Washers (for the inside against the bracket) (Figure 2). Do not tighten at this time.
4. Attach the Front Driver Side Mounting Bracket to the side panel using the included (1) 10-1.50mm x 35mm Hex Head Bolt, (1) 10mm Lock Washer, and (1) 10mm Fender Washer, (Figure 2). Do not tighten at this time.
5. Repeat steps 2-4 for Rear Driver Side Mounting Bracket. NOTE: For the 2007 JK you will only use (1) 6-1.00mm x 25mm Allen Bolt, (1) 6mm Nylock Nut, (1) 6.5mm ID x 18mm OD x 1.6mm Flat Washer (for the out side) and use (1) 6.3mm ID x 23mm OD x 3.2mm Flat Washer (for the inside against the bracket) to attach rear bracket to pinch weld, (Figure 3). For the 2008 JK you will use (2) 6mm Nylock Nuts and related hardware (Figure 4).
6. Position Driver Side Bar onto brackets. Attach Side Bar to Mounting Brackets using the included (4) 8-1.25mm x 25mm Hex Head Bolt, (4) 8mm Lock Washers, and (4) 8mmFender Washers (Figure 4). Do not tighten at this time. NOTE: For 2007 JK’s you will use the rear mounting holes, and for the 2008 JK’s you will use the front mounting holes (Figure 4).
7. Level and adjust Side Bar and Brackets, then tighten all hardware at this time.
8. Repeat steps 2-7 for Passenger Side Bar.
9. Do periodic inspections to the installation to make sure that all hardware is secure and tight.


