FREE 1 to 3-Day Delivery on Orders $149+ Details

How to Install Rugged Ridge Dual Battery Tray Kit on your 1987-1995 Wrangler

Shop Parts in this Guide
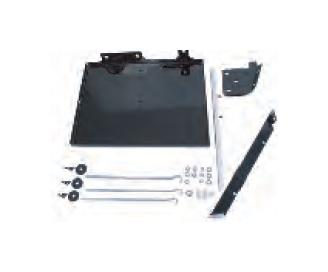
Contents:
(1) Dual Battery Tray
(1) Firewall Support Bracket
(1) Inner Fender Brace (YJ)
Fuse Block Holder
(2) Nylon Spacer (1")
(1) Nylon Spacer (1/2")
(3) 8mm Nylock Nut - "L" Bracket
(3) 8mm flat washer
(3) Threaded "J" Hooks
(3) Nylon Flat Washers
(3) Wing Nuts
(1) Battery Retainer Bar
(5) 10mm Hex Nuts - Inner Fender Brace
(1) 14mm Hex Nut - Support Bracket
Step 1: Remove Jack and tire tool. Reinstall after tray has been installed.
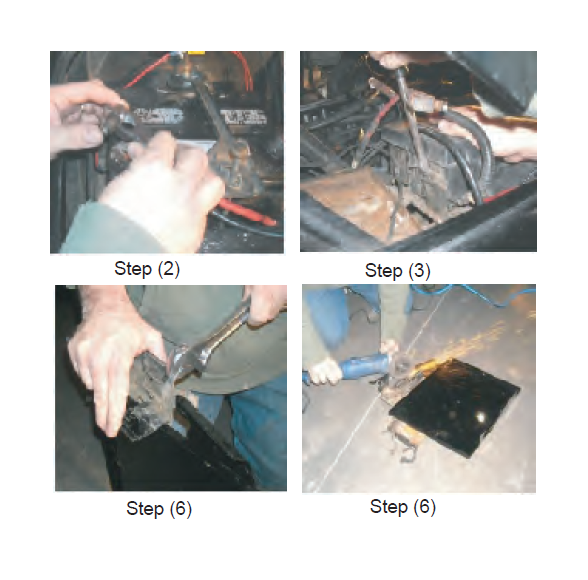
Step 2: Disconnect Battery by removing the NEG (-) cable first and then the POS ( ) connector. Remove battery from tray.
Step 3: Remove relay/fuse block from old tray. Grip fuse block and release retainer tabs . A small flat head screw driver will help release tabs. Push fuse block towards engine to remove from tray. Use pliers to release retainer clips from old tray.
Step 4: Using a flat head screw driver pry open wire loom retainer located on fuse block. Lay relay/fuse block on top of engine or AC lines so that it is out of the way.
Step 5: Unbolt old tray and lower support brace. Do not discard original bolts. They will be reused. Note that lower brace will not be reused with new tray.
Step 6: BEFORE installing new tray some modification of the original relay/fuse block bracket will be needed. The "L" shaped bracket needs to be removed from the old tray. At the end of bracket, with the single stud, bend the outer corner or tip up 1/4" to 1/2" to clear inner fender apron. An adjustable wrench can be used for this task. A cut off wheel can also be used to trim away the extra material.
Step 7: With modifications made, the "L" shaped bracket needs to be transferred to the new battery tray. Place 1/2" Nylon Spacer on single stud, and the two 1" on two long studs. Place "L" bracket onto tray and tighten using the three 8mm Nylock Hex Nuts and Washers.
Step 9: Install new Dual Battery tray reusing original hardware removed in step 5.
Step 10: Place one "J" hooks into the center hole of the Dual Battery Tray.
Step 11: Insert the other two "J" hooks into the left and right holes of the Dual Battery Tray. The hooks should be facing outwards, away from the Tray.
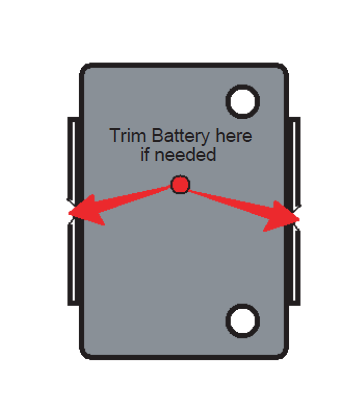
Step 12: Place batteries onto Tray. Place Battery Retainer Bar over batteries and align holes with "J" Hook. Place Nylon Flat Washer and Wing Nut onto "J" Hooks and tighten Wing Nuts evenly. Place Red protective caps onto the ends of the "J" Hooks. "J" Hooks can be trimmed if needed. Some batteries may need to have plastic lower lips notched to allow proper fitment.
Step 13: Reinstall Relay/Fuse Block and secure Wire loom with clips and loom retainer into hole in Fire Wall Support Bracket.
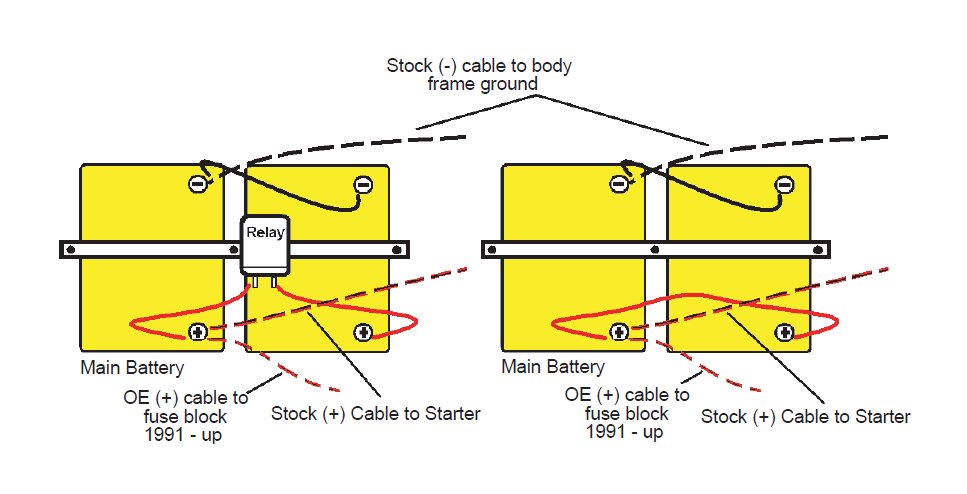
Step 14: Install battery cables starting with POS ( ) cables first. Refer to instructions supplied with Dual Battery Relay for further wiring for dual battery setups. See drawing for possible layouts.
Step 15: Reinstall jack and tools in original location.