 FREE 1 to 3-Day Delivery on Orders $149+ Details

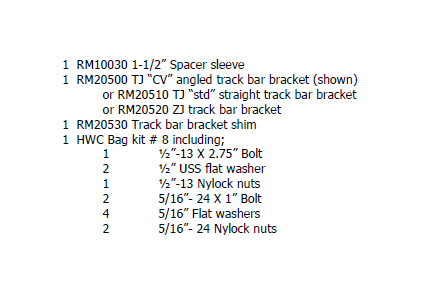
How to Install a Rubicon Express Track Bar Bracket Rear w/ CV on your 1997-2006 Wrangler TJ
Installation Time
1 hours
Tools Required
- Basic mechanics hand tools
- Drill motor with high quality 5/16” drill bit
- Jack stands and floor jack
Safety Warning:
Suspension systems or components that enhance the off-road performance of your vehicle may cause it to handle differently, on and off-road, than it did from the factory. Care must be taken to prevent loss of control or vehicle rollover during sudden maneuvers. Failure to drive the vehicle safely may result in serious injury or death to driver and passengers. We recommend you always wear your seatbelt, drive safely and avoid quick turns and other sudden maneuvers. Constant maintenance is required to keep your vehicle safe. Thoroughly inspect your vehicle before and after every off-road use.
Installation Warning:
We recommend that certified technicians perform the installations of our products. Attempts to install these products without knowledge or experience may jeopardize the safety of the vehicle. These instructions only cover the installation of our products and may not include factory procedures for disassembly and reassembly of factory components. Read instructions from start to finish and be sure all parts are present before disassembling the vehicle. Included instructions are guidelines only for recommended procedures and in no way are meant to be definitive. Installer is responsible to insure a safe and controllable vehicle after performing modifications. Do not perform test drives on public roads with partially completed installations. Always double and triple check your work before use.
INSTALLATION:
1. Lift vehicle by frame and remove rear wheels.
2. Remove the plastic dust shield that covers the bolt securing the rear track bar to the mount on the axle housing and discard (if so equipped).
3. Remove the bolt securing the track bar to the axle. If Torx, the size is T55.
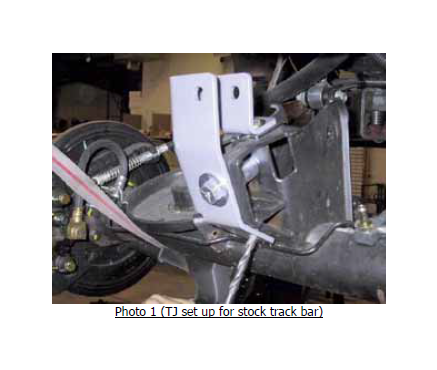
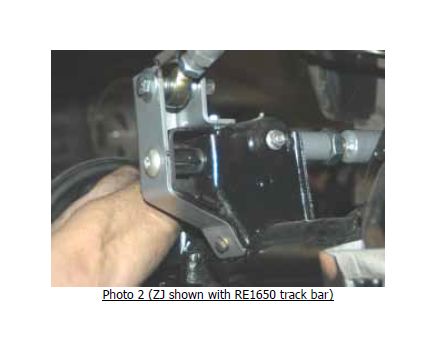
4. TJ’s -install track bar bracket using the supplied ½” x 2- 3/4” bolt and 1-1/2” spacer – refer too Photo 1 (ZJ use stock T55 bolt and 1-1/2” spacer – refer to Photo 2). The spacer is installed into the location vacated by the track bar. This will prevent the bracket from deforming when the bolt is tightened.
5. With the track bar bracket in place, drill two 5/16” holes in the axle bracket using the new bracket as a template. One hole is on top and one is on the angled surface below.
6. Install the 5/16” hardware in the holes drilled in the previous step. Some may require using the horseshoe shim between the new bracket and axle bracket at the top 5/16” bolt.
7. TJ’s - install the track bar in the track bar bracket using the factory bolt previously removed (ZJ’s use supplied ½” x 2-3/4”, and if reusing stock track bar you will have to ream or drill the bushing to ½”).
8. Recheck all nuts.
9. Reinstall wheels and lower vehicle.
10. Periodically recheck all bolts.

