 FREE 1 to 3-Day Delivery on Orders $149+ Details

How to Install Rubicon Express 2.5 in. Lift Kit w/ Mono Tube Shocks on your Wrangler
Installation Time
1 hours
Tools Required
- Basic Hand Tools
- Vehicle Hoist
- 5/16" Drill Bit
- Jack Stands
- Floor Jack
Rear Installation
STEP 1. Prepare for the rear installation by removing the following items from the rear of the vehicle: tires/wheels, shocks, sway bar end links, and the track bar at the axle end. Keep the rear sway bar links for reuse on the front of the vehicle.
STEP 2. With the items removed, carefully lower the rear axle assembly and remove the coil springs from the vehicle. Note the position and orientation of the upper coil spring isolators, they will be reinstalled with the new coil springs.
NOTE: Be careful not to overextend the rear brake lines.
STEP 3. Install the replacement rear coil springs in place of the previously removed stock coil springs.
STEP 4. Raise the axle into place and install the new rear shocks.
NOTE: If the suspension was purchased with Rubicon Twin Tube shocks you will need to install shocks on the vehicle with the body down.
STEP 5. Install the replacement RE1158 rear anti-sway bar end links in place of the previously removed factory anti-sway bar end links.
STEP 6. Install the rear bump stop extensions onto the axle pad with the offset towards the front of the vehicle, using the supplied hardware.
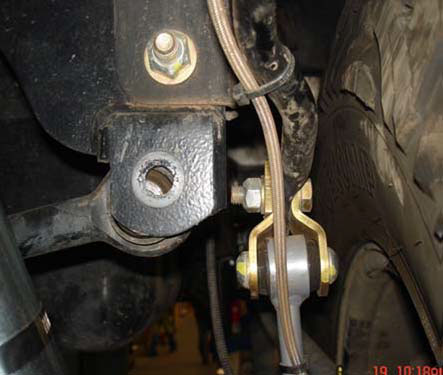
STEP 7. Install the rear upper track bar bracket over the factory axle bracket and attach with the supplied hardware. Use the supplied spacer in the factory track bar location to keep the bracket from collapsing when tightening. See Photo #1.
STEP 8. Reinstall the rear wheels and check the torque on all nuts and bolts.
STEP 9. Re-connect the track bar with vehicle on the ground and at ride height.
STEP 10. Adjust the position of the brake lines, breather hoses, and ABS lines as required.
Front Installation:
STEP 1. Prepare for the front installation by removing the following items from the front of the vehicle: tires/wheels, shocks, and sway bar end links.
NOTE: Disconnecting the front track bar may assist in front coil removal/ installation.
STEP 2. With the items removed, carefully lower the front axle assembly and remove the front coil springs.
NOTE: Be careful not to overextend the front brake lines.
STEP 3. Place the front bump stop on the center of the lower spring mount on the axle tube. Insert a center punch through the center hole in the bump stop and mark the hole to be drilled. Drill the marked hole to 5/16”
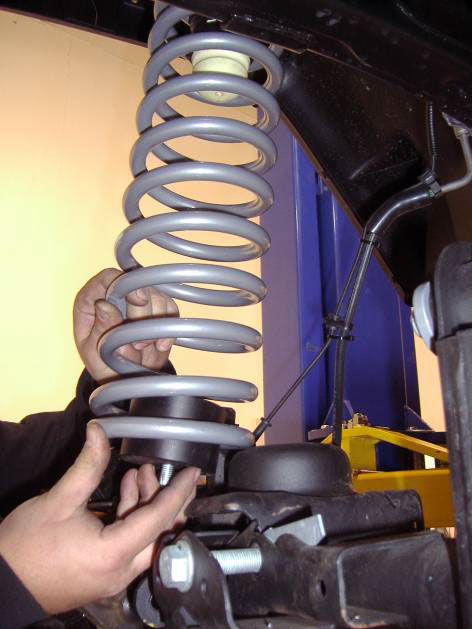
STEP 4. With the lower bump stop placed inside the new front coil spring, raise the small diameter end of the coil into the upper spring bucket and over the lower spring cup and bump stop pad. Rotate the coil spring so the end of the coil properly sits in the factory pocket and install the supplied 3/8” self tapping bolt through the center of the bump stop. Secure it to the axle. See Photo #2.
STEP 5. Install the replacement front shocks in place of the previously removed stock shocks.
STEP 6. Raise the axle into place and install the previously removed stock rear anti-sway bar end links in place of stock front end-links. Re-connect track bar if disconnection was required.
STEP 7. Reinstall the front wheels and check the torque on all nuts and bolts.
Installation review:
STEP 1. Torque all the bolts to factory specifications. Be sure to double check your work.
STEP 2. Test drive and note the location of the steering wheel.
STEP 3. Adjust the drag link to center the steering wheel if necessary.
STEP 4. Align the vehicle as soon as possible. Set to minimum factory caster angle (3-4.5 degrees positive) and factory toe-in specifications.
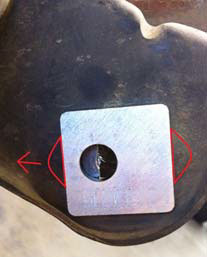
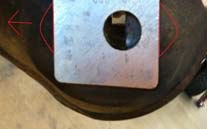
STEP 5. Supplied Alignment plate kit is provided, as an aid to your alignment technician, if needed to achieve proper caster adjustment.
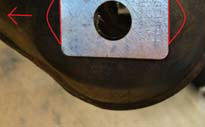
NOTE: Red arrow is front of vehicle. Red outlines are the location tabs in the factory bracket. Material must be removed from factory bracket to get a or - caster change.
STEP 6. Recheck all bolts after 50 miles and again after every off road excursion.
Application information:
- This kit is designed for the use of 35” diameter tires or smaller. If 35” tires are to be installed, it is recommended to use 35” x12.50” tires on an 8”-9” wide wheel with an offset of 0 to 12mm .
- If 33” tires or smaller are to be installed, the installation of the bump stops can be omitted to allow for more compression travel.

