FREE 1 to 3-Day Delivery on Orders $149+ Details

How to Install a Rugged Ridge Performance Hood Vents, Black on your Jeep Wrangler
Installation Time
1 hours
Tools Required
- Phillips Head Screwdriver
- 3/32 inch Allen Wrench
- Drill
- 1/16” Drill bit
- 3/16” Drill Bit
- Angle Grinder/Metal Nibblers
- Center Punch
- Razor or Hobby Knife
- Deburring tool or hand file
- Touch-Up Paint
- Painters Tape
- Marker
- Tree Fastener Removal Tool
- Socket Wrench
- 9mm Socket

Shop Parts in this Guide
CONTENTS:
Left Side Hood Vent (1)
Right Side Hood Vent (1)
Mounting Bracket, Inner (2)
Mounting Bracket, Outer (2)
OE Hood Template (1)
Installation Instructions
To reduce risk of personal injury during assembly and use of this product:
• Wear safety glasses during entire installation.
• Follow manufacturer’s safety guidelines for all power tools.
• When using an angle grinder or metal nibblers, make sure to wear gloves, eye, and ear
protection, and dust mask. Do not wear loose fitting clothing or jewelry.
• Read entire installation preocedure before beginning.
INSTALLATION INSTRUCTIONS FOR USE WITH RUGGED
RIDGE PERFORMANCE VENTED HOOD
(part # 17759.01)
NOTICE: If installing on OE hood, skip to OE Hood Installation Instructions section beginning on page 5.
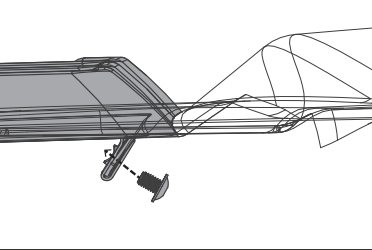
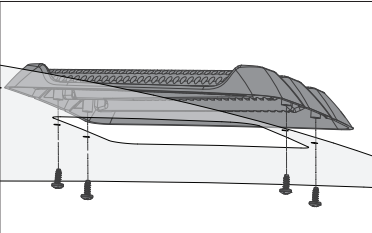
1. Using a phillips head screwdriver and suppplied phillips head screws, install inner and outer Hood Vent Mounting Brackets onto each Performance Hood Vent.

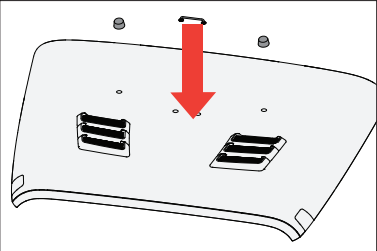
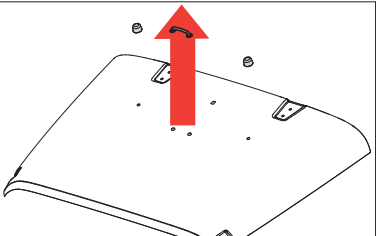
2. Open Hood. Uninstall left and right metal hood vents by removing the 8 J-Clip Screws and J-clips (4 per side) using a 3/32 inch allen wrench.
NOTICE: Save J-Clips and screws for later use.
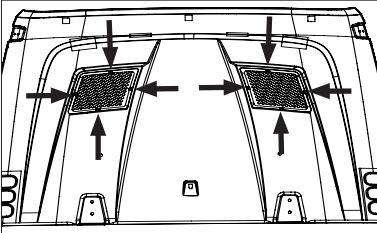
3. Position Performance Hood Vent Insert on top side of hood. Hold vent in place with one hand, and install 2 J-clips, one onto each Hood Vent Mounting Bracket on the user-side of hood. Make sure each J-Clip captures hood flange and Hood Vent Mounting Bracket.

4. With a 3/32” allen wrench, re-install J-Clip screws into the 2 J-Clips and fully tighten.
Repeat steps 3 and 4 for Performance Hood Vent Insert on other side.
INSTALLATION INSTRUCTIONS FOR USE WITH OE HOOD.
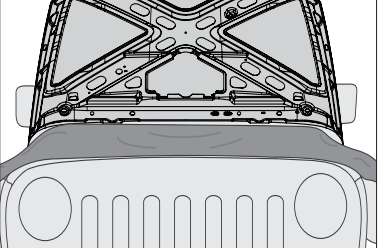
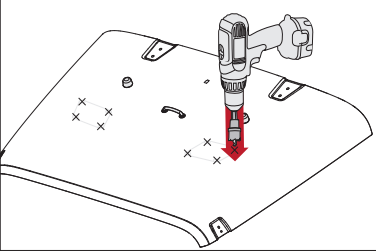
1. Raise Hood and remove hood insulation blanket by removing christmas tree fasteners using tree fastener removal tool. (JK Model Only)
2. Remove Footman using a 9mm socket. For TJ/LJ models, also remove windsheild bumpers.
3. Place hood template on flat surface. With a hobby knife or razor blade, cut out the shaded circles for the ‘Footman Holes’.
NOTICE:
There are 2 template patterns printed on the template sheet. Make sure to reference only the pattern meant for your vehicle. Items marked JK are for 2007-2015 Wrangler. Items marked TJ/LJ are for 1997-2006 Wrangler.
CAUTION: 4. Lift hood and place a blanket or other protective barrier over engine bay, fenders, and windshield. Gently lower hood.
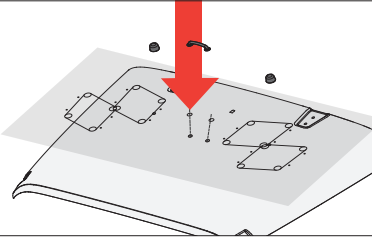
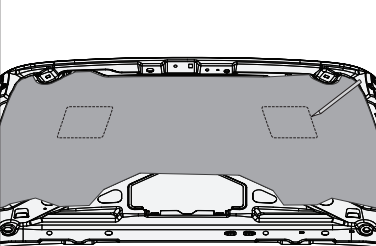
5. Place template on hood and align footman holes from step 4 with corresponding holes on vehicle hood.
6. Reinstall footman (and bumpers, if applicable) to positively locate template on hood.
7. Carefully inspect template placement to ensure proper alignment. Secure template in place with painters tape along edges of hood template.
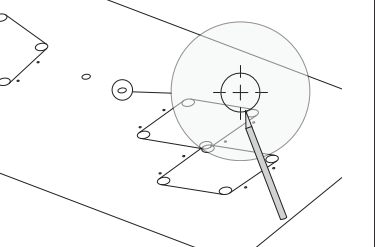
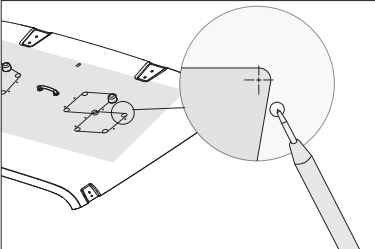
8. Use a center punch to mark the centers of mounting fastener holes for Hood Vents. There are 8 total centers to marks; 4 per side.
NOTICE: Make sure to use the correct template markings for your vehicle model/year.
9. Using a 1/16” drill bit, drill pilot holes at 8 center punched locations for Hood Vents fastener holes.
10. Use a 3/16” drill bit to enlarge 8 holes for fasteners.
NOTICE: When drilling holes in hood, be sure to support under-side of hood so the metal does not deform.
11. OPTIONAL - Use center punch to mark 4 locations on each side of hood where vent holes will be cut under Hood Vents.
12. OPTIONAL - Drill 1/16” pilot holes at 8 locations marked for vent cutouts. Use a 1” sheet metal hole saw to enlarge these holes.
NOTICE: Make sure to use the correct template markings for your vehicle model/year.
NOTICE: When drilling holes in hood, be sure to support under-side of hood so the metal does not deform.
13. Remove hood template and painters tape.
14. OPTIONAL - Use painter’s tape to connect each 1” hole with a straight line of tape around outside edges of each hole as shown in template.
15. OPTIONAL - Carefully use an angle grinder with a metal cut off wheel or metal nibbler to cut top layer of hood sheet metal along inside edge of painter’s tape.
WARNING: Always wear gloves, safety glasses, ear protection, and dust mask when cutting metal.

16. Remove painters tape. Use a deburring tool or hand file to remove any burrs or sharp edges created in steps 10-16.
17. Use touch-up paint to cover any exposed metal resulting from cutting and drilling. Allow paint to dry before proceeding.
WARNING: Always wear gloves, safety glasses, ear protection, and dust mask when cutting metal.

18. For JK models, replace hood insulation blanket. If optional hole cutouts from steps 12-16 were made: do not re-install christmas tree fasteners yet. Use a marker to trace hole cutouts onto hood insulation blanket. Use scissors or razor to cut corresponding holes in hood insulation blanket.
19. Place Hood Vent Inserts onto hood surface and align with mounting fastener holes. From underside of hood, insert supplied phillips head screws through holes created in steps 10 & 11 and use screwdriver to fasten Hood Vents in place.
20. Re-install footman on OE hood. For TJ/LJ models, also re-install windshield bumpers.
21. Replace hood insulation blanket and christmas tree fasteners. (JK Only)
22. Raise hood and carefully remove blanket from step 5, making sure not to spill any debris into engine bay.
23. Close Hood. Step back, and marvel at the awesomeness!