 FREE 1 to 3-Day Delivery on Orders $149+ Details

How to Install a Rough Country 3.75 in. Lift Kit w/ Shocks on your 2007-2014 Wrangler JK 2 Door
Installation Time
1 days
Tools Required
- 18mm Wrench
- 16mm Wrench
- 3/4” Wrench
- 9/16” Wrench & Socket
- Phillips Screw Driver
- Jack Stands
- Wood Block
- Hammer
PRODUCT USE INFORMATION
As a general rule, the taller a vehicle is, the easier it will roll. Seat belts and shoulder harnesses should be worn at all times. Avoid situations where a side rollover may occur.
Generally, braking performance and capability are decreased when larger/heavier tires and wheels are used. Take this into consideration while driving. Do not add, alter, or fabricate any factory or after-market parts to increase vehicle height over the intended height of the Rough Country product purchased. Mixing component brands is not recommended.
Rough Country makes no claims regarding lifting devices and excludes any and all implied claims. We will not be responsible for any product that is altered.
This system was developed to provide a level stance to the Jeep after it is lifted. Please note that this lift does not modify the front or rear track bar or its mounting points. This will result in what is generally considered a very insignificant shift in both the front and rear axle of approx 1/4 of an inch. Rough Country offers an optional rear track bar bracket Part # 1166 to address this. Please call your nearest Rough Country dealer to inquire.
IMPORTANT NOTE : The draglink must be adjusted to center the steering wheel BEFORE the vehicle is driven. Failure to do so will cause a computer error in the Jeep’s traction control system.
This suspension system was developed using a 285/75R17” tire with factory wheels. If bigger/wider tire are used with the factory wheels or factory offset wheels you must carefully check the clearance during turning between the tires and the lower control arm and the front sway bar link before driving.
If you have any questions concerning the design, function, and correct use of our products contact us at 800-222-7023.
FRONT INSTALLATION INSTRUCTIONS
1. Chock the rear wheels and jack up the front of the vehicle and support the vehicle with jack stands so that the front wheels are off the ground.
2. Using a 19mm deep well socket remove the front tires/wheels,
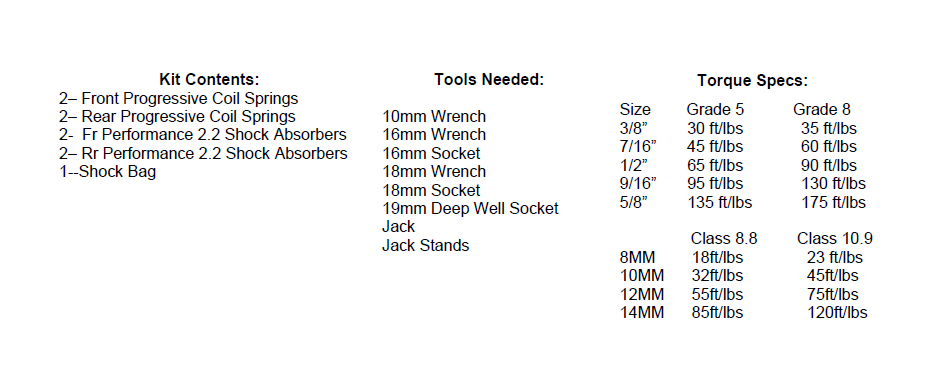
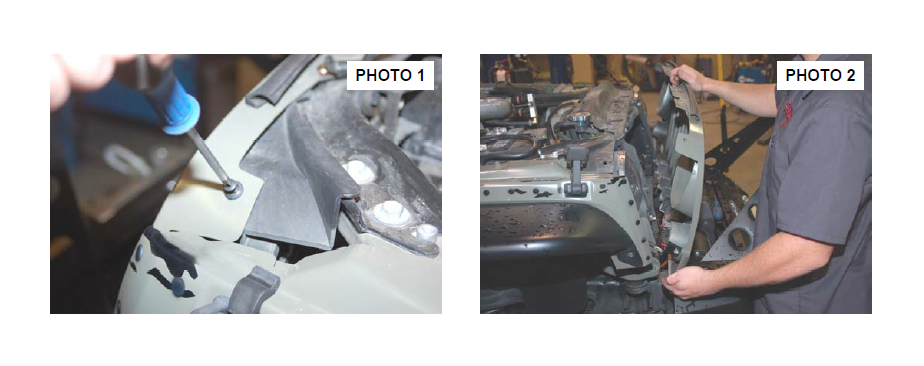
3. Using a 18mm socket and wrench remove the bottom sway bar bolts. Retain hardware for later use. See Photo 1
4. Using a 18mm socket and wrench remove the lower shock bolt. See Photo 2. Retain the lower hardware for reuse.
5. Push down on the axle to allow room for the coils to be removed. Remove coil springs, and factory spring isolator.
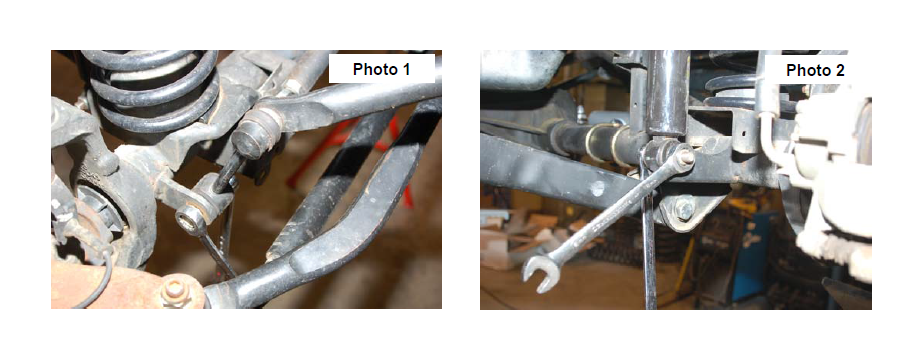
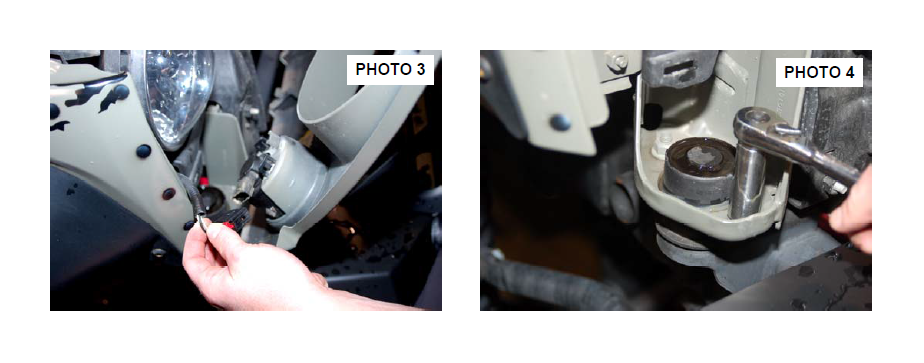
6. Install the new coil spring in the stock location with the factory isolator as shown See Photo 3.
7. Install the new Rough Country Performance 2.2 shocks in the factory location with the factory bolt in the lower shock mount and tighten using a 18mm socket and wrench. See Photo 4.
8. Reinstall the front tires/wheels and tighten to factory specifications.
9. Remove the jack stands and lower the vehicle to the ground. Install the sway bar links on the sway bar using factory hardware using a 18mm wrench after the vehicle is on the ground. Do not install the sway bar link on the sway bar until the sway bar is on the ground.
10. The draglink must be adjusted to center the steering wheel BEFORE the vehicle is driven. Failure to do so will cause a computer error with the Jeep’s traction control system and will result in odd handling and poor performance.
REAR INSTALLATION INSTRUCTIONS
1. Chock front wheels and jack up the rear of the vehicle and support the vehicle with jack stands so that the rear wheels are off the ground.
2. Remove the rear tires/wheels, using a 19mm deep well socket.
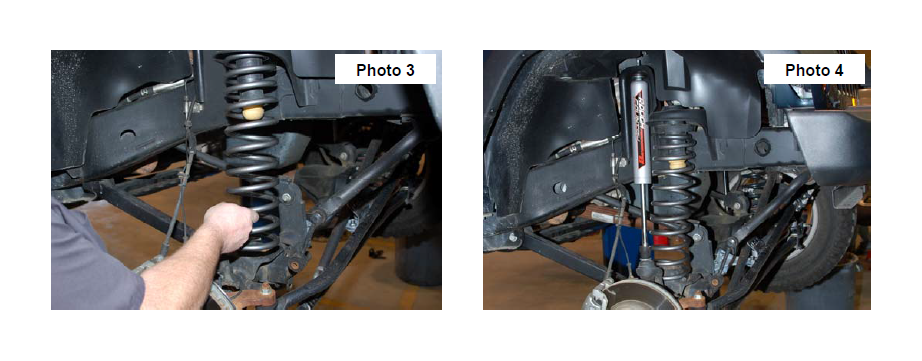
3. Remove the upper shock bolt using a 16mm socket and wrench. Remove the lower shock bolt using a 18mm socket and wrench and remove the factory shock. See Photo 5. Retain the lower shock hardware for reuse.
4. Using a 18mm socket and wrench remove the bottom sway bar bolts. Retain hardware for later use. See Photo 6.
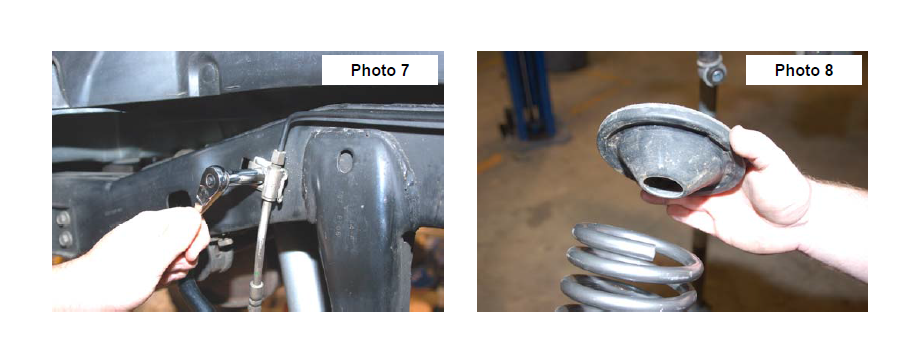
5. Using a 10mm wrench remove the bolt holding the brake line to the frame. See Photo 7. Push down on the axle to allow enough room for stock coil spring to be removed. Remove the stock coil spring and isolator.
6. Install the stock isolator on the top of the new coil spring. See Photo 8.
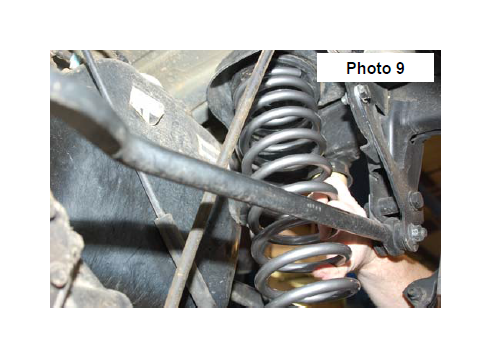
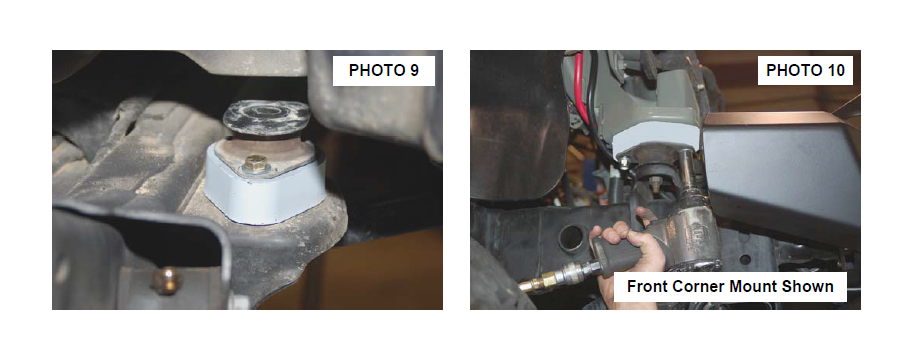
7. Install the new Rough Country coil spring in the factory coil mount as shown in Photo 9.
8. Install the rear Rough Country Performance 2.2 shock in the factory location using the factory hardware. Tighten the upper mount using a 16mm wrench and a 18mm wrench for the lower.
9. Reinstall the rear tires/wheels and tighten to factory specifications. Lower the vehicle to the ground.
POST INSTALLATION
1. Check all fasteners for proper torque. Check to ensure there is adequate clearance between all rotating, mobile, fixed and heated members. Check steering for interference and proper working order. Test brake system.
2. Perform steering sweep. The distance between the tire sidewall and the brake hose must be checked closely. Cycle the steering from full turn to full turn to check for clearance. Failure to perform inspections may result in component failure.
3. The draglink must be adjusted to center the steering wheel BEFORE the vehicle is driven. Failure to do so will cause a computer error with the Jeeps traction control system and result in odd handling and poor performance.
4. Using an certified alignment professional with experience in aligning lifted vehicles, get an alignment done to factory specifications.
5. Readjust headlights to proper settings
MAINTENACE INFORMATION
It is the ultimate buyers responsibility to have all bolts/nuts checked for tightness after the first 500 miles and then every 1000 miles. Wheel alignment steering system, suspension and driveline systems must be inspected by a qualified professional mechanic at least every 3000 miles.
NOTICE TO DEALER AND VEHICLE OWNER
Any vehicle equipped with any Rough Country product should have a “Warning to Driver” decal installed on the inside of the windshield or on the vehicle’s dash. The decal should act as a constant reminder for whoever is operating the vehicle of its unique handling characteristics.
INSTALLING DEALER - it is your responsibility to install the warning decal and forward these installation instructions on to the vehicle owner for review. These instructions should be kept in the vehicle for its service life.
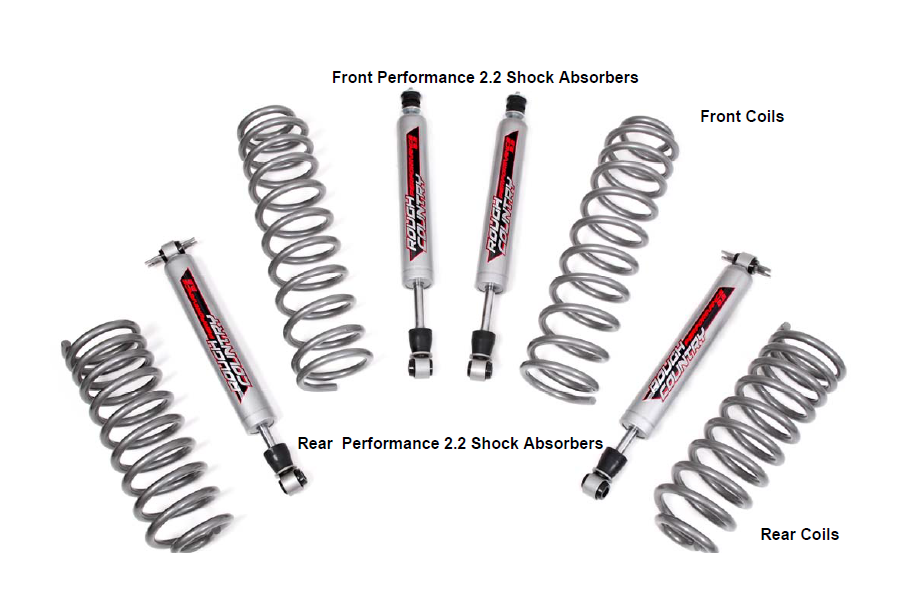
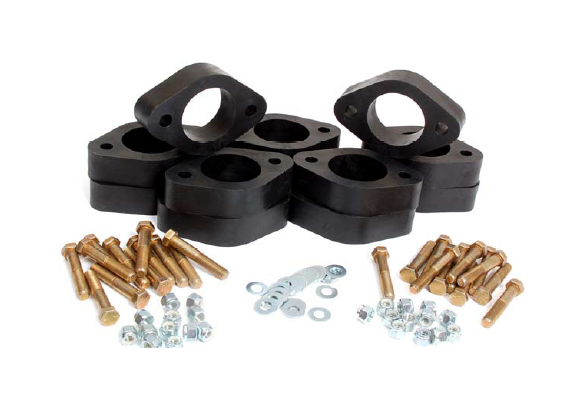
KIT COMPONENTS
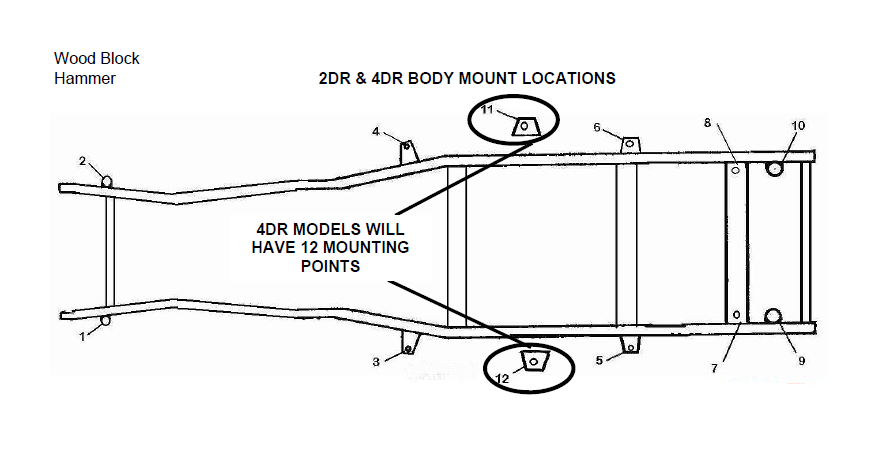
JEEP JK 1 1/4” 2 / 4 DOOR BODY LIFT KIT
Thank you for choosing Rough Country for your Jeep JK needs.
Rough Country recommends a certified technician installs this system. In addition to these instructions, professional knowledge of disassemble/reassembly procedures as well as post installation checks must be known. Attempts to install this system without this knowledge and expertise may jeopardize the integrity and/or operating safety of the vehicle.
Please read all the instructions before beginning the installation. Check the kit hardware against the parts list. Be sure you have all the needed parts and understand where they go. Also please review the tools needed list and make sure you have needed tools.
KIT CONTENTS:
RC601:
12- RC Body Blocks (4 DOOR KIT)
1—Kit Bag Containing
24—3/8” x 2 1/4” Bolts
24—3/8” Nuts
48—3/8” Washers
RC600:
10- RC Body Blocks (2 DOOR KIT)
1—Kit Bag Containing
20—3/8”X 2 1/4” Bolts
20—3/8” Nuts
40—3/8” Washers
INSTALLATION INSTRUCTIONS FOR JEEP JK 2 AND 4 DOOR BODY LIFT
1. Place Jeep on clean, dry, level surface. Installation is done one side at a time.
2. Raise hood. Using a Phillips screw driver, remove the (6) push pin inserts from grill on top side as shown. Retain for re-use. See Photo 1.
3. Pull grill toward you to release the three lower clips. See Photo 2.
4. Disconnect the parking light electrical connecter and remove grill assembly. See Photo 3.
5. Using a 16mm wrench remove the 2 stud nuts from the stock body mounts as shown (12 mounts for 4 door and 8 mounts for 2 door), removing only the passenger side first. See Photo 4.
6. After completion of removing the stud nuts, remove the center stud bolt and washer from the passenger side body mounts using a 18mm wrench . See Photo 5
7. After all isolator nuts and center mounting bolts are removed from the passenger side, position a wood block and (2) jack stands under the body as shown. Lift the body upwards and begin removing the body mounts. See Photo 6.

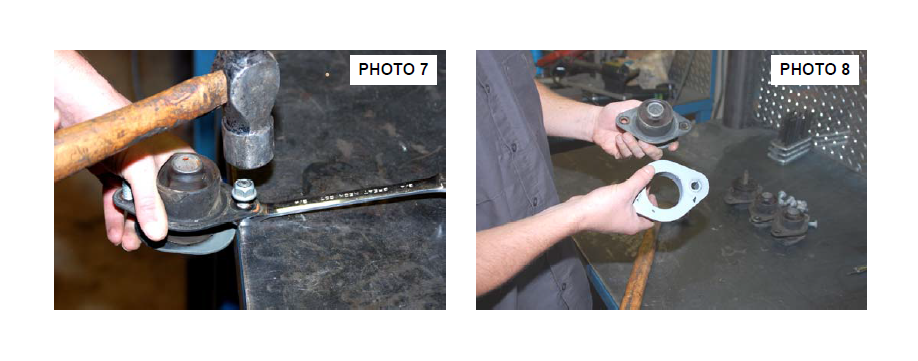
8. After removing the stock body mounts from your vehicle, replace the nut on the stud and tighten the nut only until the stud thread and nut are even. Using a 3/4” wrench and hammer, place the head side of the stud inside the wrench and then place onto a flat surface. Strike the nut side of the stud until the stud releases. Proceed with stud removal of all body mounts. See Photo 7.
9. After stud removal is complete, place the Rough Country body block onto the stock mount as shown. See Photo 8.
10. Re-install the body mount using the 3/8” x 2 1/4” bolt / washers and nuts supplied. Secure these bolts into place using a 9/16 wrench and tighten to 40ft/lbs. Note: The RC block will mount towards the body on the front two mounts. On the rear mounts, the RC block will mount to the frame side. See Photo 9 & 10.
11. Lower the jacks so that body mount meets with the frame mount and remove the jacks.
12. Using a 18mm wrench secure center mounting bolts, only hand tight.
13. Repeat all above steps to driver side.
14. After completion of installing all body blocks and mounts, completely remove jacks and wood block. Using an 18mm wrench torque center mounting bolts to 80 ft/lbs on all body mounts.
15. Reattach grill parking light electrical connectors. Snap grill into lower clips and using a Philips screw driver, secure the grill with the factory pin fasteners (6) on the top side.
16. Close hood. Recheck torque after 500 miles on all bolts. The 3/8” bolts should be 40ft/lbs and the stock mounting bolts should be at 80ft/lbs.
INSTRUCTIONS FOR 2 AND 4 DOOR JEEP JK MANUAL TRANSMISSION
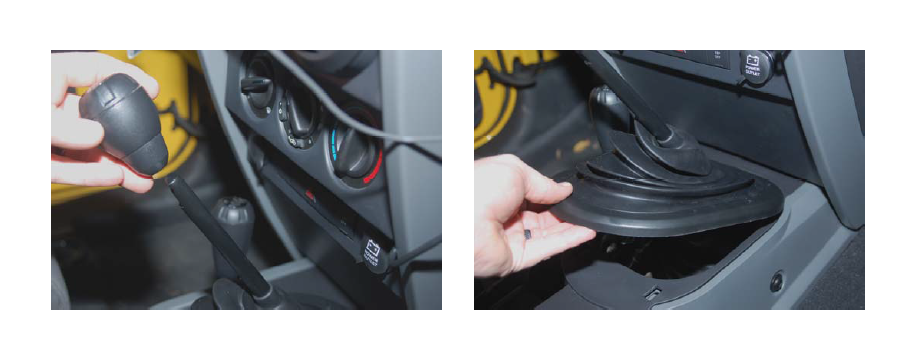
1. Remove shifter knob by pulling the knob off the shifter. See Photo 11.
2. Lift shift boot from floor panel and remove. See Photo 12.
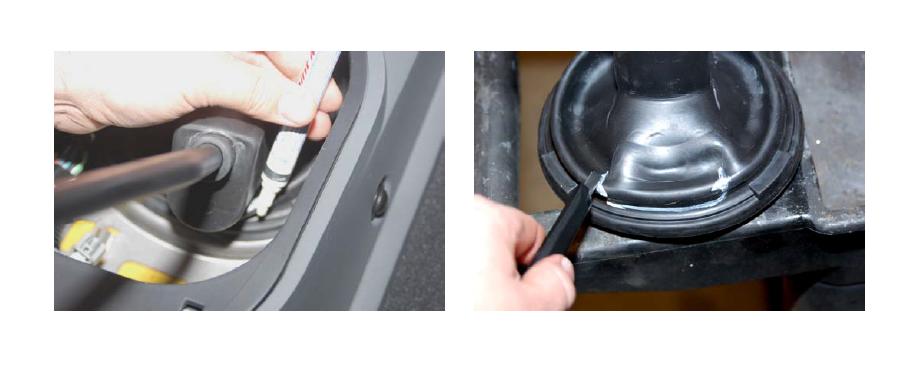
3. Engage shifter into second and the reverse gear and mark the rubber inner shift boot as shown. See Photo 13.
4. Remove inner shift boot. Using a razor blade, begin cutting along the lines as shown. See Photo 14.
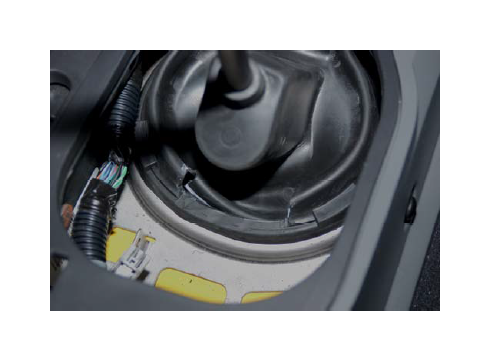
5. After cut is complete, reattach inner shift boot and push cut section inward as shown. See Photo 15.
6. Check shifter are reinstalling the inner boot to ensure there is no shifter interference. Modify as needed.
7. Reattach outer shift boot
8. Reattach shift knob.
POST INSTALLATION
1. Check all fasteners for proper torque. Check to ensure there is adequate clearance between all rotating, mobile, fixed and heated members. Check steering for interference and proper working order.
2. Re torque all fasteners after 500 miles. Visually inspect components and re torque fasteners during routine vehicle service.
