Talk to a Gladiator Sales Tech
1-877-870-8556
M-F 8:30A-11P, Sat-Sun 8:30A-9P
Logo Image
$20K Sweeps! 10 Chances to Win! Enter Daily >

RIVAL 4x4 Hood Lifts (20-24 Jeep Gladiator JT)

Item JG5961
Verify parts fit and get product recommendations.
Gladiator Sales Techs: Connect Now M-F 8:30A-11P, Sat-Sun 8:30A-9P
$0.00
Our Price

$89.00 (pair)

FREE Shipping on orders over $119 Market Price $102.35 You Save 13% ($13.35) Up to 10% off for Military & First Responders! See Details

Open Box from $26.70

Will this fit your Vehicle?

Select a different vehicle Help?
Update or Change Vehicle
Ship to: Ashburn - 20149
Sorry, please enter a valid US or CA postal code
We're sorry, zip can't be updated at this time.
    Create a list
    Add to New List

    Saved - View your saved items

    We're sorry. We couldn't save this product at this time.

    or use

      Product Videos

      Merideth: If you're looking for an easier way to access your engine bay, these Rival 4x4 Hood Lifts will do just the trick for your 2020 and newer Gladiator. Now, hood struts will make your life a whole lot easier whenever you pop the hood on your truck for whatever you're doing, whether that be to work on your motor, or just fill the washer fluid from time to time. Now, this option by Rival 4x4 will be a quality choice to completely eliminate that hood prop. Now, the kit here will consist of two Stabilus gas struts that will support the hood effortlessly while being very easy to compress so you won't have to fight to shut it. Now, these will also be completely bolt-on, so you don't have to do any modifications, unlike some other choices that may require a little bit of drilling.Now, I would like to mention that these will only work with the factory hood, but will fit all model Gladiators. So, I would just keep that in mind if you are taking a look at these. Now, when it comes to price, these will be right on par, four hood struts coming in right around the $100 mark. Now, when comparing these to some other choices on the site, they will be very simple and straightforward, which I personally like. It's a no-fuss design and it gets the job done. Now, other choices may have some extra bells and whistles like a full stainless build, quick release ends, or be compatible with aftermarket hoods. Now, I think if you're looking for a reliable set of hood struts and don't really care for those extra bells and whistles or those extra features, and you're working with the factory hood, then these are gonna be for you. Now, when it comes to install, these will be very easy at a 1 out of 3 wrenches on the difficulty meter, taking you about 30 minutes to get the job done. And one of our customers here is gonna walk you through that process step by step. So, that wraps it up for me, let's get into the install.Man: These are the required tools for the job, pretty simple job. Just a 10-millimeter socket on your socket wrench and actually a 4-millimeter Allen wrench. I'm using my bicycle park tool set here. That's pretty much the only tools you need. There's also, in the instructions, there was also suggested to use a torque wrench to make sure that the bolts that require the 4-millimeter Allen wrench is set to 9 newton meters. However, I don't have one that will be able to measure on an Allen key. So, tonight or today, this is all I'm going to be using, and it's pretty much all I need to be using for this job.Okay. Step one is where we're going to be removing this bolt. It's like the furthest bolt towards the rear of the hood or the fender wall here. It's just that 10-millimeter socket that's all you're gonna need. So, let's get this set to remove here. Because there's paint, it might be a little bit of a wiggle to get it off here. Actually, they're quite loose. Well, that was unexpected. All right. So, we got that bolt out. So, now this is gonna be the first of the hood plates. What you're gonna do is you're gonna sit... There's a hole right down here, so that's gonna be coming right where you removed that bolt. But I do wanna point out that the way this is set is that there is this little ball joint here that's gonna be connecting to the strut. You want that to be on the outside and towards the front of the vehicle. If you happen to grab the wrong bracket for the other side, you'll notice that when you set this down, the ball joint will be on the back. So, you want it to be upfront. So, let's go ahead and install that now. Let's go ahead and start it with the fingers. Get it finger-tight. And again, they want you to set this at 9 newton meters, which really isn't that much. So, maybe just a nice snug fit. And that's in there.Okay. Now we're going on to step two. So, step two is simply coming on the other side, the passenger's side of the vehicle. Again, getting the L-bracket where the vertical portion of the L-bracket is towards the outside of the vehicle and that this ball joint is towards the front. So, we're gonna start by removing the same bolt that we did on the other side, but on the passenger's side here. It's a bit of a long one. There we go. And now we're gonna take that bracket and insert that same bolt back in the hole there where it came from. And start off by tightening it with your fingers since it is a loose bolt here. It's just about finger-tight. And then we can go ahead and get our socket wrench and make sure this is straight. Actually, once it's putted up against this little frame here, it really doesn't twist at all. So, you shouldn't have any problems getting it right in position. There we go. And just nice and firm. And that is step two.Here is the next step. So, now we put the fender wall brackets on, now we're gonna move towards the...to get the brackets on the hood. So, we first start with this little silver little bracket here. You have these two Allen head screws and two washers. So, what we're gonna do is we're gonna put a washer on one of the screws. We're gonna start one of these screws on this bracket and then get my number four and then start tightening it in there. It's really tight. So, now we're gonna focus over on this area here. This is if you pull this end of this rubber little gasket part here, pull it down, you'll find this little opening in here. And what we're gonna do is we're gonna stick this bracket into this opening. First, you insert it upwards, and then you bring it back down to where the bottom screw acts as a stopper. And then you get it in position to where you have that other hole available to put the other screw in. All right. So, what I'm doing is I'm getting these just short enough to leave room for the bracket that I'm about to install, but enough to stay put. All right. So, I think these are pretty much at a good spot.So, what you're gonna do is you're gonna this fork, these two forks here, and you're gonna put these forks to straddle each bolt. So, there's that one, and there's that one. So, what you're gonna do is you're gonna hold that in place. Now we're going to tighten it all down. That's one side, and here's the other. Again, this is supposed to be set to 9 newton meters of pressure. So, I'm just gonna make that just kind of a snug fit with my hands. And that's it for that side. Let's go to the passenger's side.Next step. So, now we're going on the passenger's side. We're going to put this troublesome bracket into the passenger side of the hood here. So, again, we start off by getting a washer and a screw prepped up, and then we're gonna put it in this bracket here. Just as a starter, kind of crank that in there a little bit. Okay. That's pretty much started up. Now we're gonna put this in this hole right here. Are you zoomed in? And so, we start it off there, fit it in to where it's locked in place. Let's go ahead and tighten it to a reasonable length. So now, we gotta grab our bracket. Again, with these forks, the bottom fork is gonna grab the bottom screw. And then there we got them. Actually, no, we didn't get the washer. Gotta get that washer. There we go. You can see the washers are in front of the bracket, not behind it. So now, we're going to screw these down. Just finger-tight it first till we can get this other one in position. There we go. Now we're gonna give it a good crank and a quarter turn. And that's it for that. So, now we're ready for our last step.All right. Here we go. Last steps. We're gonna first start by taking the thicker end and put it on the ball joint of the fender wall bracket. And you'll hear a snap like that. And then we're gonna take the top end and adjust it to where it is right over that and snap it on there. And that's that side. Again, the thicker end is going to be snapped on this ball joint down here. There you go. Light little snap there. Now, for the last over the top. And there we go. That is all she wrote. All right. So, we have got the struts in, we're ready to give it a test here. Putting this bad boy up and let it go. And as you can see, it stands up on its own, closes on its own. I'm not all that done, but... And raises up all by it itself.Merideth: So, that's gonna wrap it up from my review and the install of the Rival 4x4 Hood Lifts, fitting all 2020 and newer Gladiator JTs. For more videos and products just like this, remember to always keep it right here at extremeterrain.com.

      Product Information

      Features, Description, Reviews, Q&A, Specs & Installation

      Features

      • Hood Lifts
      • Lets You Easily Open Your Hood with 1 Hand
      • High-Quality Construction
      • Features Stabilus Gas Struts
      • Eliminates the Need to Use Your Hood Prop
      • All Components Are Precision Designed
      • Only Works with Factory Hood
      • Bolt-On Installation; No Drilling Is Required
      • Includes a 1-Year Limited Warranty
      • Engineered to Fit 2020-2024 Jeep Gladiator JT Models

      Description

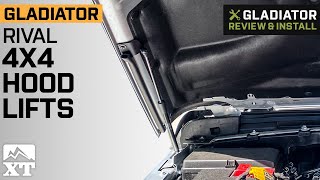
      Easily Open Your Hood. If you’re struggling to open your truck’s hood, then equip it with these RIVAL 4x4 Hood Lifts. These hood lifts feature Stabilus gas struts that provide 2 strong points of securing your hood while open. What’s more, these hood lifts let you easily open your vehicle’s hood with 1 hand, so your other hand can still hold a flashlight or any gear you need while inspecting your hood.

      High-Quality Construction. To deliver reliable performance and long-lasting functionality, these hood lifts are manufactured using the highest quality of materials. Each component is also precision designed to perfectly fit your vehicle application. What’s more, these hood lifts are made in Germany, so you can be assured of their durability and quality.

      Bolt-On Installation. These hood lifts are easy to install, thanks to their no-drill, bolt-on design. Simply follow the steps in the manual and you’ll be able to finish the installation without any hitch. However, please note that these hood lifts are only designed to work with your vehicle’s factory hood and not the aftermarket ones.

      Includes a 1-Year Limited Warranty. To assure the quality of these products, RIVAL 4x4 is offering a 1-year limited warranty. In case of product failure or breakage, you may return the items and have them repaired or replaced. Terms and conditions apply.

      Application. These RIVAL 4x4 Hood Lifts are engineered to fit 2020-2024 Jeep Gladiator JT models.

      Fitment:

      Details

      RIVAL 4x4 2A.ST.2702.1

      CA Residents: WARNING: Cancer and Reproductive Harm - www.P65Warnings.ca.gov

      Installation & What's in the Box

      Installation Info

      What's in the Box

      • (2) Hood Lift Struts
      • (4) Brackets
      • (2) Mounting Plates
      • (4) Screws
      • (4) Washers
      4.9

      Customer Reviews (127)

        Questions & Answers

        10 More Questions

        Will It Fit My Gladiator

        • 3.0L V6 EcoDiesel - 23
        • 3.6L V6 - 23