FREE 1 to 3-Day Delivery on Orders $149+ Details

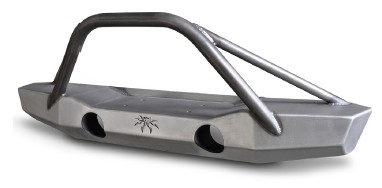
How to Install Poison Spyder Brawler MID Width Front Bumper - Bare Steel on your 07-18 Jeep Wrangler JK; 2018 Jeep Wrangler JL
Installation Time
2 hours
Tools Required
- Ratchet with 6” socket extension, 19mm deep socket and 3/4” deep socket
- Torque wrench (ft./lbs.)
- 7/32” hex key
- Dead blow hammer or rubber mallet
- Phillips & flat head screwdrivers
- Removal tool for push-in retainer clips or small pry bar
The Poison Spyder Customs Brawler MID Front Bumper is easy to install with the right tools and good mechanical abilities. If you are not confident in your mechanical skills, please seek the help of a professional to perform the installation. Please read through these entire instructions before proceeding with installation.
PARTS LIST
Please check your packages immediately upon arrival to ensure that everything listed is included, and to check for damage during shipping. The locknuts and washers are shipped attached to the mounting studs inside the bumper. If anything is missing or damaged, call Poison Spyder at (951) 849-5911 as soon as possible.
(1) JK Brawler MID Front Bumper
(8) 1/2-13 nylon insert lock nut
(8) 1/2 flat washer
BEFORE YOU BEGIN
The JK Brawler MID Front Bumper and associated components are shipped un-painted.
Before you paint or powder coat, perform the entire installation of the product to ensure that it fits without risking damage to your paint or powder coat finish. Poison Spyder Customs is not responsible for paint or powder coat costs in the event you damage the finish during installation, or that the parts are incorrect or defective.
You will want to paint or powder-coat these components prior to FINAL installation. If painting them yourself, we recommend starting with a quality etching primer and allowing sufficient cure/dry time between coats and before you apply color. Quality spray-can paints are fine, however be sure to thoroughly paint all of the inside corners and hard-to-reach areas of the bumper. A little extra time and attention to detail on your preparation and paint process will pay off in longer-lasting good looks and rust prevention.
INSTALLATION PROCEDURE
1. Park vehicle on a level surface and set the emergency brake. You will want to wear eye protection beyond this point.
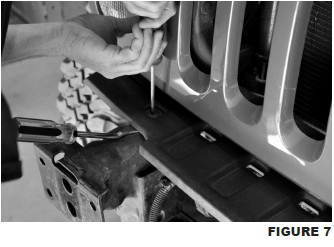
2. Remove the plastic lower air dam. Use a push-in retainer removal tool to pop out the plastic push-in retainers along the front edge and also underneath/behind the air dam where it attaches to the crash bar. If you do not have a push-in retainer tool, a flat-edge screwdriver or small pry-bar may be used.

3. If your Jeep is equipped with factory fog lamps, reach behind the bumper and disconnect the wiring harness plugs from the sockets at the back of each lamp. A small flat head screwdriver may be useful to release the tangs on the plug
4. Use a ratchet and 19mm deep socket to remove the eight (8) nuts that fasten the bumper to the frame. There are two of these nuts on the inner side, and two on the outer side, of each frame rail where it joins the bumper.
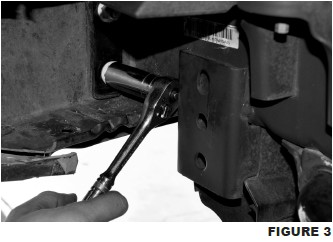
With these nuts removed, remove the bumper from the Jeep.
5. If your Jeep is equipped with factory fog lamps, these may be removed from the stock bumper and re-installed into the Brawler MID bumper. Use a Phillips screwdriver to remove the four (4) retaining screws from each lamp, on the back side of the bumper.
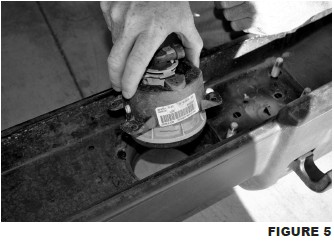
Install the factory fog lamps into the fog lamp mounts in the back side of the Brawler MID bumper. Re-use the OE retaining screws. These sheetmetal screws will form their own threads as you drive them into the retaining rings on the RockBrawler bumper, so press firmly as you twist the screwdriver.

6. Remove the plastic top bumper cover. You may be able to remove the two plastic screws with a Phillips screwdriver. But it is likely they’re “frozen” in place and will have to be pried up with the push-in retainer removal tool.
IMPORTANT: If installing the optional Skid Plate, refer at this point to the instructions that came with the Brawler MID Skid Plate, and proceed with those steps. Return to these instructions and proceed with the next step, below, once the Skid Plate installation instructions have been completed.
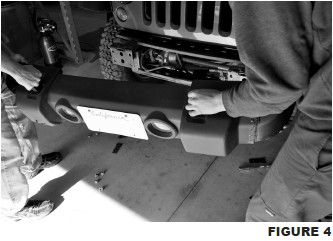
7. Install the Bumper onto the frame. There are eight (8) threaded studs located on the inside/backside of the bumper, which will correspond with the bumper mounting holes on the frame. It may be a tight fit due to slight manufacturing variances from Jeep to Jeep, but the bumper will fit with some gentle persuasion. You may need to use a rubber mallet or soft dead-blow hammer to tap the bumper into place. Be careful not to mar your paint or powdercoat finish.
8. Locate the 1/2-13 nylon insert lock nuts and 1/2” flat washers that came with your bumper (usually these are shipped threaded onto the studs). Install a flat washer and lock nut onto each of the eight bumper mounting studs at the outside and inside of the frame rail on either side of the Jeep. Snug these with the 3/4” deep socket, extension and ratchet. Torque these nuts to 70 ft.-lbs.
9. If you installed the OE fog lamps into the Brawler MID bumper, plug the harness connectors back into the sockets in the back of each lamp. The OE wire harness may be secured with stick-on harness anchors and zip-ties (not provided).
Congratulations, you have completed the installation of your Poison Spyder JK Brawler MID Front Bumper!