 FREE 1 to 3-Day Delivery on Orders $149+ Details

How to Install Poison Spyder Trail Gate - Bare Aluminum on your Wrangler
Tools Required
- Fine-tip felt marker & measuring tape
- Mechanic’s tool set including an assortment of hex keys, end wrenches, sockets and ratchet
- Drill motor with 1/4, 5/16, 25/64, 17/32 and 1/2 drill bits
- Grinder or cut-off wheel
- Thread anti-seize compound
- Touch-up paint
- Optional: Professional nut-sert install tool
Thank you for purchasing a Poison Spyder TrailGateTM for your Jeep. Installation is fairly simple with the right tools and good mechanical abilities. If you are not confident in your mechanical skills, please seek the help of a professional to perform the installation. Please read through these entire instructions before proceeding with installation.
IMPORTANT: Completely install and remove the TrailGateTM prior to painting or powder coating it. This will allow you to check for fitment or do any clearancing or fitting ahead of time, to reduce the chance of damage to the finish during final installation. Poison Spyder Customs Inc. is not responsible for costs for or damage to paint or powder coat finish under any circumstances, including paint or powder coat of incorrectly shipped or defective parts.
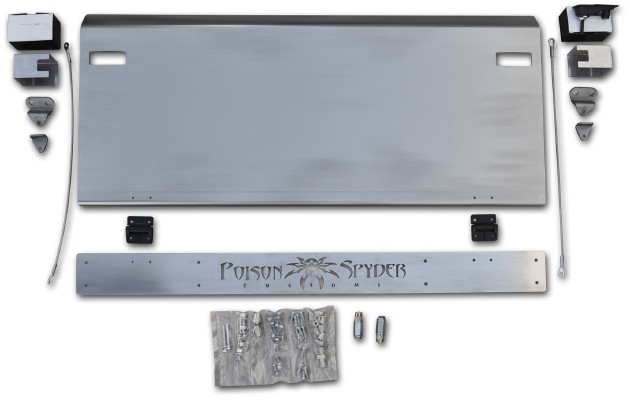
PARTS LIST
Please check your packages immediately upon arrival to ensure that everything listed is included, and to check for damage during shipping. If anything is missing or damaged, call Poison Spyder at (951) 849-5911 as soon as possible.
(1) TrailGateTM Gate Panel
(1) TrailGateTM Tramp StampTM
(1) Latch Cover Left
(1) Latch Cover Right
(2) Tub-Side Cable Bracket
(2) Gate-Side Cable Bracket
(2) Limit cable
(2) Hinge
(2) Lock-latch assembly
(2) Weatherstrip
(1) 1/4-20 nut-sert install tool
(1) 5/16-18 nut-sert install tool
(2) 5/16-18 X 1 SS button head cap screw
(2) 5/16-18 nut-sert
(12) 1/4-20 X 3/4 SS button head cap screw
(8) 1/4-20 nut-sert
(4) 1/4-20 nylon insert lock nut
(4) 1/4 flat washer
(12) 10-24 X 1 SS button head cap screw
(12) 10-24 nylon insert lock nut
(12) #10 flat washer
(2) M5-.8 X 50 hex head cap screw
NOTE: The Nut-sert installation tool provided is simple and inexpensive. It works but it can be tedious to use, especially when installing a large number of nut-serts. We highly recommend purchasing, renting, or borrowing a professional quality nut-sert installation tool, such as the “Marson Giant Thread Setter 325-RN 34604”, available from www.blindrivetsupply.com.
INSTALLATION PROCEDURE
1. Park vehicle on a level surface and set the emergency brake. You will want to wear eye protection beyond this point in time.
2. Remove the spare tire and stock tailgate, if present. Fold back carpet so that it is out of the way, exposing the shetmetal of the Jeep’s body tub, just inside of the tailgate on each side.
3. Remove the OE inside latch mechanism. Retain the two lower bolts, they will be used later.
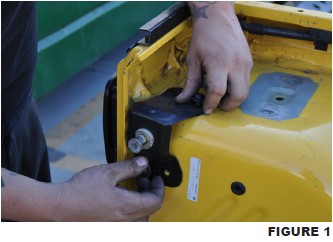
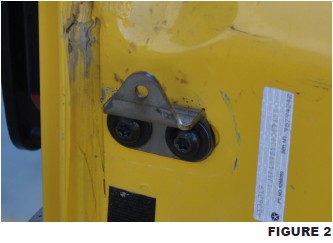
5. Install one of the provided Tub-Side Cable Brackets using the two lower bolt locations and OE hardware from the removal of the latch mechanism in the previous step. Make sure the flange with the single hole is pointed upward, as shown in Figure 2.
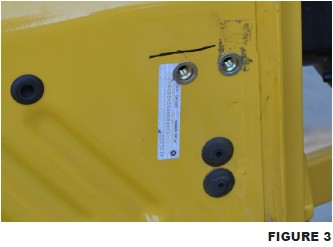
6. The other Tub-Side Cable Bracket will need to be installed on the opposite (passenger side) wall of the Jeep’s interior. There are no existing holes for this, so you will be installing the two supplied 5/16 nut-serts. Use a measuring tape and fine tip felt marker to measure the placement of the two existing bolt locations on the driver side, and mirror them to the passenger side. Measure the distance up from the floor, and in from the edge of the tailgate opening, for both holes. Mark or center-punch the two hole locations.
7. Use the procedure outlined in the Nut-sert Install Tool Instructions to install the two 5/16-18 nut-serts in the locations marked in the previous step. Use a 17/32” bit for the final hole size before installing the nut-serts.
8. Use the provided 5/16-18 SS button head cap screws to attach the remaining Tub- Side Cable Bracket where the nut-serts were installed in the previous step. Coat the threads of the screws with anti-sieze compound before threading them in.
9. Next, the lower portion of the TrailGateTM, also known as the Tramp StampTM, is installed. Begin by holding the Tramp StampTM up against the Jeep’s body tub, on the horizontal surface below the tailgate opening. Visually align it so that it is centered between the edges of the tailgate opening, with the top edge of the Tramp StampTM flush with the bottom of the tailgate opening.
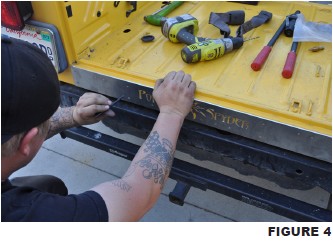
10. Use a center-punch or fine-tip felt marker to mark the two outer-most hole locations at either end of the Tramp StampTM, then set the Tramp StampTM aside.
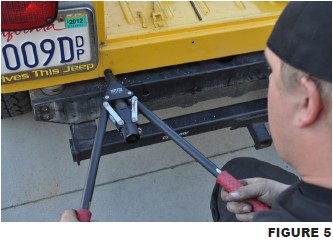
11. Use the procedure outlined in the Nut-sert Install Tool Instructions to install 1/4-20 nut-serts in the four locations marked in the previous step. Be very careful when drilling these first four holes, to make sure the bit doesn’t “walk” from your mark. Use a 25/64” bit for the final hole size before installing the nut-serts. When installing these first four nut-serts, it is very important to try to keep the nut-sert from leaning away from the hole center as you crush the nut-sert into place.
12. Temporarily install the Tramp Stamp using the supplied SS button head cap screws in the four nut-sert locations that were installed in the previous step. Make sure the Tramp StampTM still installs correctly aligned. If one or more of the nut-serts has “walked” off-center during installation, you may need to oblong the hole(s) slightly with a small rat-tail file. Coat the threads of the screws with anti-sieze compound before threading them in.
13. Use a 1/4” drill bit to drill the remaining mounting holes, using the Tramp StampTM as a drill guide. Be sure to also drill the two hinge holes at either side. Remove the Tramp StampTM.
14. In all but the hinge hole locations, drill the new 1/4” holes out to 25/64”, then proceed with installing the 1/4-20 nut-serts into these holes.
15. At the 4 hinge hole locations, drill these holes out to 1/2”. This will provide clearance for the nuts that holds the hinge to the Tramp StampTM.
16. Apply some touch-up paint to the bare metal around the edges of each of the holes just drilled, to provide future protection against rust.
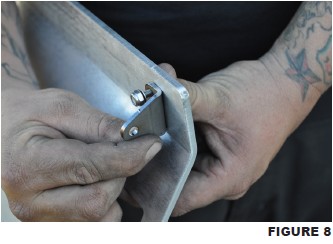
17. Install the two hinges intothe corresponding holes along the top edge of the Tramp StampTM, using the supplied SS button head cap screws and lock nuts.
18. Re-Install the Tramp StampTM, using all of the provided hardware. If one or more of the nut-serts has “walked” off-center during installation, you may need to oblong the hole(s) slightly with a small rat-tail file.
19. Bolt the TrailGateTM to the hinges using the provided hardware. Take care to ensure that the TrailGateTM is properly aligned within the tailgate opening while tightening the hardware. There is a small amount of adjustment that may be made in the hinge bolts, if needed. If further adjustment is needed for proper alignment, oblong the holes slightly with a small rat-taile file.
20. Bolt the two Gate-Side Cable Brackets to the TrailGate using the provided hardware.
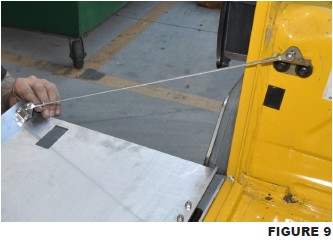
21. Attach the Limit Cable to the Gate-Side Cable Bracket, then to the Tub-Side Cable Bracket, as shown. Do this for both sides.
22. Install the provided weatherstrips to the vertical flanges along either side of the tailgate opening. Make sure the bulb seal is oriented toward the rear, so that the TrailGateTM compresses it as it closes.
23. Installthe provided lock/latch mechanisms into each of the rectangular holes in the TrailGateTM . Use the u-bracket provided in the latch kit to secure the mechanism in place. Use the provided jamb nuts and washers to orient and install the latch as shown in the photo below. Upon closing the TrailGateTM, it is likely that the latch will require some adjustment. Loosen/tighten the jam nuts to move the latch in either direction, until the correct position is found. When installed,

24. Upon closing the TrailGate, it is likely that the latch will require some adjustment. Simple loosen/tighten the jam nuts to move the latch in or out. Adjust the latch so that the outer surface of the TrailGateTM is flush with the Jeep’s tub when closed and latched.
25. Use a grinder or pneumatic cut-off wheel to cut off the excess threads from the end of the latch stud. It will need to be shortened by about 1/4” for the latch to function properly after the latch cover is installed.
26. Install the latch covers. Begin by removing the u-brackets that were installed in a previous step, and replace them with the latch covers using the M5-.8 X 50 hex head cap screws and #10 flat washers provided. Note that the latch covers are not identical, there is a right and left cover. Make sure the rectangular notch for the latch is oriented toward the bottom of the TrailGateTM (when gate is closed).

