 FREE 1 to 3-Day Delivery on Orders $149+ Details

How to Install Poison Spyder Ricochet Rockers - Bare Steel on your Wrangler
Tools Required
- 9/16” socket or end wrench
- 5/8” socket
- 6” socket extension
- Ratchet
- 7/32” hex key or hex socket
- Auto-punch or center punch and hammer
- Drill motor
- 3/8” drill bit
- Torque wrench
- Touch-up paint or clear coat
- Floor jack and extension
Thank you for purchasing Poison Spyder Ricochet Rockers (shown above) or Rocker Knockers for your Jeep CJ, YJ or TJ. You now own the ultimate in rocker panel protection for your Jeep. If you purchased Rocker Knockers with the Slider option, these have already been welded to the Rocker Knockers and install in the same manner, as do the Ricochet Rockers. Installation is fairly simple with the right tools and good mechanical abilities. If you are not confident in your mechanical skills, please seek the help of a professional to perform the installation. Please read through these entire instructions before proceeding with installation.
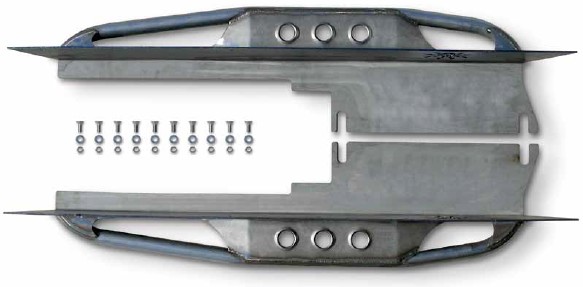
PARTS LIST
(1) Driver side Rocker Knocker
(1) Passenger side Rocker Knocker
(x) 3/8-16 X 1 SS flat head cap screw*
(x) 3/8 flat washer*
(x) 3/8-16 nylon insert lock nut*
*Quanitiy “x” varies by Jeep model:
(10) TJ
(12) CJ-5 & YJ
(14) CJ-7
Before You Begin
• Paint or powdercoat both the inside and outside of the Rocker Knockers. If painting them yourself, take the time to do a thorough job cleaning the Rockers and making sure they are completely free of dirt, grease or oils, solvents or cleaner residue. Sanding or scuffing the surface will also help the primer and paint to adhere. Use a quality etching primer, then paint in your color of choice.
• Park the Jeep on a flat, level surface and set the emergency brake.
• Be sure that the sides and undercarriage of the vehicle, in the areas you will be working, are clean and clear of debris and mud.
• Remove any plastic flares that are bolted to the side of the body (some TJ’s and YJ’s). Remove any existing rocker panel molding (some CJ’s), or any existing OEM rocker panel covers (all Rubicons and Saharas).
• While not required, it is helpful to loosen the lower three bolts that hold the OEM flares in place at the lower end.
INSTALLATION PROCEDURE
1. Loosen all of the body mounts on the driver side of the Jeep.
2. Raise the driver side of the body with a floor jack and extension. Be sure to position the jack pad at or near a body support to avoid damage to the body tub.
3. Remove the body mount bushings that are in Rocker Knocker mounting slot locations.
4. Measuring from the top, cut 3/16” off the top of the body bushing to allow for Rocker Knocker clearance.
5. Re-install the body bushings (and body lift spacers, if used), and all hardware.
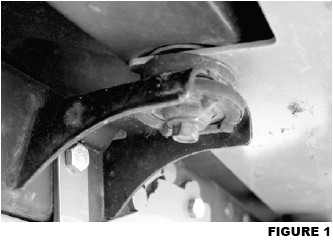
6. Slide Rocker Knocker into position, with the body mount bolts passing through the slots in the Rocker Knocker. The Rocker Knocker should be above the body mount bushing, as shown in figure 1. .
Make sure the Rocker Knocker is pressed firmly against the side of the Jeep, then gently lower the driver side body back down onto the body mounts.
7. Check all mounting positions for proper placement. Step back and observe the frontto- back position of the Rocker Knocker, and make any necessary adjustments. With the Rocker Knocker correctly positioned, clamp it firmly to the Jeep’s body with C-clamps, visegrip clamps or similar (at least one clamp at each end).
8. Use a fine-tip felt marker to mark all of the 3/8” mounting holes along the top side of the Rocker Knocker.
9. Remove the clamps, use the jack to carefully lift the driver side of the body once again, remove the Rocker Knocker and set it aside.
10. Use an auto-punch or center-punch and hammer to center-punch the drill marks for each of the hole locations marked in step 9.
11. Check behind the Jeep’s rocker panels for wiring, fuel lines or any other obstructions where the holes are to be drilled. Temporarily hold away or remove any such obstructions.
12. Drill each of the marked hole locations with a sharp 3/8” drill bit. De-burr the edges of the holes with a file, sander or burr knife.
13. On CJ’s and 2003 TJ/LJ, an access hole will need to be drilled from the inside of the tub to access the area where the rear-most nut will be installed. Use a 1” hole saw. After installation is complete, this hole can be plugged with a rubber CJ body plug.
14. Use touch-up paint or clear coat to coat the bare metal edges of the drilled holes.
15. Re-position the Rocker Knocker into place. Reinstall the body mount pieces in the order from which they were removed. Lightly tighten the body mount bolts.
16. Install a stainless steel flat head cap screw at each of the countersunk holes in the Rocker Knocker. Secure with a flat washer and nylon insert lock nut on the back side of the Jeep body tub. Tighten all hardware to specs. Re-install flares (if applicable)
17. Repeat process for passenger side.

