 FREE 1 to 3-Day Delivery on Orders $149+ Details

How to Install Poison Spyder Heavy Duty Header Bar Kit on your Wrangler
Tools Required
- 11/16” wrench
- 5/8” socket, ratchet and torque wrench
- T-50 “Tamper-Proof” Torx driver bit (available from Poison Spyder Customs)

Shop Parts in this Guide
APPLICATIONS
These installation instructions apply to the following Poison Spyder products:
14-18-030 TJ Heavy Duty Header Bar Kit
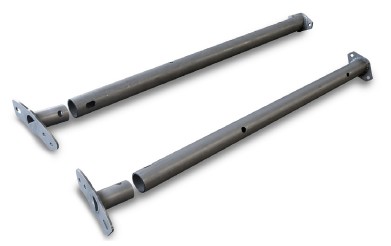
PARTS LIST
Please check your packages immediately upon arrival to ensure that everything listed is included, and to check for damage during shipping. If anything is missing or damaged, call Poison Spyder at (951) 849- 5911 as soon as possible.
(1) Right Heavy Duty Header Bar (2-piece)
(1) Left Heavy Duty Header Bar (2-piece)
(2) 7/16-20 X 2-1/2 Gr8 Hex Head Cap Screw
(2) 7/16-20 Nylon Insert Lock Nut
(4) 7/16 Flat Washer
BEFORE YOU BEGIN
You will want to either powder coat or paint the components prior to install. If painting yourself, careful preparation will make a big difference in the quality and longevity of your paint job, even when using “rattle can” aerosol paints. Begin by thoroughly cleaning the components with solvent or de-greaser, then make sure all residue is removed. Even if you use cheap paint, try to use a good quality primer. “Etching” primers are best to use on bare, unpainted metal. Allow it to properly dry before painting, and between paint coats.
If powder-coating, mask off the tube area of the short pieces. These are a slip-fit into the long tube sections, and the thickness of the powder coat may hinder assembly of the pieces.
INSTALLATION PROCEDURE
1. Park vehicle on a level surface and set the emergency brake. You will want to wear eye protection beyond this point.
2. Remove the top, door surrounds and any other obstructions to the header bars.
3. Remove the factory header bars. You may need a T-50 “Tamper-Proof” Torx bit for the rearward bolts that attach the header bars to the factory roll bar. Keep the removed Torx bolts as they will be re-used.
4. Install the Heavy Duty Header Bars using the factory Torx bolts. Note that the Heavy Duty Header Bars are specific for right and left sides. Orient them with the short piece attached to the roll bar, and the long piece attached to the windshield frame. Make sure the through-holes in the short piece are aligned with the slots in the long piece, then tighten the Torx bolts. Note that there are two sets of bolt holes on the plate, to fit the two different model year ranges. The unused bolt holes will be left empty.
5. Insert a 7/16-20 X 2-1/2 Gr8 hex head cap screw with 7/16 flat washer through the slot and hole where the two tubes overlap. Install a 7/16 flat washer and 7/16-20 Grade lock nut onto the end of the cap screw. Tighten the nut then torque to 40 ft.-lbs. Repeat for other side.
6. Re-install the factory door surrounds, top, and any other components that were removed prior to installation. The Poison Spyder Heavy Duty Header Bars come with properly located mounting holes for re-installation of the door surrounds.

