 FREE 1 to 3-Day Delivery on Orders $149+ Details

How to Install Poison Spyder Front Solid Inner Fenders on your Wrangler
Installation Time
1 hours
Tools Required
- Mechanic's tool set
- Drill motor with #2 Phillips driver bit
- 3/8", 5/16" & 17/32" drill bits
- 3/4" hole saw, step-drill or knock-out punch
- Professional nut-sert installation tool (optional)

Shop Parts in this Guide
APPLICATIONS
These installation instructions apply to the following Poison Spyder products:
PARTS LIST
Please check your packages immediately upon arrival to ensure that everything listed is included, and to check for damage during shipping. If anything is missing or damaged, call Poison Spyder at (951) 849-5911 as soon as possible. The ID numbers for each item correspond to the diagram on the following page.
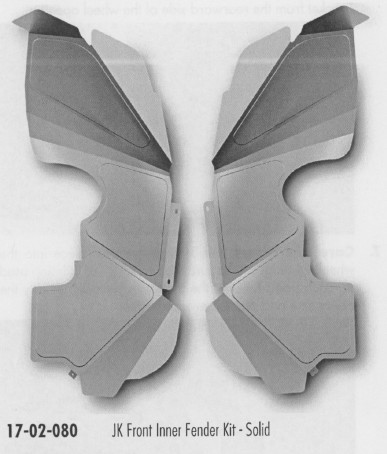
(1) JK Front Inner Fender Left
PN: 17-02-080-L
(1) JK Front Inner Fender Right
PN: 17-02-080-R
(1) JK Front Inner Fender Hardware Kit
PN: HWKIT-17-02-080 includes:
(2) #8.18 X 1/2 washer head self-tapping sheet metal screw
(4) 5/16" SAE High Strength Flat Washer
(4) 5/16-18 Gr8 Serrated Flange Nut(2) 5/16.18 Nut-Sert
(1) 5/16" Nut-Seri Install Tool - includes:
(1) 5/16-18 X 2 Gr5 Hex Head Cap Screw
(2) 5/16" SAE Hardened Flat Washer
(1) 3/8-16 X 1.1/8 Coupling Nut
(1) 5/16-18 Nut-Sert
INSTALLATION NOTES
The following procedures for Installation of the Poison Spyder JK Front Inner Fenders assumes that Poison Spyder Crusher Flares have already been installed, or are being installed concurrently with the Inner Fenders. If the Crusher Flares were installed by someone else or if it has been a long time since they were installed, it might be helpful to take another look at the Crusher Flare installation instructions to re-familiarize yourself with certain aspects of that installation process and the components used. That knowledge may be helpful in installing these Inner Fenders.
If installing the Inner Fenders with the stock plastic flares or with other manufacturers' aftermarket flares, some creative problem solving may be necessary on the part of the installer, as Poison Spyder can not foresee all potential problems associated with installing these parts with other manufacturer's products.
INSTALL PROCEDURE
1. Park vehicle on a level surface and set the emergency brake. You will want to wear eye protection beyond this point.
2. If you still have the trimmed stock plastic inner fenders from a prior Crusher Flare installation, remove them.
3. Apply masking tape to the Jeep's fender, around where the flare attaches. This will protect the Jeep's paint finish in case the flare or the inner fender components are accidentally bumped against it during the following installation procedures.
4. Remove the LED marker light, if it was installed as part of the prior Crusher Flare installation.
5. Unbolt and remove the Crusher Flare from the Jeep.
6. Remove the Crusher Flare Lower Sub-Frame Bracket from the rearward side of the wheel opening.
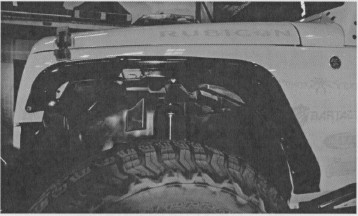
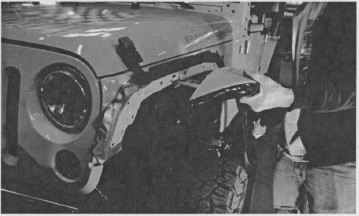
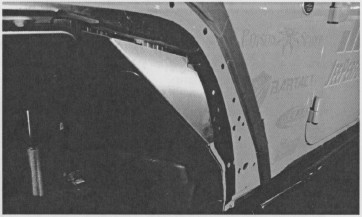
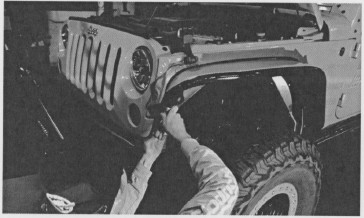
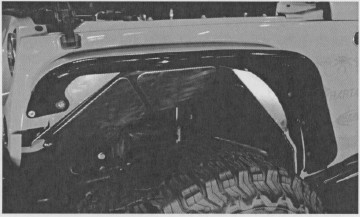
7. Carefully insert the Inner Fender piece into the wheel opening. Make sure the correct piece is being used on each side. Refer to the photos to correctly identify the driver side and passenger side pieces.
8. Hold the Inner Fender in place while re-installing the OE metric hex head bolts that were removed at the top of the wheel opening. They will pass through the two holes at the top of the Inner Fender, through the Crusher Flare Upper Sub-Frame Bracket, and into the threaded holes in the Jeep's sub-frame.
Make sure the rearward flange of the Inner Fender piece aligns correctly into the pocket where the Crusher Flare Lower Sub-Frame Bracket was removed, then tighten the two OE metric hex head bolts at the top of the Inner Fender.
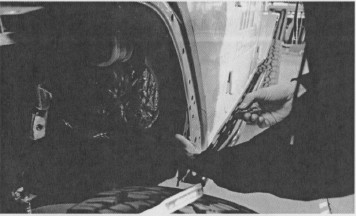
9. Re-install the Crusher Flare Lower Sub-Frame Bracket using ONE of the bolts that were removed, to attach it to the outer sheet metal of the Jeep's fender to hold it into place. Make sure the other hole in the bracket is aligned with the corresponding hole in the Jeep's fender.
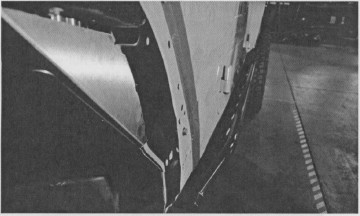
10. Use a 3/8" bit to drill through the second (un-bolted) hole in the Lower Sub-Frame Bracket, using it as a drill guide to drill the corresponding hole through the Inner Fender.
11. Reinstall the two bolts (inner and outer) on to the Crusher Flare Lower Sub-Frame Bracket at the hole location that was drilled in the previous step. IMPORTANT: On the INNER bolt, use the supplied 5/16-18 serrated flange nut on the inside of the Jeep's tub, rather than the nylon insert lock nuts that originally came with the Crusher Flares. The flange nuts will grip and be easier to tighten without keeping a wrench on the nut in a hard-to-reach location.
12. Remove the bolt that was first temporarily installed into the Lower Sub-Frame Bracket, and drill through the Inner Fender at that location using a 3/8" bit, similarly as in previous steps for the other hole location.
Once this hole has been drilled, remove the outer bolt from the other hole location, install the inner bolt at the new location using another of the supplied serrated flange nuts, leaving the Lower Sub-Frame Bracket installed with only the two inner bolts in place (the two bolts which pinch the Inner Fender between the bracket and the Jeep's inner tub.
FAQ: Why do I have to drill these holes? Why aren't they already laser-cut into the panel at the Poison Spyder factory?
ANSWER: The JK Inner Fender is designed to fit all revisions of Poison Spyder JK Crusher Flares. The location of the Lower Sub-Frame Bracket has changed slightly through the several revisions of this product over the years, making it impossible to leave a hole that accommodates all variations. The solution is to leave it blank and let the installer place the hole where it needed to be in order to fit whichever revision Crusher Flare is being used.
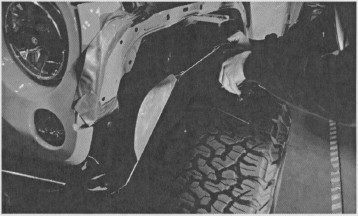
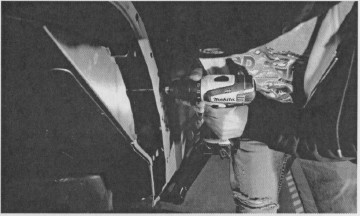
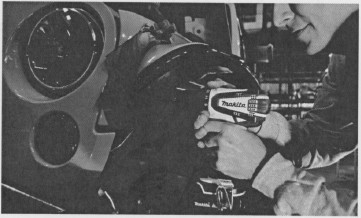
13. One of the flare mounting bolts is in a location that will be impossible to access the nut on the back side of the panel after the Inner Fenders have been installed. A 5/16-18 nut-sert will need to be installed in this difficult bolt hole location, which is directly below the hood latch on either side of the Jeep. Drill this hole out to 17/32" in preparation for installing one of the supplied 5/16-18 nut-serts.
NOTE: It is HIGHLY RECOMMENDED to invest in a professional nut-sert installation tool, such as the one sold by Poison Spyder (p/n: 70-TS-325-RN) or elsewhere.
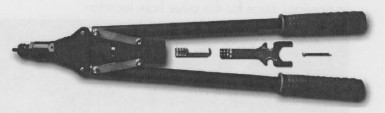
The professional tool will make the installation of nut-serts MUCH easier than using the free tool included in this kit, and it will come in handy with future product installations as well. If using a professional nut-sert installation tool, follow the directions that came with the tool and skip the next three steps of these instructions. The simple "tool" included with this product is admittedly frustrating to use, however it will work for those with patience who would like to save the cost of the professional tool. If using the simple tool included with this product, continue through the following steps.
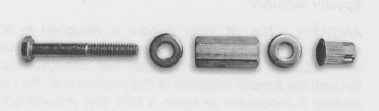
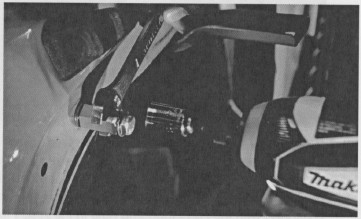
14. The provided nut-sert install tool consists of a bolt, two washers and a coupler (long) nut. Assemble these items as shown (bolt—washer—coupler nut—washer — nut-sert). Insert the nut-sert end of the assembly into the hole you drilled.
15. Use an open end wrench to hold the coupler nut stationary while turning the head of the bolt clockwise with a ratchet (or small impact wrench) and socket. As you turn the ratchet, the bolt will draw the far end of the nut-sert toward the inside of the sheet metal, gripping it with the knurled outside edge of the nut-sert as it deforms. Continue to turn the ratchet until the nut-sert is fully seated. DO NOT OVER-TIGHTEN as you can damage the nut-sert, or cause it to lose its grip.
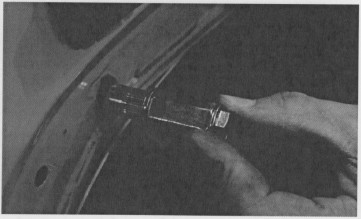
16. Once the nut-sert has seated correctly, loosen the bolt then remove it and the rest of the tool from the nut-sert. Install a new nut-sert onto the tool, oriented the same as the last, and set it aside until your next nut-sert installation. Inspect the nut-sert to make sure it is properly seated and that the surrounding sheet metal isn't excessively deformed. Note that some deformation of the sheet metal is normal, and that it will be covered by the part after installation.
If you "spin" a nut-sert: That is, if it loses its grip due to over-tightening or improper installation, the quickest, easiest fix is to use a MIG welder to place a small tack weld at the edge of the nut-sert flange. Before applying the tack weld, sand or grind the paint from a very small area of the sheet metal where the tack weld will be. Then insert a screw into the nut-sert to protect the threads from weld splatter. Only apply a very small tack or two, as you do not want to heat up and deform the nut-sert or the sheet metal. Then grind the tack(s) smooth and apply touch-up paint to prevent rust.
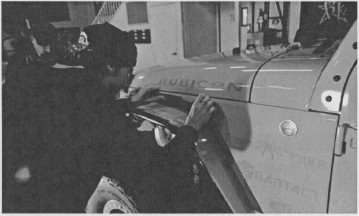
17. Re-hang the Crusher Flare, installing the forward-most bolt and the lower bolt at the Lower Sub-Frame Bracket (at the rear of the flare). Make sure all of the flare's mounting bolts align properly into their holes.

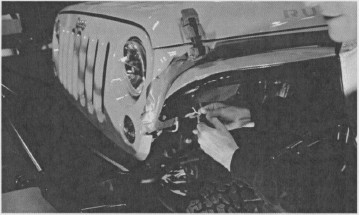
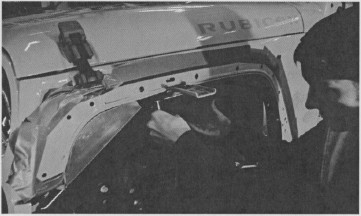
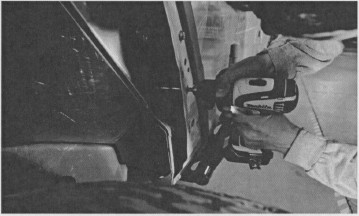
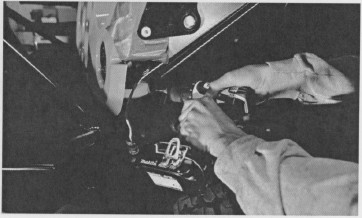
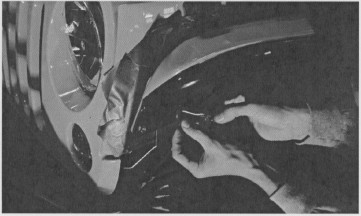
18. At the front-lower corner of the Inner Fender, find the screw-tab which should be resting against the Jeep's body tub sheet metal just above the forward body mount.
It may need to be pushed slightly into place.
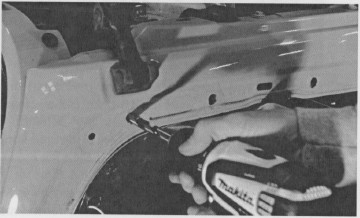
19. Use the supplied self-tapping sheet metal screw to secure the Inner Fender to the body tub at this screw-tab location. The following photo depicts drilling a pilot hole
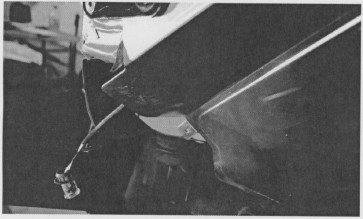
20. Use a rotor-broach, hole-saw or step-bit to drill out the 3/4" hole at the forward LED lamp location. If using a rotor-broach or hole-saw, it may be possible to use the hole in the Crusher Flare as the drill guide. If using a step-bit it will probably be necessary to temporarily remove the Crusher Flare after marking the hole location, but before drilling the hole.
FAQ: Why do I have to drill this hole? Why isn't it already laser-cut into the panel at the Poison Spyder factory?
ANSWER: The JK Inner Fender is designed to fit all revisions of Poison Spyder JK Crusher Flares. The location of the LED marker lamp hole has changed slightly through the several revisions of this product over the years, making it impossible to leave a hole that accommodates all variations. The solution is to leave it blank and let the installer place the hole where it needed to be in order to fit whichever revision Crusher Flare is being used.
21. Re-install the 3/4" LED marker lamp into the designated hole in the Crusher Flare, taking advantage of the clearance afforded by the new corresponding hole in the Inner Fender. It will be necessary to loosen/remove several of the bolts holding the Crusher Flare and Inner Fender to the Jeep, so they may be pulled away slightly to gain access behind the panel to re-attach the wiring and install the lamp.
22. Re-install any removed fasteners, then go back over every bolt on the Crusher Flare and the JK Inner Fenders to ensure that each is tight.
23. Remove the protective masking tape that was applied at the beginning of the installation.
24. Repeat the procedure to install the Inner Fender on the opposite side of the Jeep.
Congratulations, you have completed the installation of your Poison Spyder JK Front Inner Fenders!

