FREE 1 to 3-Day Delivery on Orders $149+ Details

How to Install Poison Spyder 4 in. 6-LED Flush Mount Tail Light (07-18 Wrangler JK) on your Jeep Wrangler

Shop Parts in this Guide

LED TAIL LIGHT INSTALLATION
Poison Spyder Customs 4” LED taillights are designed to work with Poison Spyder Crusher Corners that were specifically made for aftermarket LED taillights. They also work with other manufacturer’s corner protectors, or on Jeeps without any corner protectors. In all cases, a 4-1/2” round hole must be cut into corner protector or sheet metal to install the LED (plus screw holes for the flange-mount style LED). These instructions do not cover the procedure for creating this mounting hole, it is assumed that it is already present or you purchased Poison Spyder Crusher Corners already made for LED taillights.
1. Pull the factory wiring harness taillight plug through the 4” LED hole to have room to work.
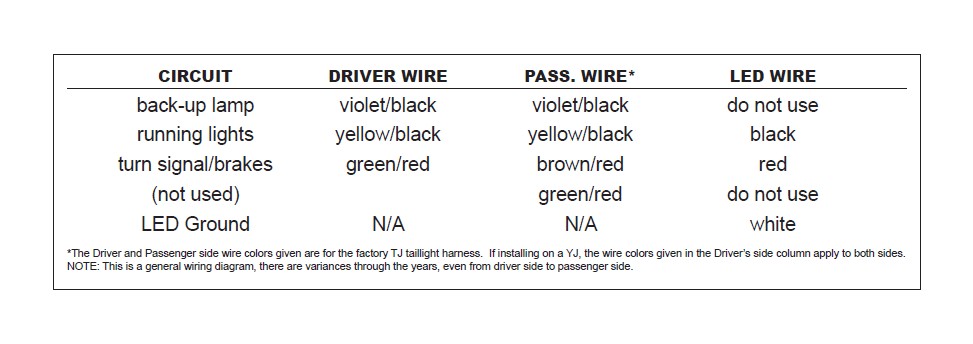
2. Cut the factory taillight plug from the stock taillight pigtail (between the plug and the taillight). You will re-use the taillight side of this plug. Leave as much wire as possible.
3. Use the information in Table 1 to make the correct connections between the cut wires from the factory taillight plug, and the black and red wires in the supplied LED pigtail harness. Whether you solder or crimp-connect, we recommend using heat-shrink tubing on all connections. Once the necessary electrical connections have been made, plug the OEM pigtail plug (now with the LED pigtail attached) back into plug in the Jeep’s chassis harness. Do not plug the opposite end of the pigtail into the LED lamp fixture at this time.
4. Tape-off unused wires in the stock harness. These will be the violet/black wire on both sides (unless you are wiring your own, separate back-up lights) and the green/red wire on the passenger side, which is unused. Stow these wires inside the wire loom or zip-tie them securely to the harness.
5. Properly ground the white wire in the LED pigtail harness to your Jeep’s body. The push-in style LED’s come with a ring terminal already connected to the white wire. With the flange-mount style LED, you will need to add a ring terminal to the white ground wire. Use a sheet metal screw or self-tapping (“tek”) screw to secure the ground. Be sure not to drill through any sheet metal where the back side is exposed or visible. Sand or grind the area where the terminal will contact the sheet metal to ensure a positive contact.
6. Plug the LED lamp fixture into the wiring harness pigtail, then check for operation by switching on turn signals, running lights, brakes. If you have not installed LED-specific flashers yet, the flash speed may be incorrect when checking turn signals at this point. If any light is not working properly, use a test light or meter to check continuity at each of the connections you made, and re-do as needed.
7. Secure any slack in the wiring harness with zip ties, split-loom, etc.
8. Install the LED light by either slipping it into the rubber grommet and pushing it into the hole (push-in style) or by attaching with screws (flange-mount style).
INSTALLATION NOTES:
• On CJ8, additional inner wheel well removal is needed for flush-mount taillight install
• On ’03 and newer TJ’s, the passenger side taillight may need to be inverted to clear factory emissions equipment.
LED FLASHER INSTALLATION
LED’s require a special flasher module to provide the correct current resistance for the LED’s as opposed to the factory incandescent bulbs. If you install LED’s without the correct flasher, you will notice that your turn signals and flashers will blink at a faster rate.
The correct LED flasher for each year model Jeep will solve this problem, and is available separately from Poison Spyder Customs. Each LED flasher is an easy plug-in replacement for the factory flasher.
Locations for the stock flashers are as follows:
1976-96 CJ/YJ: Under dash
1997-2000 TJ: Underneath and to the right of the steering column, behind dash cover(s).
2001-06 TJ/LJ: On top of steering column, under steering column cover.
1. Remove any dash or column covers (TJ/LJ)
2. Unplug the flasher from the harness.
3. Install Poison Spyder LED Flasher into the stock flasher socket.
4. Check to ensure that all LED’s are working properly.
5. Replace any dash or column cover(s) that were removed in step 1.