 FREE 1 to 3-Day Delivery on Orders $149+ Details

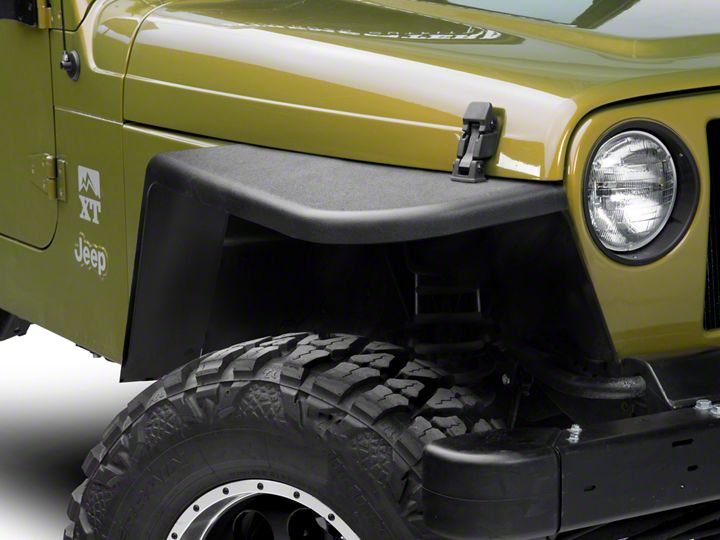
How to Install MCE Gen-II OE-Style Flexible Flat Fenders - 3 in. (97-06 Wrangler TJ) on your Jeep Wrangler
Installation Time
3 hours
Tools Required
- Cutting device for sheet metal (reciprocating saw, cut-off wheel, etc.)
- Drill
- Center punch
- 1/4” drill bit
- 13MM wrench or socket (for OE fender-grille bolts)
- 15MM wrench or deep socket (for hood latch)
- 3/8” wrench or socket (for Nylock nuts)
- 1/8” Hex wrench (for cap screw)
- Ink marker (for marking cut lines)
- 7/16” wrench (for OE flair)
- Philips driver for drill
Shop Parts in this Guide
*Thank you for your purchase of our Generation II Fenders! We hope that you will love the new look and function of your Jeep with the addition of our product. It is our desire as well that your installation go as smoothly and quickly as possible. Please read through these instructions entirely, and be sure to have the proper tools handy. Also remember, if this is the first time modifying your Jeep, the first cut is the hardest.
If you have any questions, please visit our website at www.flexiblefenders.com, or reach us by phone (425) 260-8781 or e-mail [email protected]
Safety First!: When cutting sheet metal, make sure to wear eye protection and gloves at the very minimum of Personal Protection Equipment (PPE). Cut metal can be sharp and rough, and be aware that sheet metal can have a small amount of “spring” to it at the end of the cut. If this is your first time cutting sheet metal, start at a slow pace that you are comfortable with. However, do not fear- with the above PPE and going at your own pace, even your first cuts will look professional.
1. REMOVE THE OE TRIM, FLAIRS, AND HOOD LATCHES
Remove all remnants of the OE plastic flair/marker lights, hood latches, and rubber hood stops. The rubber hood stops will not be reused. The nut-serts on the sides of the Jeep can also be removed if desired. We have had good luck with the removal of the nut-serts by grinding the heads off, and then using a hammer and punch to knock the nut-serts inward, or drill them out.
2. REMOVE THE 3 BOLTS HOLDING THE OE FENDER TO GRILLE
Remove the 3 forward bolts that vertically run down the sides of the grille.
3. MARK YOUR TRIM LINE
Using a pair of scissors, carefully cut out the paper template on the outside edge of the lines (the lines should still be visible on the template once it is cut out). Once the template is cut out, place it on top of the OE Jeep fender so that the hood latch holes line up. The solid line should be touching, over very close to touching, the ridge of sheet metal that separates the inner and out fender. A few pieces of tape will aid in holding the template in place while tracing. Trace along the dotted line.
At the rear of the template, continue drawing the line down to meet the back edge of the wheel well, ending the line at the point where the back edge of the wheel well starts to curve towards the front of the Jeep. Refer to Fig. 1 and note the drawn line to help explain.
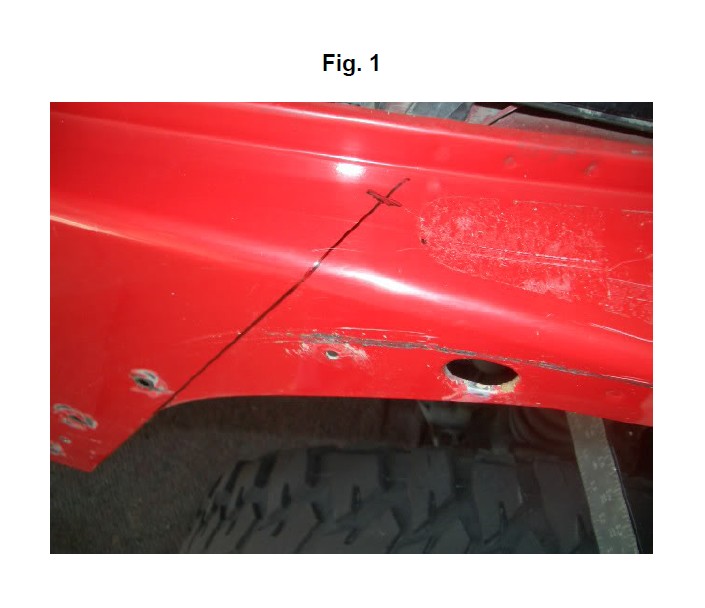
Also, refer to Fig. 2 for an example of how the cut needs to be made.

4. CUT ALONG YOUR LINES
Using a reciprocating saw, cut-off wheel, or any cutting tool of your choice, cut along the lines which you have just drawn. Once completed, we recommend filing any sharp edges and applying primer paint to the exposed metal surfaces. This prevents rust and makes the job more professional. Be conservative with your cutting. Remember, you can always trim more if needed.
5. INSTALL THE RUBBER GROMMET AND SPACER
In the large hole towards the bottom of the MCE fender, push the rubber grommet in place. Once the grommet is in place, push the spacer into the hole so that it is flush on the outer surface.
6. MARK AND DRILL HOLE FOR LOWER BRACKET AND FASTENERS
Install the angle bracket onto the MCE fender by running the 1” button head fastener through the grommet/spacer, then slotted hole on the bracket, and use a washer and nut. Tighten just so there is no more slop, and make sure the side of the bracket which will attach to the Jeep is flush with the edge of the fender. Place the MCE fender onto the OE fender and install the hood latch snugly. Make sure the MCE fender is sitting on the Jeep properly (push inward if needed), then with a pen mark where the hole needs to be drilled. Remove the MCE fender for drilling the hole. However, before removing the fender, mark the rest of the holes. With the fender then removed, center punch the holes and drill to ¼” diameter. Install the angle bracket to the body with a ¾” button head bolt.
7. INSTALL GRILLE BRACKET
Place MCE fender back on OE fender, then:
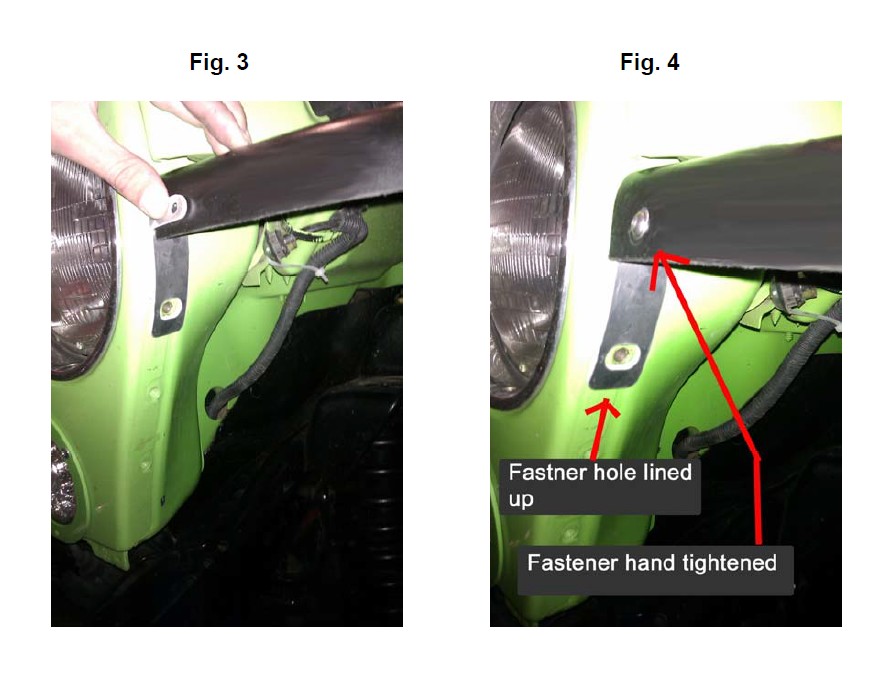
Refer to Fig. 3: hold grille bracket so that the large slotted hole at the bottom is centered up and down over the bolt hole on the side of the grille, and the “wing” of the bracket extends over the front surface of the fender. Next, make sure the “wing” of the bracket falls on the center of the flat surface of the fender (between bottom of the top radius and bottom edge of fender). Slight downward pressure on the MCE fender may be required, such as in Fig. 3. Mark the center of the slotted hole where it falls on the surface of the MCE fender. Remove the bracket and drill the MCE fender with a ¼” drill bit. (Center punch the hole for accuracy!)
Next, refer to Fig. 4: attach the grille bracket to the inside of the front surface of the MCE fender using a ¾” long button head fastener, and use the wing nut to fasten by hand.
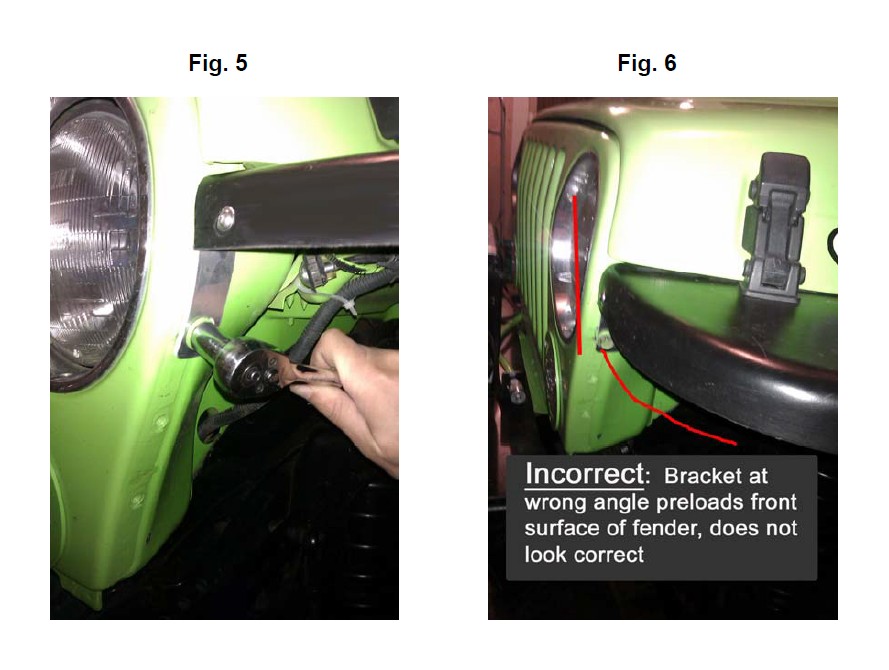
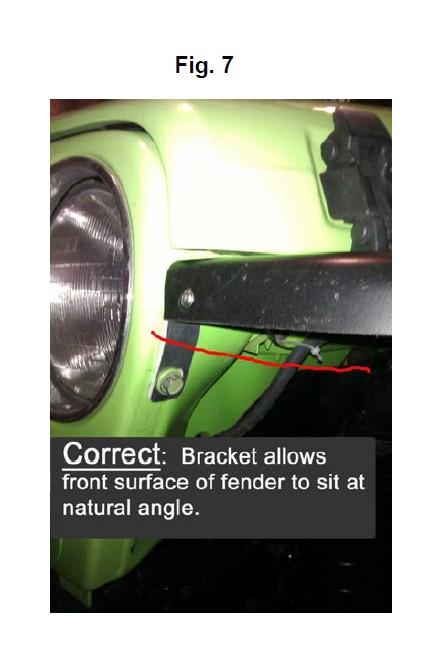
Next, refer to Fig 4, 5, 6 and 7: with the grille bracket attached to the fender, line it up with the hole on the side of the grille (downward pressure may be required again). Install the OE 13mm bolt, making sure to use caution when tightening that the grille bracket allows the front surface of the fender to fall where it naturally wants to. The grill bracket may hold slight downward pressure on the MCE fender, however, it should not preload the surface in any other way. Doing so will cause the fender to not look right. From the side, look down the front of the fender and there should not be any visual warpage due to the bracket preloading the front surface. Due to tolerances of different Jeeps, the grille bracket is aluminum and the “wing” can be easily modified with channel locks/hammer/vice in order to conform to the MCE fender properly, if need be. A few minutes of extra time here if need be will ensure a proper looking and functioning fender.
8. Install Flare Backing Strip
This plastic strip goes on the side of the OE fender, and up against the inside of the MCE flare where it meets the body behind the tire. With the MCE fender sitting on the OE fender, place the backing strip so that it touches the inside of the flare, and slide it down the side of the Jeep until it makes contact with the MCE angle bracket. Mark the location of the backing strip, and remove the MCE fender one last time. With the MCE fender out of the way and the backing strip held in place with your marks, drive in 3 each of the self tapping screws, evenly spaced over the strip.
9. INSTALL FENDER
Place the MCE fender back on the OE fender and install the fasteners and hood latch. The longer countersunk fasteners go in the area where the OE fender has a 2nd layer of sheet metal. We recommend that the fasteners are not tightened fully until all of them are installed, in order to aid in everything lining up. The grille bracket bolts may utilize the wing nuts in order to be quickly removed on the trail for full fender flexibility. If the supplied nylock nuts are used, only tighten to just barely snug.
Move to the next side and install in the same manner.
Congratulations, you are done!

