Talk to a Wrangler Sales Tech
1-877-870-8556
M-F 8:30A-11P, Sat-Sun 8:30A-9P
Logo Image
$20K Sweeps! 10 Chances to Win! Enter Daily >

Quake LED Tempest 9-Inch HD Headlights; Black Housing; Clear Lens (18-24 Jeep Wrangler JL)

Item J133386-JL
Verify parts fit and get product recommendations.
Wrangler Sales Techs: Connect Now M-F 8:30A-11P, Sat-Sun 8:30A-9P
$0.00
Our Price

$659.98 (pair)

FREE Shipping Market Price $758.98 You Save 13% ($99.00) Up to 10% off for Military & First Responders! See Details

Will this fit your Vehicle?

Select a different vehicle Help?
Update or Change Vehicle
Ship to: Ashburn - 20149
Sorry, please enter a valid US or CA postal code
We're sorry, zip can't be updated at this time.
Recommended Install Shops
How It Works
Install Shops are available near Ashburn - 20149

Add Local Shop Installation

Total cost of service $174.99
    Create a list
    Add to New List

    Saved - View your saved items

    We're sorry. We couldn't save this product at this time.

    or use

      Product Videos

      Hey guys, today we're checking out the 9 inch HD Tempest Halo LED Headlights fitting all 2018 and newer JL Wranglers. So, if you're looking for a bump in your lighting performance while also getting a stylish headlight for the front end of your Wrangler, this option is going to be a great choice to take a look into. So, that lighting performance is going to be a big step up from your factory setup with LED projectors, as well as a halo integrated into the headlight. Now, those are going to help you out with better visibility on dark backroads as well as dark trails, and they're also going to add a very modernized look with the bright, white color temperature. Now, the halo is going to act as a daytime running light, but what I really like about this choice in particular is the fact that this is going to integrate HD RGB technology. So you will be able to change the color of the halo to whatever color you'd like via your phone and via Bluetooth. Now, that's going to set you apart from really the rest of the crowd that doesn't have these headlights and add a custom look to the front end of your Jeep.Speaking of that look, this is going to be a big bump up in up in styling with the black housing and the riveted accenting, giving you a very sleek and even aggressive look to the front end of your Jeep. Not to mention, these are going to be a lot more durable than your factory setup. Perfect for somebody who's taking their Jeep out on the trails and wants a headlight to hold up to those trail rides.With all that being said, these are going to be roughly $600, putting these at a very average price point for a set of high quality headlights. Now these are going to bring a lot more to the table than some other less expensive options with the LED projector technology, the halo, and even the RGB technology. Some other choices will not integrate a halo at all or may not have the color function that this does. Now, in my personal opinion, I think if you're looking for all those bells and whistles, you're looking for all that custom styling and some really good lighting performance, then this is going to be right up your alley.So, install's going to be a light two out of three wrenches on the difficulty meter and that's just because we have to do some simple wiring. However, most of this install is plug and play. And you'll just need a couple of basic hand tools to get the job done. So speaking of that install, let's jump into that now.The tools that I used for my install were a trim removal tool, an impact wrench, 10 millimeter socket, a pair of wire cutter, strippers, and crimpers, and a flat head screwdriver.Our first step to this install is to take off our grille. So we're gonna remove the six pop clips that are holding on the grille up at the top. I'm gonna be using a flat head screwdriver but you can also use a trim removal tool. After all the clips are taken out, what we can do is lift up the top of our grille and unhook it from the body of our Jeep and then just pull back. It's only held in by a couple of clips. And then we can fully remove our grille.Next, we can remove our headlight by removing the three 10 millimeter bolts surrounding our headlight housing. I'm gonna be using a 10 millimeter socket in order to do so. After the headlight is disconnected and out, what we can do next is disconnect the wiring harness. We're gonna press down on that tab and pull back.Before we can mount up our headlight, we do have to lay out our wiring harness to make sure everything is going to the correct place, but I wanted to give you guys a brief overview of what's going on here because it does look like a mess right now. So, down at the bottom, we have two connectors. These are going to go to either side and connect to our turn signal wiring harness. This is going to activate the turn signal and the halo in our headlight. Moving on up the wiring, you will have a positive as well as a negative connector that we're going to attach to the battery. And then we have our main control box. This is going to basically control all the functions that you'll see in the headlights in just a little bit. Now moving back, we have two main wiring harnesses. These are gonna be for the driver and the passenger side headlight. These are going to plug in the back along with the factory style connector, and they also have fog light wiring harnesses on them if you'd like to add those to the set at a later date. These are compatible with those. So, right now we can go ahead and spool out the wire and lay it where it needs to go.So I'm gonna take these three wires, we won't be using our white wires, so we can tie that out of the way, but these are the wires that are going to connect to our battery and need a power source. The power wire, or the red wire, that is going to also have an in-line fuse in there, which I personally do like to see out of wiring harnesses. So I'm just going to put that on the side right now, we'll get to that in just a minute. Then we have our yellow as well as our blue wire. Our yellow is gonna be our driver side and our blue is gonna be our passenger side. So what we can do is just kind of route this to the other side. We're gonna hook up our passenger side first. So we can drop our connector down through behind the battery tray. Our wiring harness for our turn signal is down there. We can access that through the bottom through our inner fender liner. What I'm gonna do is just pass this down. You can even disconnect this. This is just a simple spade connector. You don't want to pass through the whole harness. And then once that is down through, we can head underneath and connect our connector.So, just to give you guys a better look at what's going on here, I did remove the inner fender liner. You don't necessarily have to do that. You can just pull it back and look at it from the inside of liner, but we have the wiring harness for our fender light right underneath the inner fender liner on the body there. What I'm gonna do is take a trim removal tool. There is a little clip that is holding it on. So I'm just going to pop that off, and then we can disconnect this harness. So once that's disconnected, we can grab our split wiring harness and connect the male and female connectors in between. Once those are in place, we can take that wire and attach that spade connector. And then we can head to the battery to wire everything up.What I'm gonna do next is attach a connector to each of these ends, both positive and negative, and then we can attach them to our battery terminals. So, I just have a standard connector here. You wanna make sure that the wire is stripped. Then we can use the crimping tool. Crimp that down. I would recommend to heat shrink these. Do the same thing for the negative. And then we can attach them to the battery. We can start with our positive. I'm just going to take a 12 millimeter socket and remove our accessory nut. Attach our connector. Tighten that down with the 12 millimeter socket. And then do the same thing with the negative, except for we are gonna be using a 10 millimeter socket.Before we mount up our new headlight and plug it in, I did wanna show you guys how I ran the wires just because it can get a little bit confusing making sure they are all cleaned up and in the right place considering all these lights and harnesses are pretty far away from each other. So, what I actually did was mounted the control box, or we will mount the control box in the center. This is going to allow all the leads from the driver side and passenger side to reach with also having our battery terminals reach as well. I ran it behind here and then we actually are just going to mount it up underneath our upper splash guard there, make sure that everything is cleaned up and looking nice but also making sure that everything is functional.So what we can do now is actually plug in our headlight. Again, we are gonna have that second lead. That is going to be if you want to mount up a fog light. Right now we are not doing that just because this package does not include that. So we're gonna put that aside. However, what we can do is plug in the control box wiring harness to our headlight as well as the factory style wiring harness.So, what we can do now is take our two plugs for the main control box, there are gonna be arrows to help you guide the plug in place. And there's also gonna be a cap. This is gonna protect the connector from any water or dust or mud. Once that's screwed on there, what we can do is take our factory harness, plug that in until you hear a click. We can clean this up in just a second. Run that with the other wires and we can mount this up into place.So, as you guys can tell, right now this is illuminated red. That is because it is hooked up to the battery. We will be able to download an app in just in a minute and actually turn those off or change it to whatever color that we'd like. But right now we're just going to mount this up. I'm just going to secure it down with the 10 millimeter socket that I used before.Before we jump into the rest of the install, I did wanna show you guys the app that comes with this. I am going to turn this off right now, but there is a QR code on the control box that allows you to open up this app, and you will actually be able to change this light to whatever color that you'd like. There's a couple of different modes on here that I'll get to in just a second. You will be able to choose between different features and then you will also actually be able to sync these up with music as well. But for right now, I'm going to turn them off and then we'll get back to all the other functional features about this headlight.Before we hop into the rest of the install, I did wanna stop down and tell you guys a little bit more about this new headlight and what benefits you're gonna get out of this setup in comparison to your factory headlights. So, right off the bat, you can tell that this is going to be completely different as far as the headlight and the lighting technology is concerned. Starting off with the housing, this new headlight is going to be a lot more durable and set up a lot sleeker than our factory setup. So, our factory headlight is going to be made of a plastic material, a plastic housing, and even a plastic lens. We're gonna have the chrome reflector inside and also that halogen bulb. Now moving over to our new headlight setup, obviously it is gonna be a lot more durable, but we're also getting some styling out of it as well with the riveted accenting in the black housing. Not to mention, it's going to made of a die cast aluminum material. You're getting a polycarbonate lens, which will be able to take a lot more abuse than our factory plastic lens, and it is going to be dustproof and waterproof. So if you are out on the trail all day kicking up dust or if you take a dunk with the front end of your Wrangler, the LED lights inside are going to be just fine. This is going to be IP67 rated as well, which is a high IP rating for that dust and waterproofing. Now, not only is the housing going to be a big step up, but the lighting performance is as well with a projector LED inside as well as an LED halo. That's gonna act as a daytime running light and its also gonna have RGB HD technology within it, so you will be able to change the color of the halo with a Bluetooth controller from your Android or your iPhone. Not to mention, it's going to have lighting effects as well and up to 121 of them. Not to mention, just the overall LED performance is going to be a big step up from our factory halogen bulb. This is going to have a more uniform light pattern and is going to be a lot brighter than our incandescent bulb and it's also going to look a lot more modernized with a 6,000k color temperature in comparison to the factory bulb, which will have a warm, yellowish hue to it. So, not only are you just getting an upgrade in LEDs, you are getting an overall upgrade when it comes to the full headlight itself. So enough about these two on the table, let's finish up our install.So then we can repeat that process on the other side using our 10 millimeter socket, removing the three bolts that are holding on the headlight. We can disconnect our harness and then run the rest of our harness over to our turn signal. So what we can do now is run our wire up to our turn signals and remove this box so we can access our wiring harness to add our split connector. So this bracket is holding on this box here. I am going to take a 10 millimeter socket and remove the two mounting bolts. Once it's disconnected, we can just pull up on these clips, wiggle this out of the way, and then we'll be able to access our turn signal wiring harness right at the bottom here.What we can do next is disconnect our harness and add our split harness in between. After that's clipped in, what we can do is take our wire and plug that into our connector here. Before we mount up our headlight, we can tuck this back and reattach our fuse box. Just tighten that back down with a 10 millimeter socket. And then we can move up to the front.What we can do next is plug in our halo plug. This is going to the control box. Take that cap, screw that down on the connector. Then we can take our factory wiring harness and plug that into our headlight. I would recommend to clean up some of this wiring as well just because there is gonna be a decent amount. Then we can mount up our headlight. Again we can secure it down with our factory hardware. We can tighten that up with a 10 millimeter socket.So, after you clean up all of your wiring, what we can do is attach our grille. Just give it a good press. Then we can reattach our clips. After your grille's attached, we can close up the hood, and then you're all set to go.So that's gonna wrap it up for my review and install. Make sure you like and subscribe. And for more videos and products like this, always keep it right here at extremeterrain.com.

      Product Information

      Features, Description, Reviews, Q&A, Specs & Installation

      Features & Specs

      • Sporty Halo LED Headlights
      • Reinforces Safety and Style
      • With High Beam and Low Beam Driving Patterns
      • Bright White Light With 6000K Color Temperature
      • With Output of 1,500 Lumens
      • Clear, High-Strength Polycarbonate Lenses
      • Heavy-Duty Housings
      • With IP67 Rating
      • SAE and DOT-Compliant
      • Bolt-On Installation
      • Sold as a Pair, Driver and Passenger Sides Included
      • Made in the USA
      • Designed for All 2018-2024 Jeep Wrangler JL Models

      Description

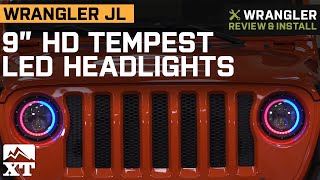
      Bolder Nighttime Confidence. Illuminate the road with a clearer and brighter field of vision by mounting the 9-Inch HD Tempest Halo LED Headlights on your JL. The evenly dispersed and long-range beam patterns allow you to see far down the road and avoid potential hazards. These lights come in a captivatingly striking appearance with stylish halos that reinforces your Jeep Wrangler’s aggressive exterior.

      Aggressive Illumination. These HD Tempest Headlights feature efficient operations as they use less power due to a low current draw. This technology does not compromise the intensive light beam concentration and focus. It particularly reinforces safety by reducing the excessive glare as it utilizes advanced optics for the well-defined beam cutoffs. Additionally, the halos offer solid, and evenly-distributed illumination that appealingly encircles the primary lights.

      Heavy-Duty Construction. Designed to match your JL’s rugged off-road activities and the harsh outdoor conditions, these HD Tempest Headlights are waterproof and extremely durable. They are engineered to resist potential damages from shocks and vibration with their military-grade, die-cast aluminum housings, and shatter-proof polycarbonate lenses.

      SAE and DOT-Approved. These lights were manufactured in compliance with DOT and SAE standards. These CCFL Halo Projector Headlights meet the rigidity, performance, and safety regulations consistent with the transportation law, making them legal for street use.

      Direct-Fit Replacement. Precision-engineered to fit your Jeep Wrangler, these headlights feature a hassle-free installation that reuses the factory mounting locations and electrical system. The installation process completes with light mechanical and electrical skills required.

      Application. These 9-Inch HD Tempest Halo LED Headlights are intended for use on all 2018-2024 Jeep Wrangler JL models.

      Fitment:

      Quake LED QTE914

      CA Residents: WARNING: Cancer and Reproductive Harm - www.P65Warnings.ca.gov

      Installation & What's in the Box

      Installation Info

      What's in the Box

      • (1) Driver Side Headlight Assembly
      • (1) Passenger Side Headlight Assembly
      • (1) HD Controller
      • (6) Flat Washers
      • (2) T-Tap Connectors
      • (2) Fender Light Wire Adaptors
      4.6

      Customer Reviews (18)

        Questions & Answers

        10 More Questions