Talk to a Gladiator Sales Tech
1-877-870-8556
M-F 8:30A-11P, Sat-Sun 8:30A-9P
Logo Image
$20K Sweeps! 10 Chances to Win! Enter Daily >

Rear Bumper (20-24 Jeep Gladiator JT)

Item JG24268
Verify parts fit and get product recommendations.
Gladiator Sales Techs: Connect Now M-F 8:30A-11P, Sat-Sun 8:30A-9P
$0.00
Our Price

$364.99 (each)

FREE Shipping Market Price $420.99 You Save 13% ($56.00) Up to 10% off for Military & First Responders! See Details

Will this fit your Vehicle?

Select a different vehicle Help?
Update or Change Vehicle
Ship to: Ashburn - 20149
Sorry, please enter a valid US or CA postal code
We're sorry, zip can't be updated at this time.
Recommended Install Shops
How It Works
Install Shops are available near Ashburn - 20149

Add Local Shop Installation

Total cost of service $299.00
    Create a list
    Add to New List

    Saved - View your saved items

    We're sorry. We couldn't save this product at this time.

    or use

      Product Videos

      Merideth: What's up, guys? Meredith with ExtremeTerrain.com, and today we're checking out this Rear Bumper fitting all 2020 and newer JT Gladiators. Now, the OE plastic bumper isn't all that great for utility and protection, and won't do you much justice if you're taking your JT off-road or you're planning on doing it. Now, this, however, will be a solid option for some added armor, and recovery for your off-road adventures while keeping it affordable, and having some more team styling, which will match with basically any mod that you pair with it.This rear bumper will offer some advantages for off-road scenarios like welded D-ring mounts with included D-rings for recovery situations that have a 4-and-3/4-ton of pulling capacity. Now, when looking at the recovery points, this will also have lower provisions for your factory kits so you won't have to sacrifice that feature when upgrading to this rear bumper. Now, with that, you're also going to have the option to keep your rear parking sensors, and have a location for the hitch plug and license plate as well as the license plate lighting. Now, this will also have angled up ends on either side to allow some better clearance in addition to a large cutout in the center to provide a step into your bed, even with a small cutout on the back to maintain drainage and avoid any puddling on top of the surface.Now, this will be made of a tough steel plate material, so if you are going off-road, you're not going to have to worry about anything harming this bumper's integrity. The coating will consist of a four-layer process with pretreatment, a phosphating layer, an E coating, and an anti-scratch heavy-duty wrinkle black powder coat finish. Now, that process is just to ensure that this will hold up to the elements very well over time and resist any rusting on the steel underneath. This is also going to be completely bolt-on, so you're not going to have to do any modifications when it comes to bolting this up. We'll show you how to do that in just a minute.Now, like I brought up before, this is going to be pretty affordable for a rear bumper at about $400. Now, what I think shines through about this is that it's uncomplicated as far as the approach is concerned, and still provides all of the key staples that you would need compared to some rear bumpers that may have a bit more to them that you may not personally use as far as features are concerned. Now, consequently, the simple styling will also match well with any type of build that you have, whether you're looking to keep it modest with just bumpers or add it to a plethora of mods.Now, install is going to be completely bolt-on, like I mentioned before, but I am still going to give it a lighter two out of three wrenches on the difficulty meter. There are a decent amount of things that you have to swap over into this bumper, so I would say it's probably going to take you about three hours to get the job done. I would recommend having an extra set of hands on deck, though. It's going to help the process go a lot smoother. Now, at this point, we can head over to our shop and check out a detailed breakdown on how to get this onto your gladiator at home. So that is going to wrap it up for me. Let's go ahead and jump into the install.Man: Tools required for this install include an impact, a clip remover tool, an 18 and 21-millimeter wrench, an extension, a swivel adapter, and 16 and 18-millimeter socket. What's up, guys? Today, we're installing a rear bumper on our Gladiator. First, we're gonna watch a quick uninstall video showing you how to remove your factory bumper, and then I'll meet you back here for the install.Merideth: So the first step to removing our rear bumper is to remove the license plate. Now, I'm gonna use a 10-millimeter socket in order to do that. However, depending on the hardware that you have mounted up for your license plate, your tool may depend. So using that 10-millimeter socket, I'm just gonna remove the two bolts on top. And then once we remove the license plate, that's gonna expose two bolts in the middle.Next, with a 16-millimeter socket, we can remove these two bolts that are holding on the center part of our rear bumper. Next, now that we're underneath the truck, what we can do is disconnect our hitch plug wire. So you just have to depress that clip and pull back. You wanna make sure that there's no clip that is secured to the bumper. If so, you are gonna need a trim removal tool or a clip removal tool. There may be a Christmas tree clip that holds this to the bumper and also to the frame. You just wanna make sure that it's disconnected from the bumper. Next, we can disconnect the license plate light wiring harness. So I'm just going to depress that clip and pull back. Now, all we just have to do is press down and pull back.And then what we can do next is take a clip removal tool, and just make sure that the wiring harness that's coming out of the bumper is disconnected from the frame. We don't want the frame and the bumper connection because if we pull back on the bumper, it's still gonna be connected with this wiring harness. I'm just gonna use a clip removal tool, and we can disconnect that from the frame. And then our next step is to disconnect the bumper at the frame itself, with a 16-millimeter socket, we can remove the two nuts on either side that are holding the bumper to the frame rail right here. We can repeat that on the other side.Now, that everything's disconnected, what we can do is completely remove the bumper from the Jeep. So we're just going to grab the bumper and pull back. Now, if you do have a different trim level, there may be a couple more bolts. You may have two more down here. However, that should basically do it as far as the attachment system from the bumper to the Jeep. Last but not least, we can disconnect our factory tow hook. This is held in by two 21-millimeter bolts. So I'm gonna use a 21-millimeter socket and a 1/2-inch drive ratchet in order to remove those.So we do have to take out our license plate light housing and the wiring harness, as well as our hitch plug here. So I'm going to start with the hitch plug. I have a flathead screwdriver, I'm just gonna depress these two tabs on either side, and we can just push it out the front. Once both clear the bumper, it'll just fall right out. Put that to the side. Then we can start by undoing this wiring harness for the license plate lights. So I am just gonna take a clip removal tool, and start popping these out. And we can also unplug these just by pressing down on the clip and pulling back. Then you can put this harness to the side. And then we can push the housing out the front. So if you just pull up on this tab, you'll be able to clear that tab on the side of the light. Same at the bottom. Right? And you can do the same thing on the other side.Man: So, now, with our stock bumper removed and everything that we need taken out of it, we can start assembling our new bumper. We're gonna start with our two license plate lights. We're gonna slide those into our holes and clip them into place. So, now, the connector on our license plate light is gonna go towards the rear of the bumper. So slide that in first. And then just push it in to clip it into place, and do the same thing for the other one. Next, we can install our trailer plug, line that up, and press that into place.Next, we can install parking sensors if you have them. What you're gonna do is you're gonna take the sensor, you're gonna pop off that rubber seal around it, you're gonna replace it with this felt washer, and then you can put your parking sensor in through the back here. And then on the back of the parking sensor, you're gonna put this foam spacer, and then this cap onto the back. Now, we don't have parking sensors on ours, so we're gonna be using these caps just to block it off. So you'll just line this up and press it in just like that, and do the same thing for the rest of them.Next, we can install our double bolt plate. This is going to come through the front side to the back, and then we'll add our retainer clips onto those studs. And then you can do that same thing on the other side. Next, we can come back to where we disconnected our tow hook and install our support bracket. We'll drop this on top of the frame, and then drop a bolt with a flat washer through the top. And then we have a flat washer, a lock washer, and a nut going on the bottom. We'll do that same thing for the second hole. And then we'll just straighten out our bracket, and tighten that down with an 18-millimeter wrench and socket. And then you can do that same thing on the other side.So, now, we're ready to get our rear bumper mounted up to the frame. I've got myself a buddy to help line this up. We've got a flat washer, lock washer, and a nut that are gonna be going on the back of that double bolt plate. Next, we can grab a bolt with a lock washer and flat washer, and slide it through the hole in our support bracket, and then take our nut plate, and thread our bolt into it. Next, we can grab an 18-millimeter socket and tighten down the two nuts. I'm going to lift up on the bumper a little bit. Next, we can take that same 18-millimeter socket and tighten down the bolt on the other side of our nut plate, and then you can do that same thing on the other side. Now, we can grab our trailer plug and reconnect it, and pop our push clip back into place.Next, we can reinstall the harness for our license plate lights. So we'll plug in our connector. And then you can do that same thing on the other side. And now, we can reconnect the connector for our license plate harness. Now, once we have that reconnected, we can reinstall our push clip into the frame. Next, we can zip-tie our harness out of the way. We have this square cutout right here that we can run a zip tie through. And then you can grab a pair of scissors or diagonal cutters and cut off the excess of the zip tie. Now, the last thing we need to do is install the clips for our license plate screws. So these will just slide into the hole, and push them down into place. Now, once we have everything else taken care of, we can finally install our D-rings. So slide this over the hook. Slide our bolt through and thread it into place. And now, you can do that same thing on the other side.So that'll wrap up this review and install of the Rear Bumper for your 2020 and newer Gladiator JT. Thank you for watching, and for all things Gladiator, keep it right here at extremeterrain.com.

      Product Information

      Features, Description, Reviews, Q&A, Specs & Installation
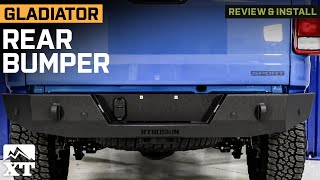
      Features & Specs

      • Rear Bumper
      • Enhanced Protection
      • Great Towing and Recovery Options
      • Fits 2020-2024 Jeep Gladiator JT Models

      Description

      Protection. The rear bumper protects the back of your Jeep Gladiator JT from the dangers of unexpected hits and crashes. It is a powerful protector. Its substantial presence adds an extra layer of security, strengthening the body, tailgate, and rear lights of your vehicle, especially while tackling hazardous off-road terrains. You may go out on your travels with confidence knowing that your Jeep's rear end is protected thanks to this sturdy protection.

      Reliable. This outstanding rear bumper, which is built to increase ground clearance and improve departure angles, gives your Jeep the agility and ability required to skillfully handle rocky routes and overcome challenging obstacles. With this priceless addition installed, you can go out on your off-road excursions with absolute assurance knowing that your Jeep Gladiator JT is prepared to handle any difficult terrain that lays in front of you.

      Power. Many rear bumpers are equipped with an incredible number of tow hooks or D-ring attachments, giving your Jeep a remarkable amount of adaptability and utility. These features act as handy points of attachment, enabling smooth recovery or towing operations whenever necessary. With these built-in tow hooks or D-ring attachments at your disposal, your Jeep Gladiator JT transforms into a beacon of aid, enabling you to rescue your own vehicle from challenging situations with simplicity and effectiveness.

      Installation. Putting this Rear Bumper on your Jeep Gladiator JT is easy and requires no drilling.

      Application. The Rear Bumper fits 2020-2024 Jeep Gladiator JT models.

      Fitment:

      CA Residents: WARNING: Cancer and Reproductive Harm - www.P65Warnings.ca.gov

      Installation & What's in the Box

      Installation Info

      What's in the Box

      • (1) Rear Bumper
      • Mounting Hardware
      • Instruction Manual
      5.0

      Customer Reviews (2)

        Reviews of similar Exterior products have an average rating of 4.8 out of 5

          Questions & Answers

          10 More Questions