 FREE 1 to 3-Day Delivery on Orders $149+ Details

How to Install a Hyline Offroad Tire Carrier Ready Rear Bumper on your 1987-2006 Jeep Wrangler
Tools Required
- Ratchet
- 18mm Socket
- 5/8" Socket
- Torque Wrench
- 18mm Wrench
- 5/8" Wrench
- Drill
- 7/16" Bit
- Safety Glasses

Congratulations on your purchase of the Hyline Offroad Standard Rear Bumper. Our Bumpers are completely manufactured in our facility located in Perkasie, PA. They are designed and engineered by Offroad enthusiasts just like you to be rock solid at an affordable price. Hyline Offroad would like to thank you for your recent purchase and look forward to serving you in the future.
- Hyline Offroad Staff
PLEASE READ INSTRUCTIONS BEFORE BEGINNING INSTALLATION
Rear Bumper Installation
Step 1 – Remove the stock rear bumper by unbolting the two 18mm nuts from each side. It’s easier to use a wrench to remove the top nut nearest the body mount. Next, remove the two bolts on the bottom of the bumper that attach it to the frame. You’ll also need to remove any factory or aftermarket towing hitch you may have installed. The stock bumper should be free to remove at this point.
***DO NOT THROW AWAY THE TWO BOTTOM BOLTS. YOU WILL REUSE THEM***
Step 2 – (1997-2006 TJ Rear Bumper Installation) **For 1987-1995 YJ Installations Skip to Step #3**
Each Hyline bumper we sell comes with Frame Tie-in Brackets for the TJ Model Year only. To install these brackets you will need to use a 7/16” Bit to drill a thru hole on the inside of the frame, using the existing holes in the frame as a guide. (SEE FIGURE 1)
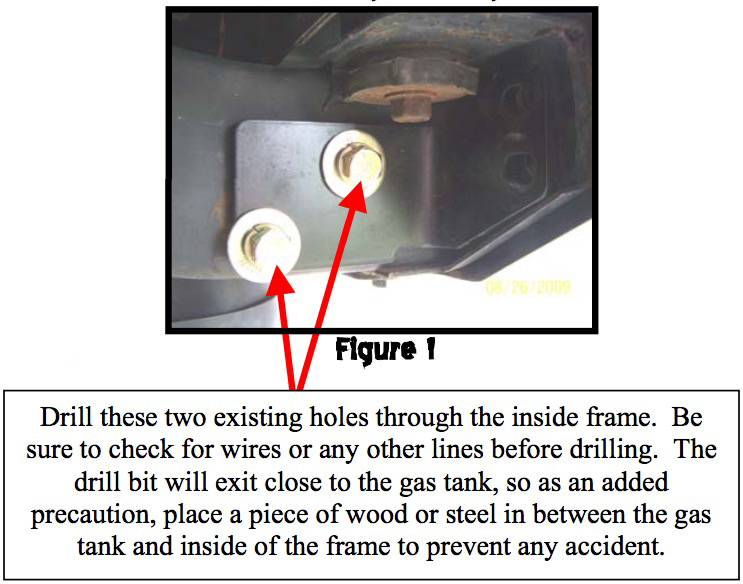
After holes are drilled thru, Install the Frame Tie-in Brackets, Using the supplied 7/16-14 x 3-1/2” Bolts. Install parts in the Following order: Bolt, Flat Washer, Tie-in Bracket, Thru Frame, Flat Washer, Lock Washer, Nut. ONLY HAND TIGHTEN
***THE NEXT STEP MAY REQUIRE TWO PEOPLE TO LIFT AND HOLD BUMPER IN PLACE***
Note: If installing a Tire Carrier you may need to keep the Gr8 Bumper Mounting Bolts loose in order to install the Tire Carrier & Pivot Pin. Refer to “NOTE” at Step 4 in Installation Instruction Packet for TJ-YJ-20STC.
Step 3 – Some TJ Models may have eight mounting holes in the rear cross member, but most will only have four. All YJ Models should have eight mounting holes in the rear cross member. Our rear bumper allows for installation of bolts through all eight mounting holes if applicable. For YJ Models you will not be installing the Frame Tie-in Brackets.
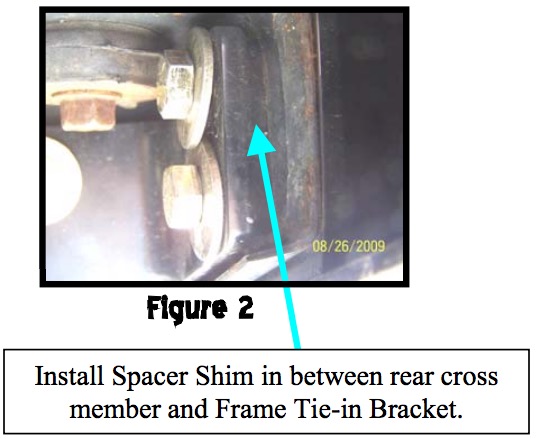
For TJ’s you will install two bolts on each side using supplied 7/16-20 x 1-3/4” Bolts. Install parts in the following order: Bolt, Flat Washer, Lock Washer, Tie-in Bracket, & Spacer Shim. (SEE FIGURE 2) Re-install the two bolts you took out of from the bottom of the stock bumper. BE CAREFUL NOT TO CROSS THREAD THE 7/16-20 x 1-3/4” BOLTS WHEN THREADING INTO THE BUMPER.
For YJ’s you will install four bolts on each side using supplied 7/16-20 x 1-3/4” Bolts. You will not be installing the Frame Tie-in Brackets on the YJ Model.
Step 4 – Tighten all bolts and torque to 75-78 ft/lbs. After about 50-100 miles of driving re-check all bolts and torque to proper settings.
Send your OFFROAD pictures to [email protected] . If we choose any one of your pictures to be used on our website, We send you a FREE Hyline Offroad T-Shirt.
Attention
Installation instructions provided must be read and followed exactly when installing product. Failure to do so could potentially result in injury or death of any occupants in the vehicle. WEAR SEAT BELTS AT ALL TIMES WHEN DRIVING!
Though our products are rugged, they are primarily designed and built to enhance the appearance of the vehicle and will not protect from death or injury in the event of an accident. Adhere to all vehicle manufacturers specifications
