 FREE 1 to 3-Day Delivery on Orders $149+ Details

How to Install a Garvin Adventure Rack On Your 2007-2017 Jeep Wrangler JK

Shop Parts in this Guide
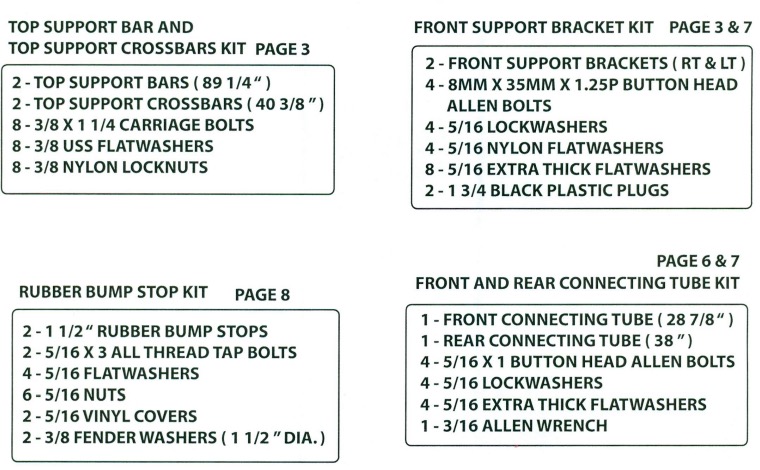
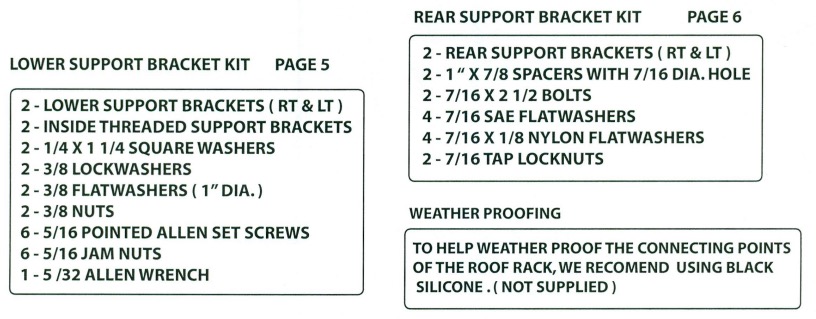
PARTS LIST
Installation Instructions
1. Leave all fasteners loose or slightly tight to hold in place. This will make installation easier.
2. The Adventure rack was designed using a stock factory rear bumper. The Garvin Wilderness G2 Series Bumper is compatible with the Adventure Rack. Other aftermarket rear bumpers may require slight modification to work with the rack.
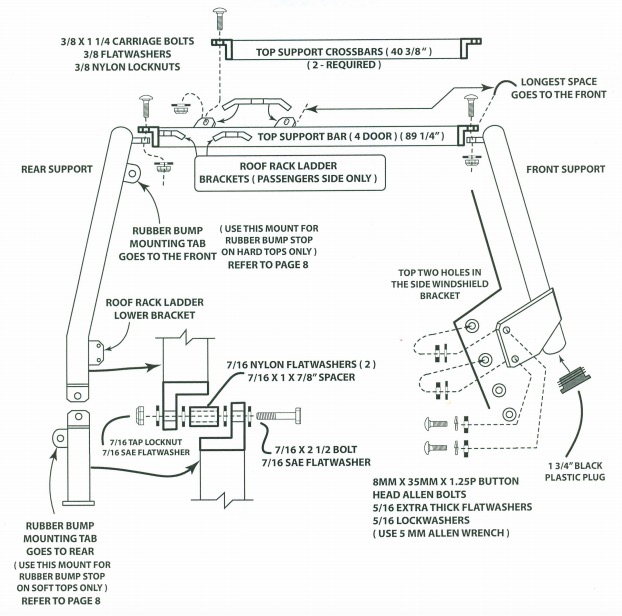
3. For general assembly a passengers side view of the Adventure Rack is drawn on page 3.
4. Remove factory rear bumper.
5. Remove the rear factory tail lights, refer to page 4.
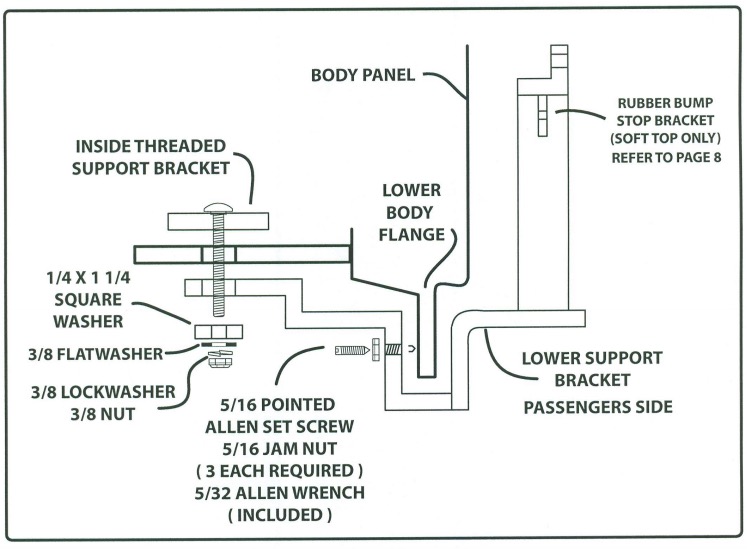
6. Install lower support brackets to inside threaded brackets as shown on page 5. Note! If you have a soft top install the rubber bumpers to the lower supports before installing on vehicle. Refer to page 8.
7. Align and tighten 3/8" dia. nut and lockwasher on lower support bracket. Do not tighten the allen pointed set screws at this time.
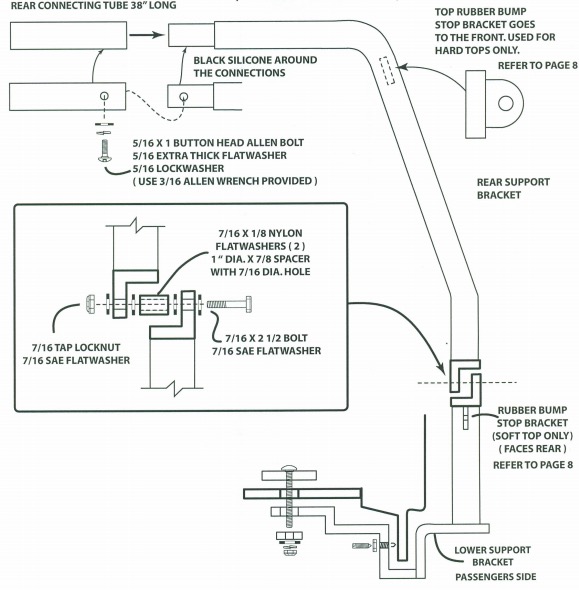
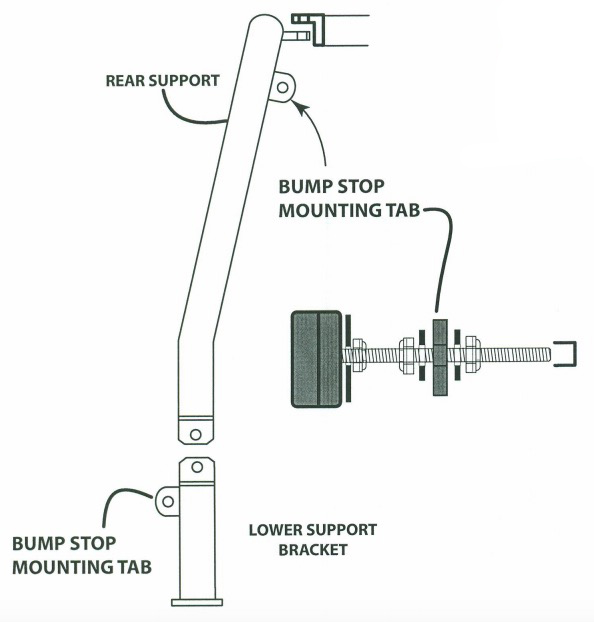
8. Install rear support brackets to lower supports as shown on page 6. Slightly tighten to hold in place. Install rubber bump stops to rear supports, refer to page 8.
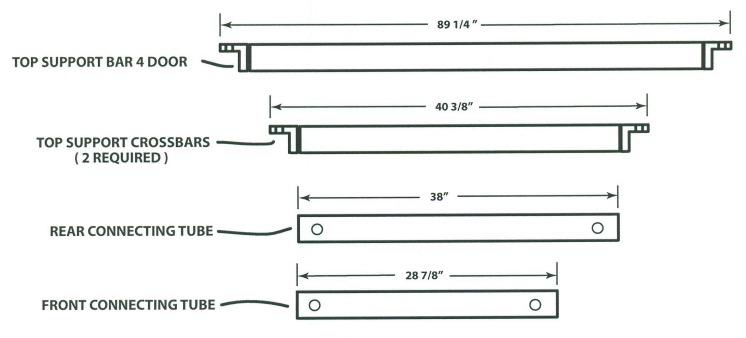
9. Install rear connecting tube 38" to supports as shown on page 6. Align and slightly tighten to hold in place.
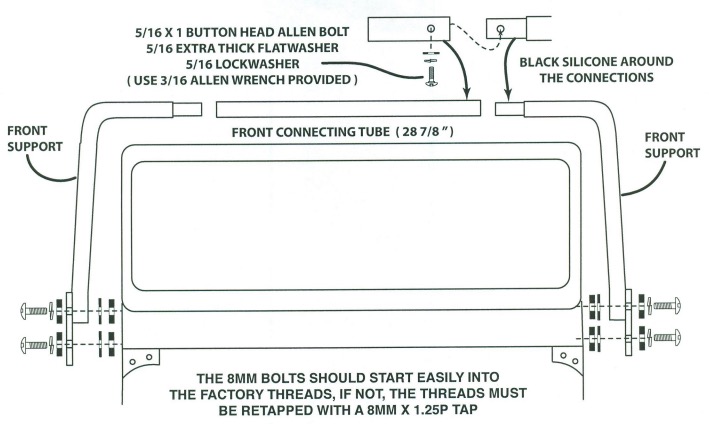
10. Install the 1 3/4" caps into the bottom tube on the front supports as shown on page 3. Install front supports to vehicle as shown on page 7. Leave the mounting bolts loose on both sides to allow for adjustment when connecting the front tube (28 7/8")
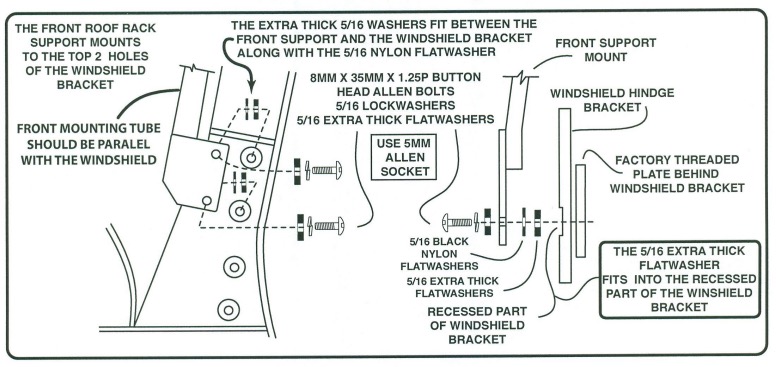
11. Install bolts into front connecting tube and slightly tighten all bolts. 12. Align front mounts so they are parallel with the front wind shield and tighten all four mounting bolts (5mm Allen)
13. Install top support bar to front and rear supports. Tabs go inboard and the long side goes to the front, as shown on page 3. .
14. Install the two top support crossbars to the top support bar as shown on page 3.
15. Align the Adventure Rack and tighten all fasteners.
16. After rack is aligned and all fasteners tightened, use the 5/32 Allen wrench to tighten all of the pointed Allen set screws in the lower support bracket into the lower body flange. Secure with the 5116 jam nuts.
17. Re-install factory rear bumper.
Weather Proofing Connecting Joints:
• Back out the 5116 button head allen bolts approx. 1/4" from the tubes. Apply black silicon to the threads and hole. Re-tighten bolt.
• Apply black silicon around the area where the front and rear tubes slide over the supports.
• Touch up all nicks and scratches that normally occur with a black enamel paint.
Tilting Back the Adventure Rack:
• Remove the front bolts that connect the top support bar to the front supports and back off the top rubber bump stops.
• From the rear pull back the rack and let it rest on the opened tailgate spare tire or some other support such as a table.
GENERAL DRAWING - PASSENGERS SIDE SHOWN
1 - REMOVE THE TAILIGHT FROM EACH SIDE.
1a- ON 2012 MODELS OPEN THE TAILGATE TO REMOVE THE ARM ON PASSENGERS SIDE BEHIND THE TAIL LIGHT.
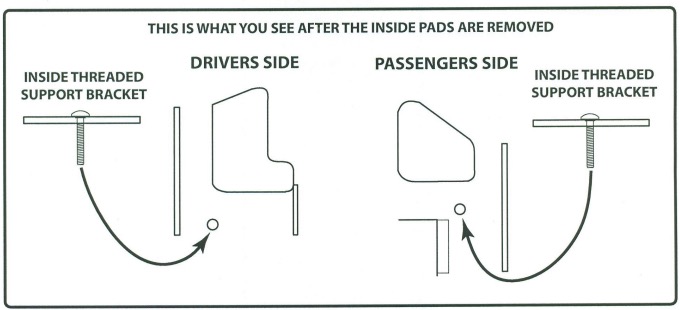
2 - REMOVE THE PAD THAT IS IN THE BOTTOM, (2012 MODELS CUT OUT THE SPRAYED IN FOAM THAT COVERS THE HOLE ( DRIVERS SIDE ONLY)
3 - INSTALL THE INSIDE THREADED SUPPORT BRACKET IN THE SMALL HOLE AS SHOWN, FIGURE A, RE-INSTALL PADS AND TAIL LIGHTS.
FIGURE A
4 - INSTALL THE LOWER SUPPORT BRACKETS AS SHOWN, TO THE INSIDE THREADED SUPPORT BRACKETS AND THE BODY FLANGE. ALIGN AND TIGHTEN
5 -INSTALL 5/16 ALLEN SET SCREWS AND JAM NUTS,SLlGHTLY TIGHTEN SET SCREWS TO LOWER BODY FLANGE TO HOLD IN PLACE, WILL TIGHTEN LATER AND LOCK WITH JAM NUTS LATER.
6 -WHEN INSTALLING THE LOWER SUPPORT BRACKET, THE RUBBER BUMP STOP BRACKET GOES TO THE REAR, AS SHOWN IN FIGURE B.
FIGURE B ( PASSENGERS SIDE SHOWN)
REAR TOP SUPPORT BRACKET AND REAR CONNECTING TUBE INSTALLATION DRAWING ( PASSENGERS SIDE SHOWN)
FRONT MOUNTING SUPPORT INSTALLATION
REAR RUBBER BUMP STOP INSTRUCTIONS
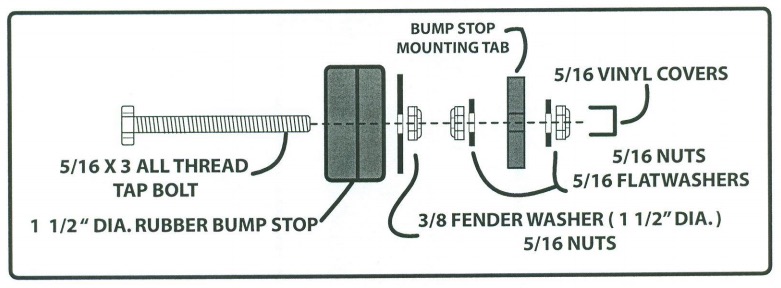
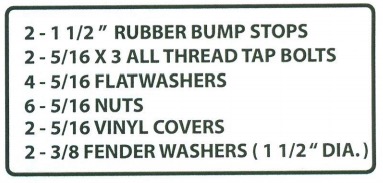
PARTS LIST
1 - ASSEMBLE RUBBER BUMPER TO TAP BOLT AND TIGHTEN.
2 -INSTALL BUMP STOP TO TOP MOUNTING TAB ON FREEDOM TOPS AND BOTTOM TAB ON SOFT TOP MODELS.
3 - THE BUMP STOP MUST BE INSTALLED ON THE LOWER SUPPORT BRACKET BEFORE THE BRACKET IS INSTALLED ON VEHICLE.
4 - ADJUST THE RUBBER STOP SO THAT IT JUST TOUCHES THE BODY OR FREEDOM TOP. SECURE WITH 5/16 NUTS AND FLATWASHERS.
5 - USE SOME VASOLINE JELLY ON THE RUBBER IF A SQUICKING NOISE NOISE IS HEARD, THE RUBBER WILL GET HARD OVER TIME.
