 FREE 1 to 3-Day Delivery on Orders $149+ Details

How to Install Carr Super Hoop - XP3 Black Powder Coat Pair (07-17 Wrangler JK 4-Door) on your Jeep Wrangler
Tools Required
- Drill Motor
- 5/16” drill bit
- 1/8” drill bit
- 2 - ½” wrench
- 2 - 7/16” wrench
- Phillips screw driver
- pencil
MATERIAL NEEDED:
Drill Motor, 5/16” drill bit, 1/8” drill bit, 2 - ½” wrench, 2 - 7/16” wrench, Phillips
screw driver, pencil.
MATERIAL FURNISHED:
2 – Super Hoop step castings, 4 – Large mounting brackets, 4 – “L” brackets, 2 –
Hardware packs, 1 – Instruction. (Important! Not all of the parts in these
hardware packs may be needed for proper installation).
WARNINGS!
> Do not over tighten the nuts and bolts or damage to the castings and or stripping of the threads could result.
> FOR SAFE AND PROPER USAGE OF THIS PRODUCT, THE MOUNTING INSTRUCTIONS MUST BE FOLLOWED CAREFULLY AND
COMPLETELY.
> The manufacturer and distributor of this product are in no way responsible for the consumer’s failure to adhere to the warnings and directions of these
instructions in the event of damage to the consumer’s vehicle, other properties and or personal injury.
1. For the proper position of the step, the front edge of the seat while in normal driving position should be in line with the center of the step. For personal preference or to avoid any obstruction underneath body metal, step can be moved left or right.
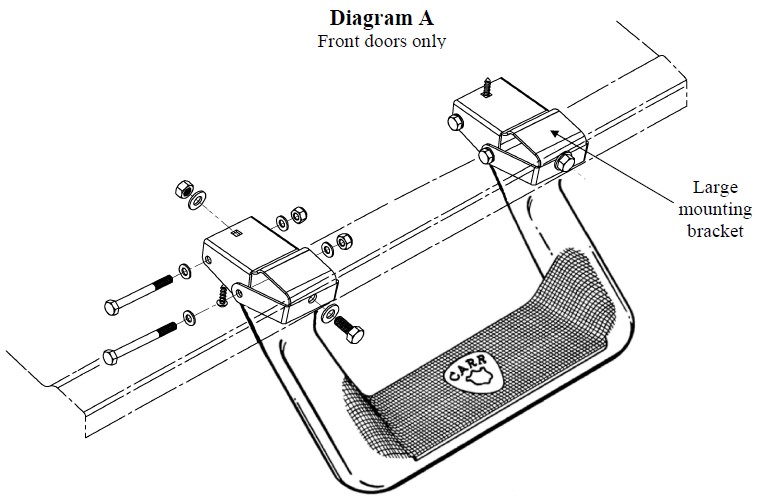
2. Assemble the steel brackets to the step as shown in the Diagram A, and securely tighten.
3. When positioning the step against the body metal, be sure to avoid all bumps and screws to make sure that the step assembly is against a flat surface.
4. When the desired location is found, while holding the step in that position, take a short pencil and mark through the hole located in the front of each large mounting bracket onto the body metal.
5. Center punch the marked hole
6. Take a 1/8" drill bit and drill out the centered punched holes.
7. Replace the 1/8" drill bit and drill out the 1/8" hole for the marked 5/16” hole with a 5/16" drill bit.
8. After drilling, make sure that all the burrs are removed.
9. Place the step assembly back on the vehicle where the holes are drilled.
10. Take the 5/16” hardware that is provided and securely tighten the both large mounting brackets to the vehicle. See Diagram A.
11. Take a 1/8” drill bit and drill two more holes through the square holes that are located on each large mounting bracket.
12. Take the sheet metal screws provided and securely tighten.
13. Repeat all the above for the other side of your vehicle.
14. Make sure all hardware is securely tightened and that all the directions of this instruction have been followed carefully and completely, otherwise product failure could occur.
