FREE 1 to 3-Day Delivery on Orders $149+ Details

How to Install Bushwacker Textured Cut-Out Fender Flares (87-95 Wrangler YJ) on your Jeep Wrangler
Tools Required
- Drill
- 3/16” Drill Bit
- #2 Phillips Bit
- 5/16” Wrench
- 5/16” Socket
- 7/16” Wrench
- 7/16” Socket
- Socket Driver
- Scissors
- T45 Torx bit

Shop Parts in this Guide
FLARE INSTALLATION PROCEDURES
Step 1: Painting (Optional)
(A) Bushwacker only approves installing the flares according to these written instructions with the hardware provided. WARNING: Failure to install according to these instructions will invalidate the warranty. This includes, but is not limited to, using alternative installation methods, hardware, or materials. DO NOT USE: Loctite, SuperGlue, or similar products on the hardware or the flares.
(B) It is recommended that painting be done prior to installation.
(C) Clean outer surface with a high-grade degreaser. DO NOT USE LACQUER THINNER OR ENAMEL REDUCER AS A DEGREASER. Wipe outer surface thoroughly with a tack rag prior to painting.
(D) Sand outside of flares with 320 grit sand paper and wipe clean with a high-grade degreaser.
(E) Paint flares with adhesion promoter in two light coats; allow 5 minutes flash time between coats. Let second coat dry for 15 minutes before applying primer, sealer, or topcoat. If adhesion promoter is allowed to dry for more than 4 hours, reapply adhesion promoter.
(F) Paint flares with a high build primer.
(G) Color coat must have a flex additive to prevent paint cracking.
(H) Paint flares using a high quality lacquer, enamel, or polyurethane automotive paint and clear coat.
Step 2: Preparing the Work Area (Front and Rear)
(A) Remove the factory fender flares and stone guards.
(B) Remove the marker light from the front fender flare.
(C) Remove Fender Flares from box and lay flat to allow them to return to their natural position. Preferable temperature is 75 degrees F or warmer.
Step 3: Edge Trim Installation
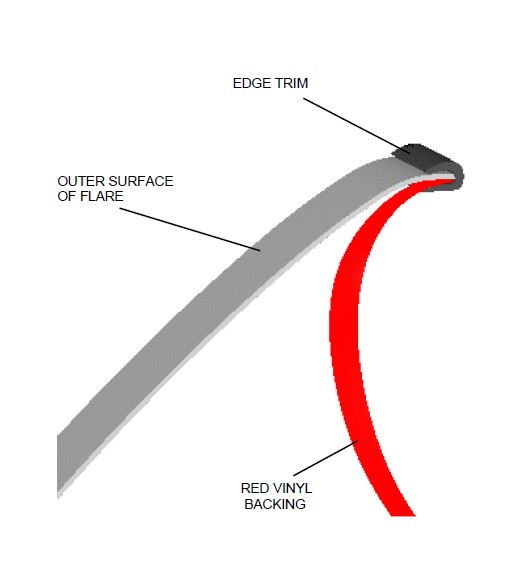
(A) Peel two to three inches of red vinyl backing away from edge trim tape. Applying the adhesive side of the edge trim to the inner side of the flare, affix the edge trim to the top edge of the flare (the portion that comes in contact with the vehicle).
(B) Press edge trim into place along the top edge of the flare in one-foot increments, pulling red vinyl backing free as you continue to work your way around the top edge of the flare. Repeat steps 3A and 3B for remaining flares.
(C) Trim excess edge trim away with scissors.
Step 4: Trimming Fenders (for tires over 33”)
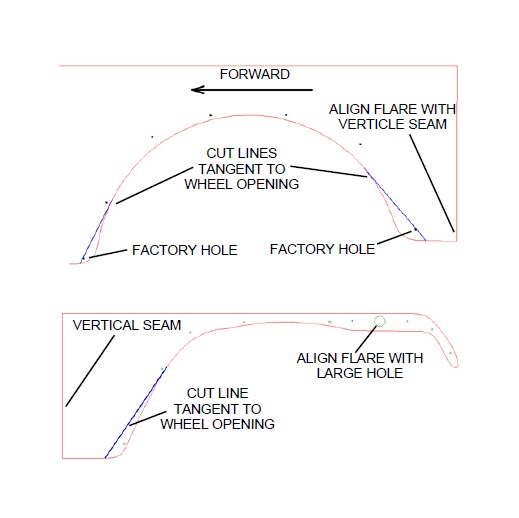
(A) Mark a point on the front fender 4¾” forward from the vertical seam at the rear of the fender.
(B) Draw a line from that point to a point tangent to the wheel opening, and cut along that line with an air nibbler or reciprocating saw.
(C) Draw two lines on the rear fender tangent to the wheel opening and through the lower holes at the front and rear of the fender.
(D) Cut the rear fender along those lines using an air nibbler or a reciprocating saw.
Step 5: Flare and Stone Guard Installation
(A) Stone guard
1. Fasten the stone guard to the vehicle with the factory screws that were previously removed.
(B) Front Flare
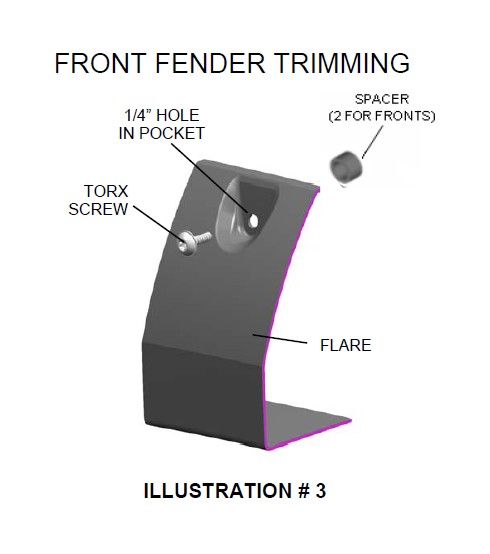
1. Holding the front flare in place on the vehicle, align the 1¼” hole in the marker light pocket with the large hole in the fender and mark the mounting hole locations on the vehicle fender using the holes in the flare as a guide.
2. Drill the vehicle fender at all marked positions with a 3/16” drill bit.
3. For the Front Flare, insert a supplied Torx screw through hole in pocket. Place two 1/4" thick spacers on the screw from the back side of the pocket.
4. Holding the flare into position on the fender, insert the screws through the drilled holes in the fender. Use caution: Do not over tighten the screws. Over tightening will not allow the flare to expand and contract with temperature changes after the flare is installed.
5. Install the marker light into the flare and reattach the marker light to the factory holes that it came out of, using the 1½” screws in the hardware kit.
(C) Rear Flare
1. Holding the rear flare in place on the vehicle, align the rear corner of the flare with the vertical seam at the rear of the vehicle and mark the mounting hole locations on the vehicle fender using the holes in the flare as a guide.
2. Remove the flare.
3. Drill the vehicle fender at all marked positions with a 3/16” drill bit.
4. For the Rear Flare, insert a supplied Torx screw through hole in pocket. Place one 1/4" thick spacer on the screw from the back side of the pocket.
5. Holding the flare into position on the fender, insert the screws through the drilled holes in the fender. Use caution: Do not over tighten the screws. Over tightening will not allow the flare to expand and contract with temperature changes after the flare is installed.