FREE 1 to 3-Day Delivery on Orders $149+ Details

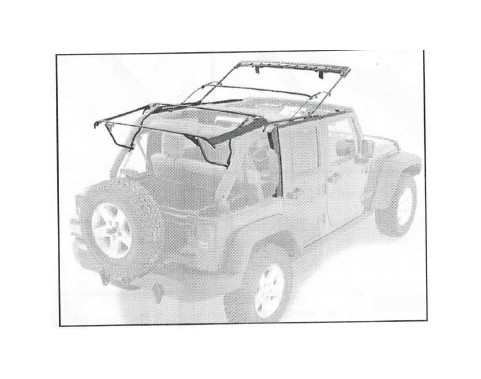
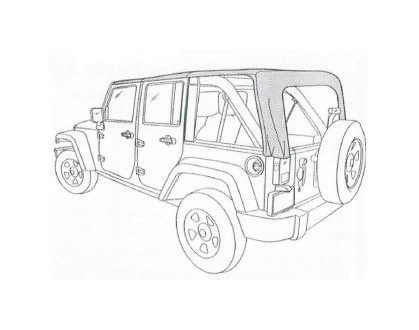
How to Install Bestop OE Style Soft Top Replacement Bow & Frame Kit (07-17 Wrangler JK 4 Door) on your Jeep Wrangler

Shop Parts in this Guide
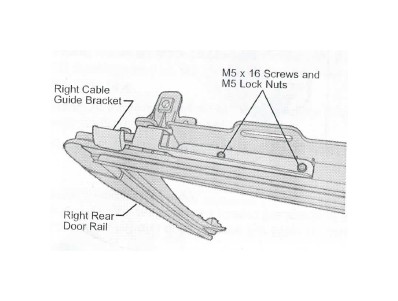
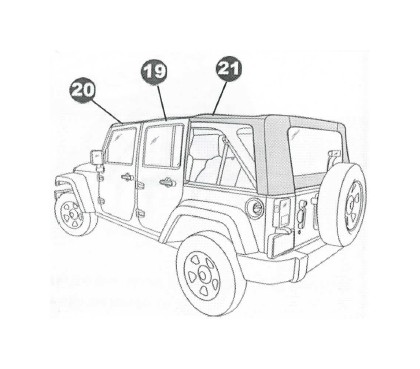
Mount Cable Guide Brackets to Rear Door Rails
Mount the Right Cable Guide Bracket to the Right Rear Door Rail with two (2) M5 x 16 Screws and M5 Lock Nuts. Repeat with the Left Rear Door Rail.
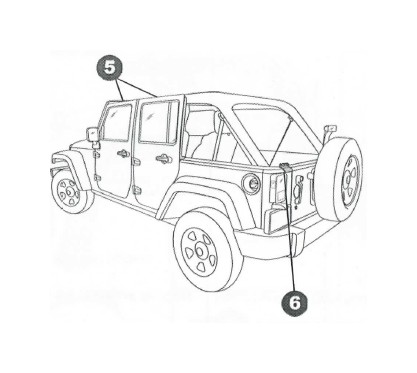
Install Rear Door Rail
Locate the left and right Rear Door Rail. Insert the pin in the bottom of the Door Rail into the hole in the belt rail behind the door. Place an M8 x 75mm Knob through the tab on the Door Rail and tighten.
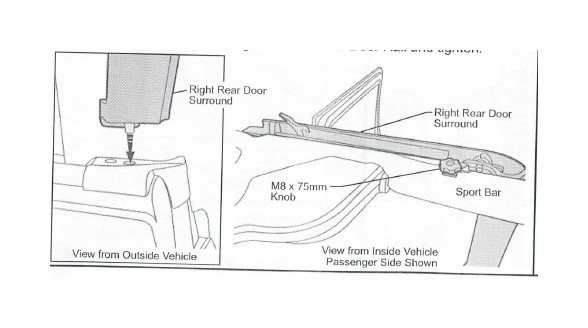
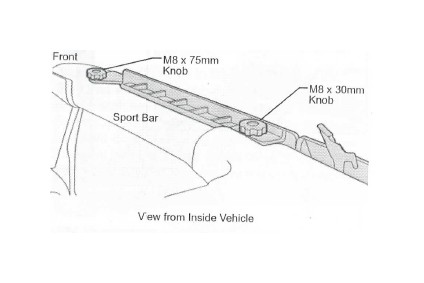
Install Knobs
Install an M8 x 75mm Knob at the front of the rail and an M8 x 30mm Knob in the center.
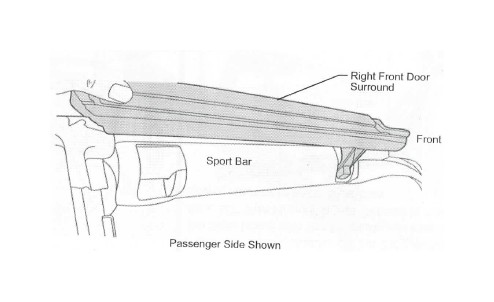
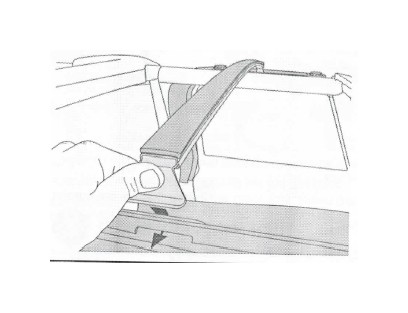
Install Front Door Rail
Place the Front Door Rail above the door opening.
Install Top Arches
Insert one end of the Front Top Arch in to the slot in the middle of one of the Front Door Rails. Push the other end inward to flex the bow and insert it into the slot on the other side of the vehicle. Repeat with the Rear Top Arch.
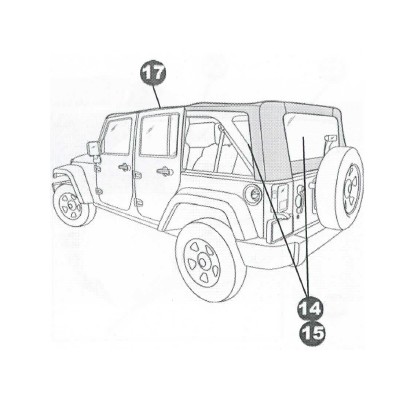
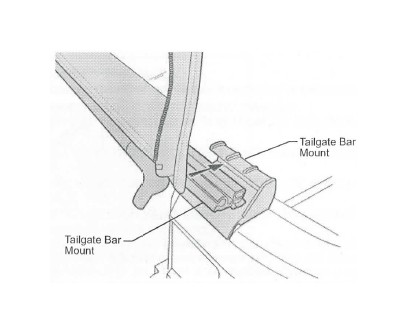
Install Tailgate Bar Mounts
Locate the left and right Tailgate Bar Mounts. Orient them on the vehicle. Hook the bottom of one mount under the belt rail and roll it toward the inside of the vehicle until it clips into place. Repeat this with the other Tailgate Bar Mount.

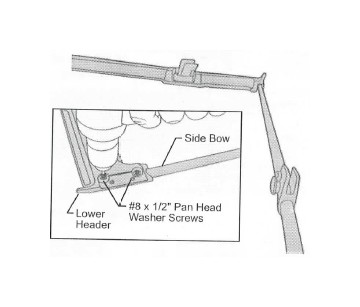
Install Side Bows on Lower Header
Place the Lower Header on the Side Bows. Orient the Side Bows with the Brackets up. Install two (2) #8 x 1/2" Pan Head Washer Screws to secure the Lower Header to each Side Bow.
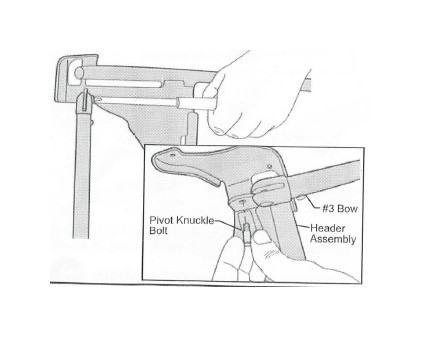
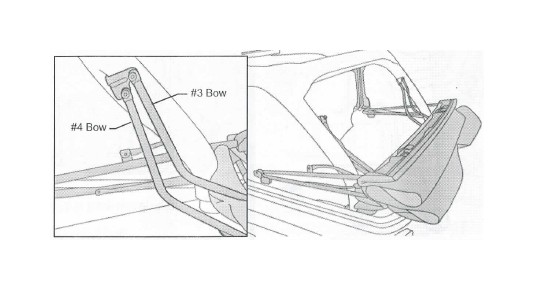
Install #3 Bow on Header Assembly
Use a Pivot Knuckle Bolt to install the #3 Bow to the Side Bow/Header Assembly.
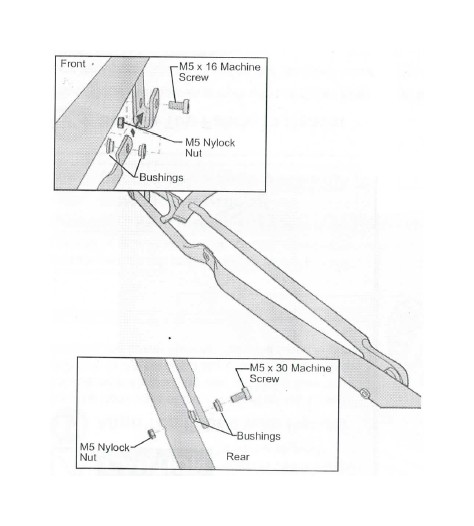
Assemble #2 Bow to Header / Side Bow Assembly
Locate the #2 Bow Assembly. Place it on the Side Bow/Header Assembly.
Front: Install an M5 x 16 Machine Screw with two (2) Bushings and an M5 Nylock Nut on the front of the Side Bow.
Rear: At the rear install an M5 x 30 Machine Screw with (2) Bushings and an M5 Nylock Nut.
Repeat these steps on both legs of the #2 Bow
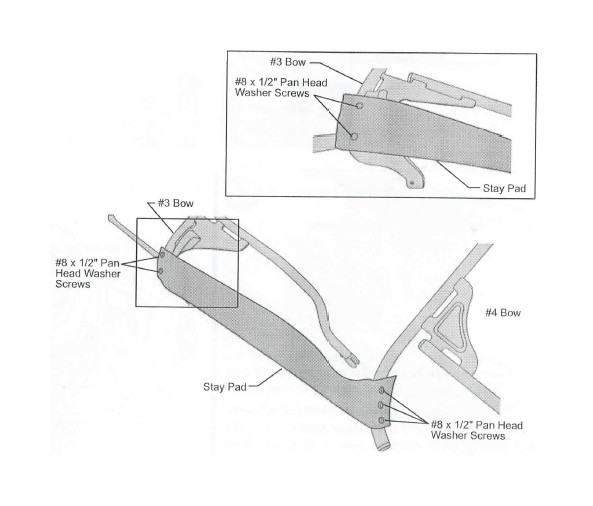
Install Stay Pad
Align the two (2) holes in the square end of the Stay Pad with the 2 holes in the corners of the #3 Bow. Install two (2) #8 x 1/2" Pan Head Washer Screws. Pull the pointed end of the Stay Pad back to the #4 Bow. Make sure that it is not twisted and the point is to the inside. Install three (3) #8 x 1/2" Pan Head Washer Screws. Repeat on both sides.
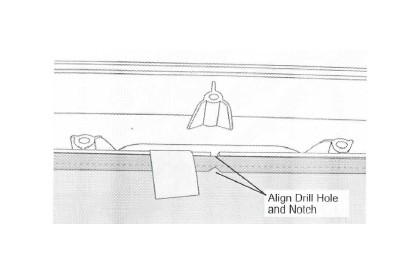
4) Align Top Fabric with Header
Lay the front edge of the top fabric on the Lower Header with the backing side up. Make sure the drill hole in the center of the fabric lines up with the notch in the Lower Header. Tape the fabric in place.
Secure Top Fabric to Header
Place Edge Protector over front edge of Upper Header and tape in place.
Lay the Upper Header on top so that the fabric is sandwiched between the Upper and Lower Headers.
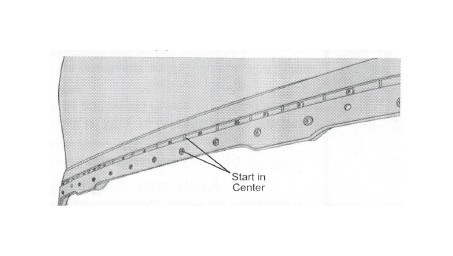
Start with the center hole and install twenty-three (23) #8 x 1/2" Hi-Lo Screws to attach the Upper Header to the Lower Header. Secure the Upper Header to each Side Bow with four (4) #8 x 1/2" Pan Head Washer Screws.
Install Side Bows on Header Assembly
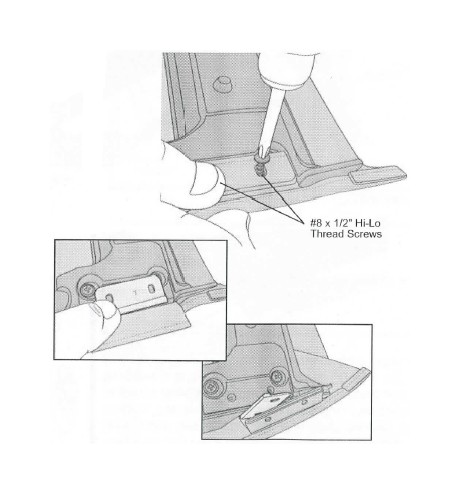
Wrap the fabric around the edge of the header. Slip the fabric pocket sewn into the top between the headers and position the anchor foot.
Install two (2) #8 x 1/2" Hi-Lo Thread Screws through the fabric and metal flag into the Lower Header on each side.
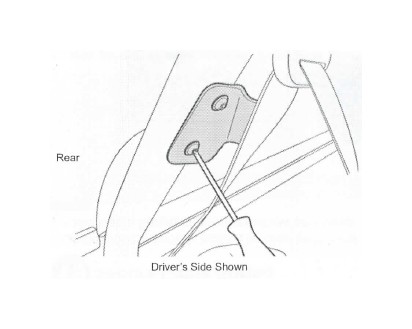
Install Bow Mount Brackets on Sport Bars
Use Bow Mount Screws to install Bow Mount Brackets on rear sport bar.
Secure Top Fabric Assembly to Mile Bow Mount Bracket
Place the Top Fabric Assembly on the back of the vehicle with the header on top. Clip the #4 Bow pivot knuckle into the forward lower hole in the Bow Mount Bracket. Clip the #3 Bow pivot knuckle into the top slot in the Bow Mount Bracket.
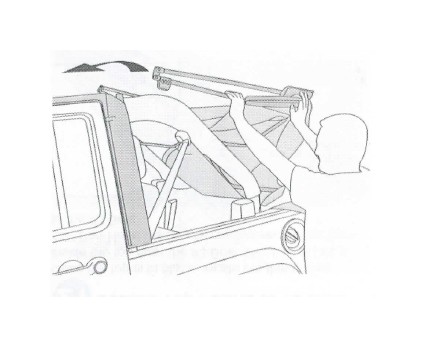
Drape Top Fabric over Vehicle
Open the Top Assembly and drape it over the cab of the vehicle.
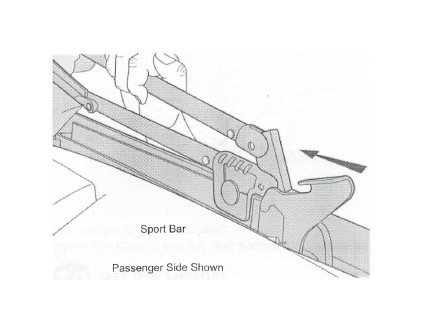
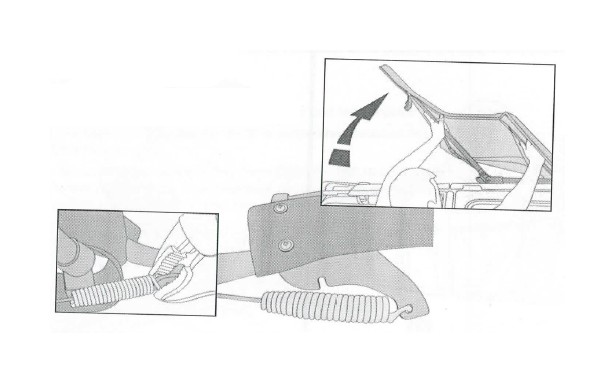
Secure Pivot Assembly
Slide the Pivot Assembly on the Top along the track above the door until it latches into place.
Drape Top Fabric over Bows
Pull the fabric up over the bow assembly.
Secure Cable Spring
Fold the Header back to reduce tension on the top. Secure Cable Spring to bracket on bow and crimp spring.
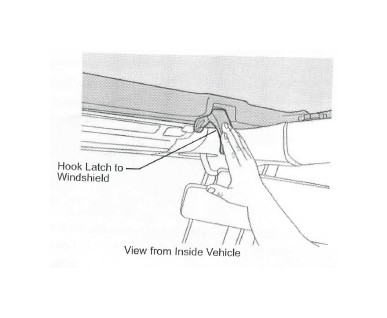
Secure Header
Close the front of the Top and secure the latches on the header to the windshield.
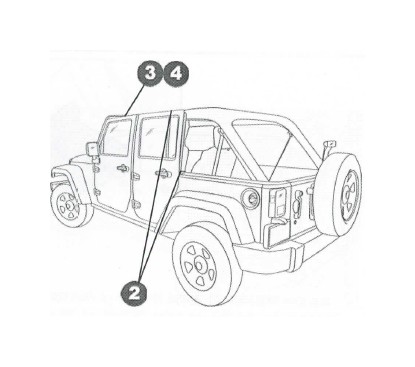
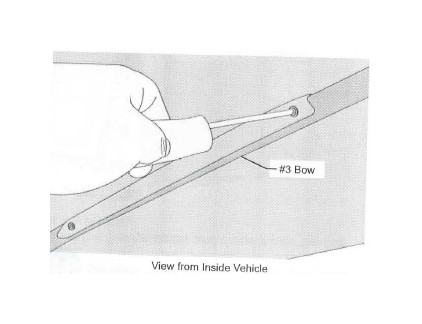
Secure Top Fabric to #3 Bow
Once the top is in place, locate the flaps sewn inside the top near the #3 Bow. Use four (4) #8 x 1/2" Pan Head Washer Screws to secure the flaps to the #3 Bow.
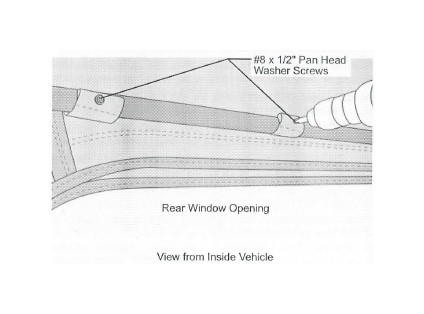
Secure Rear Bow
Locate the four (4) flaps sewn inside the top above the rear window opening. Install a #8 x 1/2" Pan Head Washer Screw to secure each flap to the Rear Bow.
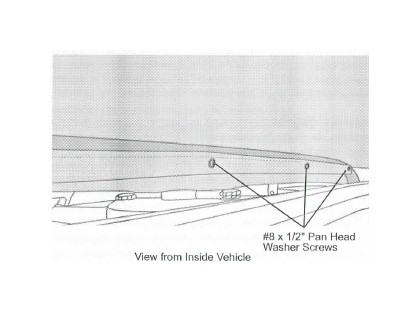
Secure #2 Bow
Locate the flaps inside the top in the center. Wrap them around the #2 Bow and install five (5) #8 x 1/2" Pan Head Washer Screws.
Install Tailgate Bar
Slide the channel in the Tailgate Bar onto the tubing along the bottom of the Rear Window on the inside.
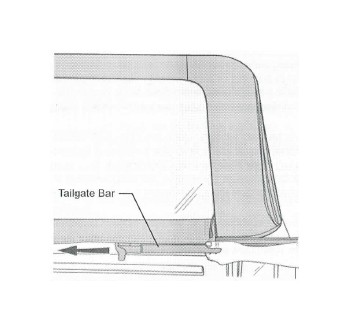
Secure Tailgate Bar
Slide the Tailgate Bar into the Tailgate Bar Mounts on each side of the tailgate opening.
Care and Maintenance of your Bestop Product
Your Bestop product is made of the finest materials available. To keep it looking new and for the maximum possible wear, it will need periodic cleaning and maintenance.
Fabric: The fabric should be washed often using soap, warm water and a soft bristle brush Rinse with clear water to remove all traces of soap. Bestop recommends using Bestop Cleaner (part no. 11201-00) and Bestop Protectant (part no. 11202-00) Bestop Cleaner and Bestop protectant are specially formulated to provide a total cleaning and protection system. Bestop Cleaner safely removes the toughest stains, will not harm vehicle finishes, is biodegradable and environmentally friendly. Bestop Protectant protects against UV-fading, cracking and hardening, and repels dust, grease, dirt and mildew.
Windows: Keep windows clean to avoid scratching. DO NOT use a brush on the windows! Wash with a water-soaked cloth or sponge and a mild dishwashing detergent. Bestop recommends Bestop Vinyl Window Cleaner (part no. 11203-00), which safely cleans and protects vinyl windows and helps prevent UV damage. NEVER WIPE THE WINDOWS WHEN THEY ARE DRY. Be careful when cleaning snow or frost from the vinyl windows since they are easily scratched and may crack at low temperatures. DO NOT roll the sides or rear window in cold weather. The windows become stiff and will crack. Cracks caused by misuse in cold temperatures are not covered under warranty.
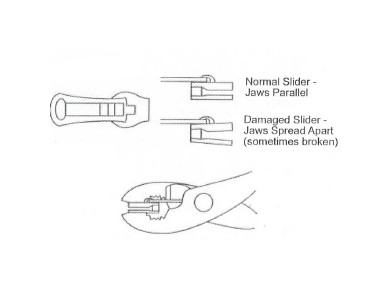
Zippers: Keeping zippers cleaned and lubricated with Bestop's Zipper Cleaner (part no. 11206-00) will help prevent damage and keep the zippers in smooth working condition. If a zipper opens behind the slider, the slider may have been spread apart. This problem can usually be repaired by using an ordinary pair of pliers to bring the sides back into parallel. Return slider to the end of the zipper in the normal Open position. Squeeze lightly at first and test the zipper. If the zipper continues to remain open squeeze more firmly with the pliers and try the zipper again. Repeat this procedure until the zipper operates correctly.
Water: Seeping through at the seams may be stopped by applying 3-M Scotchgard® on the inside of the seams. Rips in the fabric may be repaired with Bondex® iron on patches. Iron the patches to the Inside of the top, carefully following the Bondex® instructions. Snaps: Keep snaps cleaned and lubricated with silicone to help prevent snaps from sticking to the studs. If a snap does become stuck to a stud, use a screwdriver and GENTLY pry apart to prevent permanent damage to the snap or the top fabric.