FREE 1 to 3-Day Delivery on Orders $149+ Details

How to Install TruShield Xtender Net System on your Wrangler
Installation Time
2 hours
Tools Required
- Flat Head Screwdriver
- Phillips Head Screwdriver
- 9/16 Wrench, Socket or Adjustable Wrench
- Pliers

Shop Parts in this Guide
***IMPORTANT NOTICE***
The Xtender Bars are not a safety feature and should not be considered as such. They do not add to or subtract from the safety of the stock Jeep Wrangler roll cage.
The Xtender Bars will not protect persons or property in the event of an accident. The Xtender Bars are only strong enough to support the Xtended net system.
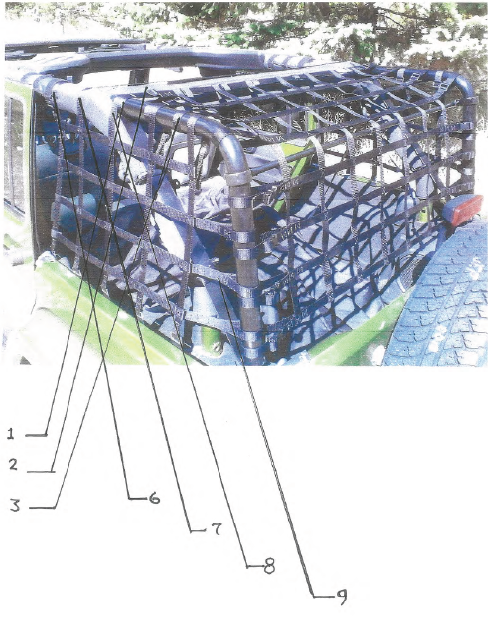
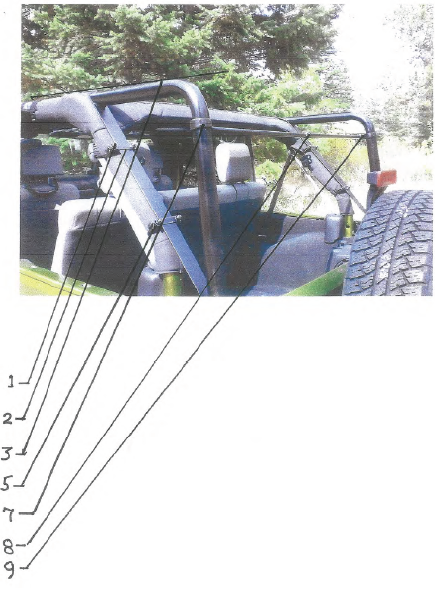
REFERRING TO THE ATTACHED PHOTO:
1. From the bottom, place the U-Bolt around the padded roll bar, taking care to not snag the padding with the bolt threads.
2. Place the Xtender Bar base plate above the roll bar and tighten the nuts only enough to hold it in place.
3. Align the horizontal top of the Xtender Bar with the horizontal top of the roll cage.
4. Looking from the back, align the Xtender Bar vertically to match the roll cage.
5. Add the 2nd (lower) U-Bolt and tighten.
6. Repeat steps 1 through 5 with the other Xtender Bar.
7. Place the bar clamps around the Xtender Bars approximately where shown in attached photo, but do not tighten until Spanner Bar is in place.
8. Connect the two lengths of the Spanner Bar with the bar coupler. The coupler is a tight fit and may have to be tapped into place.
9. With the bolt, washer and thumb screw provided, attach the Spanner Bar to the bar clamps and tighten.
***The Spanner Bar ends should be behind the bar clamp flanges to assure a tighter fit. If the clamps seem somewhat loose it is not a problem as long as the Spanner Bar is horizontal when the net is installed. The Spanner Bar prevents the Xtender Bars from collapsing toward each other when the net is tightened.
When reinstalling the hardtop, the U-Bolts must be loosened and bar/net moved to the left a couple of inches allowing room for the rear wiper plug-in.
INSTALLATION INSTRUCTIONS
Enclosed you will find three separate packages of nets (rear net, left side net and right side net). Our label will be on both the rear net and the right side net.
Lay all three of the nets out on a flat surface with the labels facing out.
When installed, the rear and right side nets will have the labels out from the right side of the nets.
Begin by installing the REAR NET.
REAR NET
1. Referring to the attached photo, the upper most strap should be attached as close as possible to the crossover roll bar.
2. Crossover roll bar.
3. Loosely attach the balance of the straps to the Xtender Bars.
4. Adjust the connections so the vertical and horizontal straps are perpendicular to each other.
5. Tighten.
SIDE NETS
6. Begin with the first vertical strap closest to the rear edge of the door. Attach the metal hook to the Jeep body and connect the strap and buckle around the roll bar. This will keep the net in place while connecting the other straps.
7. The next strap goes over and connects with the same strap from the other side.
8. This strap does the same, but goes through the "keepers" on the top strap of the rear net. Connect the next two straps and align the vertical and horizontal straps so they are perpendicular to each other and tighten.
9. Connect the three horizontal straps to the Xtender Bars.
NOTE: Roll cage bars and nylon webbing are subject to expansion and contraction with temperature variations. Occasional tightening may be necessary and best done in the cool of the morning.
TIP: Use pliers to grip the strap ends to pull the strap extra tight.