FREE 1 to 3-Day Delivery on Orders $149+ Details

How to Install Alloy USA - Precision Gear - Dana 30 Grande 30/30 Kit, 3.73 & Up on your 1987-1995 Wrangler
Warning: Please read instructions fully prior to installing the Alloy USA axle kit. Make sure vehicle has been placed in gear, emergency brake applied, and wheels blocked. Vehicle must be secured prior to installation.
DISASSEMBLY
Step 1: Remove all components outboard of the right and left knuckle. Please refer to your owner's manual for the proper procedure.
Step 2: Remove vacuum actuator assembly. Please refer to your owner's manual for the proper procedure.
Step 3: Pull both right and left axle assemblies from vehicle. Discard stock two piece axle.
Step 4: Remove right side outer seal and discard.
Step 5: Remove differential cover and bearing caps (mark RH,LH). Remove carrier
Note: Removing differential does not affect your ring and pinion settings as long as the carrier bearings remain attached to the carrier, and pinion is left in axle housing. Be sure to mark bearing caps in relation to the side they were removed from.
ASSEMBLY
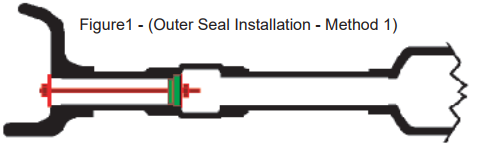
Outer Seal Installation (Note: The following illustrates two different ways to install the new seal.)
(Method 1) - Use threaded rod, large washer, and two nuts.
Step 1: Clean axle tube bore. Bore can be scraped clean by using the threaded rod and a smaller I.D. flat washer. Insert washer and rod to the end of tube and pull back scraping any dirt and gear oil that may have settled to the bottom of the tube.
Step 2: Insert threaded rod into axle housing. Slide seal onto rod through disconnect opening. Place large washer onto rod end through opening. Thread nut onto rod. Leave about 1" of rod at end (See Fig.1).
Step 3: Set seal in seal bore of axle tube (See Fig.1).
Step 4: Slide large washer onto the rod at the knuckle end and thread nut onto rod. Tighten nuts while checking outer seal to make sure it remains square to the bore. Continue until seal is fully seated
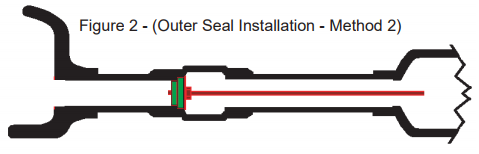
(Method 2) - Will be necessary to fabricate or buy seal insertion tool as shown (Fig.2)
Step 1: Clean axle tube bore. Bore can be scraped clean by using the threaded rod and a smaller ID flat washer. Insert washer and rod to the end of tube and pull back scraping any dirt and gear oil that may have settled to the bottom of the tube.
Step 2: Using seal insertion tool, drive seal into bore and impact with hammer (See Fig.2). Check seal, through disconnect opening, to ensure seal remains square in tube seal bore.
INNER SEAL INSTALLATION - Driver's side
Step 1: Clean axle tube bore. Bore can be scraped clean by using the threaded rod and a smaller I.D. flat washer. Insert washer and rod to the end of tube and pull back scraping any dirt and gear oil that may have settled to the bottom of the tube.
Step 2: Place seal into seal bore through carrier opening. Use a 1-3/8" socket or a correct sized wood block. Impact with hammer until fully seated. Before hitting make sure that the seal is square with seal bore. Refer to owner's manual if needed.
AXLE INSTALLATION
Step 1: Install differential carrier noting correct end cap placement. Tighten to correct fl/lbs, and install cover.
Step 2: Assemble inner and outer axle shafts with u-joints. Insert axle assembly into housing. Take care to avoid damaging seal when installing.
Step 3: Install left axle assembly (driver's side).
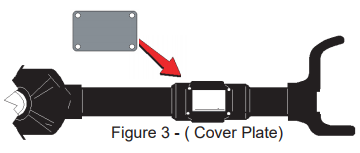
Step 4: Install new Block-Off plate in place of vacuum disconnect cover. Either an O.E. gasket or silicone sealant can be used (Fig.3).
Step 5: Reinstall outer steering knuckle and brakes per owner's manual. Fill differential housing with gear oil.