FREE 1 to 3-Day Delivery on Orders $149+ Details

How to Install an Alloy USA Heavy Duty Ball Joint Kit on your Jeep Wrangler

Shop Parts in this Guide
Installation Guide: Heavy Duty Replacement Chromoly Ball Joints
Please Note: AlloyUSA H/D ball joints are direct replacements for factory (OE) components. Please refer to the factory service manual for manufacture approved installation instructions. Design changes do not affect installation procedures. Additional installation notes and information have been provided to help with installation.
Installing ball joints requires a working automotive knowledge and should be performed by a certified automotive mechanic. Vehicle will require an alignment inspection after H/D ball joint installation. Failure to align vehicle properly will result in premature ware of suspension - steering components and void manufactures warranty.
The AlloyUSA H/D ball joints are made of a high strength Chromoly steel designed to out last OE and all leading replacement parts. Each joint is supplied with grease fittings and regular maintenance should be performed it insure long service life.
Helpful notes:
(1) Remove steering knuckle and axles. Refer to factory manual for correct procedure.
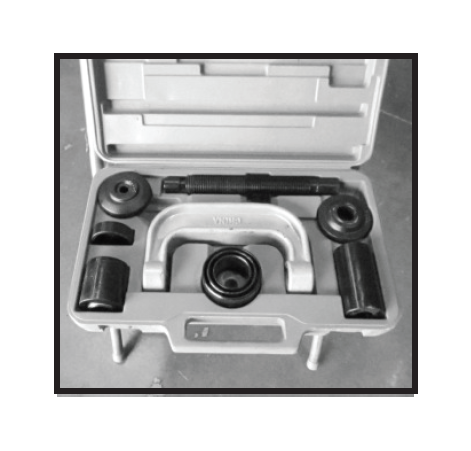
(2) A ball joint C-frame press and adaptor will be used for proper installation. This ball joint press can be purchased from several suppliers including Northern Tools, OTC, Harbor Freight and Miller Special Tools. Installing ball joints with a hammer will void manufacture warranty.
(3) Upper ball joint is supplied with standard zerk fitting. Use this fitting to add grease to both ball joints before installation. (DO NOT OVER FILL) Special designed lower joint will require needle zerk fitting. This fitting has been supplied with your H/D kit. Remove zerk fittings before installing.
(4) Clean inside of ball joint guides before installing joints.
(5) Prior to installing ball joints remove poly dust covers. After joints have been pressed in reinstall dust boots before installing knuckle.
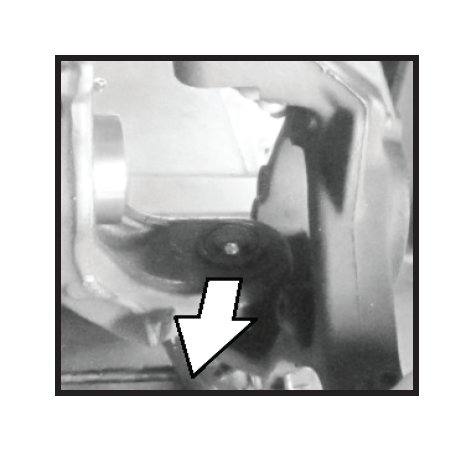
(6) Install ball joints - referring to factory service manual. Lower ball joint should have needle zerk fitting facing forward as shown. Ball joints must be installed using ball joint C-frame press as noted in step (1).
(7) Reinstall steering knuckle making sure dust boots have been reinstalled to ball joints. Double check position of lower ball joint zerk fitting . Following factory specs torque lower ball joint nut to 80ft-lbs and upper ball joint nut to 75ft-lbs. Nuts can be tightened further to align cotter pin hole with castle nut openings (DO NOT BACK OFF TO ALIGN HOLES). Reinstall zerk fitting. Needle fitting is to be used in lower joint. Add grease if needed.
(8) Reassemble vehicle per factory manual - Have vehicle alignment checked and set to factory specs if required.