FREE 1 to 3-Day Delivery on Orders $149+ Details

How to Install Zone Offroad Front Sway Bar Links w/ 3-4 In. Lift on your 1997-2006 Wrangler

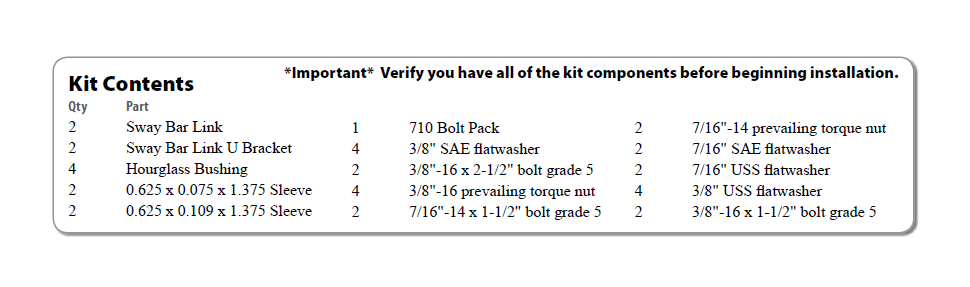
Shop Parts in this Guide
»Pre-Installation Notes
1. Special literature required: OE Service Manual for model/year of vehicle. Refer to
manual for proper disassembly/reassembly procedures of OE and related components.
2. Adhere to recommendations when replacement fasteners, retainers and keepers are called out in the OE manual.
3. Larger rim and tire combinations may increase leverage on suspension, steering, and related components. When selecting combinations
larger than OE, consider the additional stress you could be inducing on the OE and related components.
4. Post suspension system vehicles may experience drive line vibrations. Angles may require tuning, slider on shaft may require replacement,
shafts may need to be lengthened or trued, and U-joints may need to be replaced.
5. Secure and properly block vehicle prior to installation of Zone Offroad Products. Always wear safety glasses when using power tools.
6. If installation is to be performed without a hoist, Zone Offroad Products recommends rear alterations first.
7. Due to payload options and initial ride height variances, the amount of lift is a base figure. Final ride height dimensions may vary in
accordance to original vehicle attitude. Always measure the attitude prior to beginning installation.
INSTALLATION INSTRUCTIONS
1. Park the vehicle on a clean, flat surface and block the rear wheels for safety.
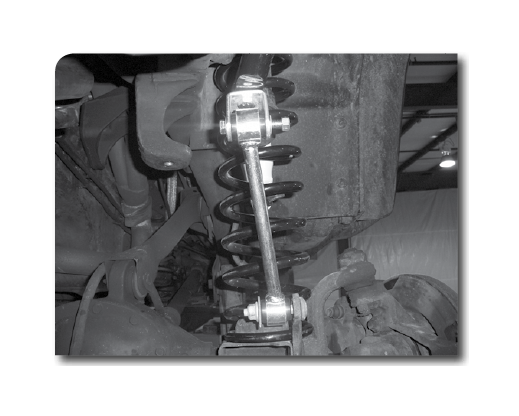
2. Disconnect the factory sway bar links from the sway bar. On TJ models, the
upper mount has a tapered end that is seated in the sway bar. Use a small pickle
fork to release the taper.
3. Disconnect the sway bar links from the axle. Remove the nut and the sway bar
link from the bolt. Some early models will require a T55 torx socket to hold the
bolt from rotating. Later models used a bolt with a serrated neck that is pressed
into the bracket so it will not rotate. Save axle mount hardware.
4. Attach the U-brackets to the sway bar with the provided hardware as follows:
TJ models: Use 3/8" x 1-1/2" bolt with a 3/8" USS washer, run up through the
bracket and sway bar link hole and fasten with a 3/8" USS washer and 3/8"
nut. XJ/ZJ models: Use 7/16" x 1-1/2" bolt with a 7/16" SAE washer, run up
through the bracket and sway bar link hole and fasten with a 7/16" USS (large)
washer and 7/16" nut Leave hardware loose.
5. Position the U-brackets so the through holes are parallel with the sway bar link
axle mount hole. Torque 3/8" hardware to 35 ft-lbs, 7/16" hardware to 45 ft-lbs.
6. Lubricate and install the bushings and sleeves in the new end links. Each link
should have and large ID and a small ID sleeve installed.
7. Install the end of the link with the large ID sleeve on the original mounting bolt
at the axle with the end link offsetting toward the center of the vehicle. Fasten
with the factory nut but leave loose at this time.
8. Install the end of the link with the small ID sleeve in the U-bracket and fasten
with the provided 3/8” x 2-1/2" bolt, nut and washers. Run the bolt from the
inside out. Leave hardware loose.
9. With the links completely installed, torque the lower factory hardware to 55
ft-lbs and the upper 3/8" hardware to 35 ft-lbs.
10. Check all hardware after 500 miles.