 FREE 1 to 3-Day Delivery on Orders $149+ Details

How to Install Zone Offroad Drag Link Flip Kit for 2 in Suspension Lift (07-18 Wrangler JK) on your Jeep Wrangler

Shop Parts in this Guide
Welcome
CONGRATULATIONS on purchasing new Bar Pin Eliminators from JKS Manufacturing. We are committed to providing you with the best products available and your satisfaction is our first priority.
PLEASE READ these Installation Instructions carefully, and save them for future reference, as they contain important installation and maintenance information.
Important
Must be used with factory pitman arm.
Requires 3" of front bump stop extension
Cannot be combined with other track bar relocation systems, although most popular adjustable track bars are okay.
Must have a minimum of 3" of bump stop extension.
Important
Installation
1. FRONT DISASSEMBLY
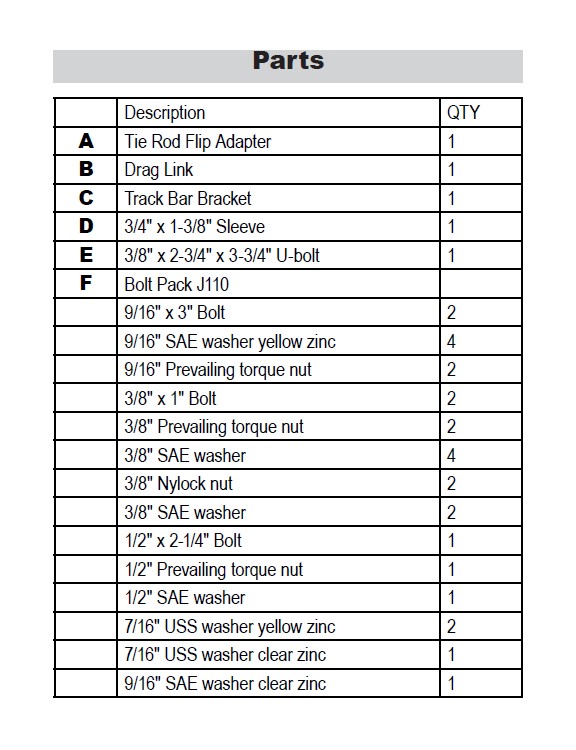
Disconnect the front track bar (21mm) from the axle. Save bolt and nut tab.
Raise the vehicle and support the frame with jack stands behind the front lower control arm pockets.
Remove the wheels.
Remove the front splash guard by removing the 6 plastic clips.
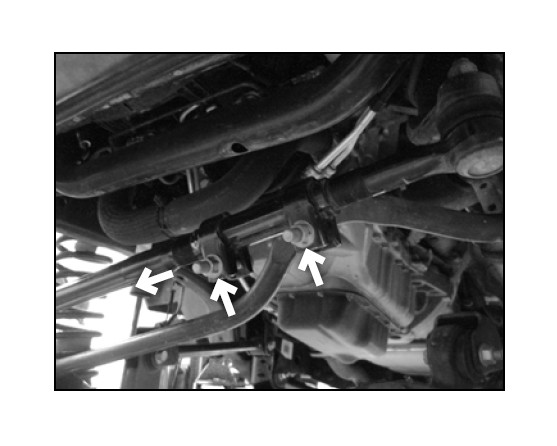
Disconnect the steering drag link from the passenger side steering knuckle. Use a hammer on the end of the steering knuckle at the tie rod end to release the tapered seat.
Loosen the drag link adjustment collar (15mm) and un-thread the passenger side drag link from the adjusting collar.
2. DRAG LINK FLIP
High steer drag link, tie rod flip adapter, track bar bracket, spacer sleeve and bolt pack J110 required for this section.
Drill out the tapered upper drag link hole on the passenger side steering knuckle to 7/8". A step drill with the largest size being 7/8" is recommended. This tool is available through JKS, part number 1699. Use care to drill as straight as possible to avoid an oversized hole and loose connection.
With the hole drilled to 7/8" (.875"), insert the provided tie rod flip adapter into the hole. The adapter is designed to have a slight preload into a 7/8" hole to ensure a tight fit so gently tap it into place using a hammer.
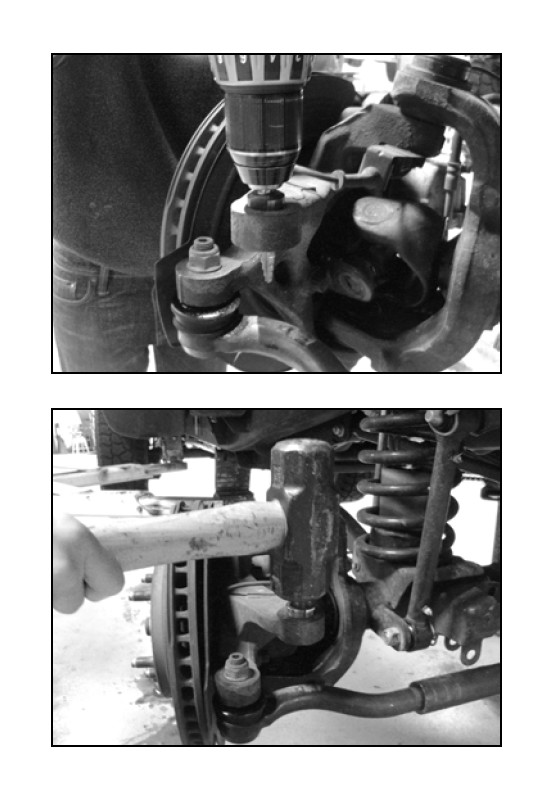
Thread the replacement drag link into the adjustment collar so it matches the length of thread engagement of the tie rod end at the pitman arm.
Fasten the drag link to the knuckle using the provided 9/16“ washer from bolt pack J110. Torque the nut to 63 ft-lbs.
Important: Be sure to use the additional washer, it is a larger diameter to cover the 7/8" hole.
3. TRACK BAR BRACKET
Place the track bar bracket onto the factory track bar mount. Install two 3/8" bolts through the 2 outer front holes.
Line up the original track bar mounting hole with the center hole in the bracket and insert the provided 3/4" x 1-3/8" sleeve. Loosely fasten the bracket through the original track bar hole with the provided 9/16" hardware.
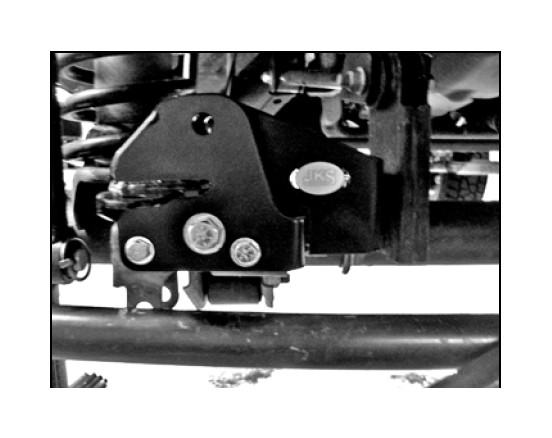
Fasten the bracket to the axle with the 3/8" U-bolt, nylock nuts and washers.
Torque the 3/8" hardware to 40 ft-lbs. and the 9/16" hardware to 125 ft-lbs.
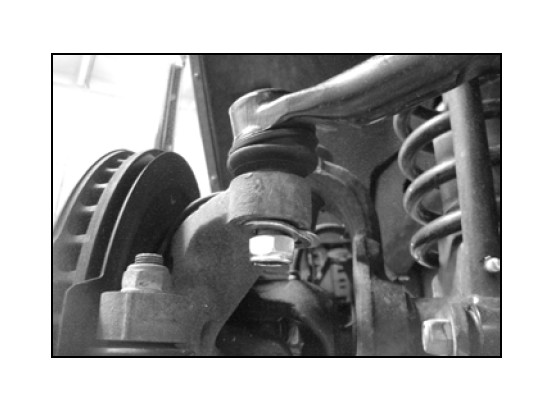
4. HIGH MOUNT STEERING STABILIZER
Remove the bolt mounting the steering stabilizer to the axle and the tie rod. Remove the steering stabilizer.
Loosen the clamp that mounts the steering stabilizer to the tie rod.
Rotate the steering stabilizer tie rod mount until it lines up with the new mount on the track bar bracket.
Place one of the 1/2" clear zinc USS washers on the factory tie rod mount followed by the steering stabilizer, another USS washer and the factory 12mm nut.
If using the factory steering stabilizer, use the factory axle hardware to mount it to the bracket. If an aftermarket stabilizer is installed, use the provided 1/2" bolt, nut, and washers from bolt pack J110. The larger diameter washer is used on the bottom against the stabilizer bushing.
5. FINAL FRONT INSTALLATION STEPS
Install the wheels and torque to the lug nuts to 125 ft-lbs.
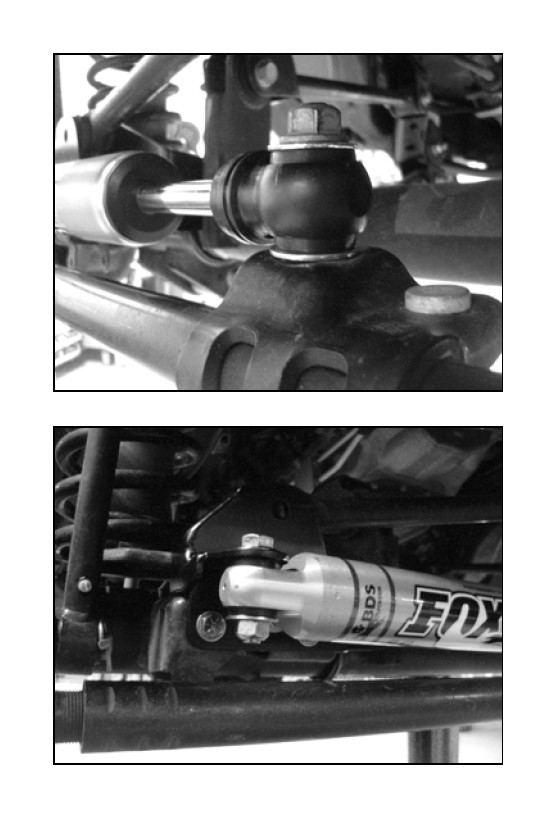
Lower the vehicle to the ground and attach the track bar to the new high steer bracket with the 9/16" hardware. Have an assistant turn the steering wheel to aid in aligning the track bar bolt.
If equipped with an adjustable track bar, measure the distance between the tire and chassis from consistent points on each side.
Take the difference of the measurements on each side and divide it by half. Adjust the track bar by that amount and re-install it into the bracket.
Torque the frame and axle track bar bolts to 125 ft-lbs.
Adjust the steering wheel to center with the adjustment collar on the drag link. Once centered torque the bolts to 26 ft-lbs.
Check all hardware torque after 500 miles.
