 FREE 1 to 3-Day Delivery on Orders $149+ Details

How to Install Zone Offroad 1 in. Budget Motor Mount (87-06 Wrangler YJ & TJ) on your Jeep Wrangler
Tools Required
- Metric/Standard Socket Wrench Set
- 15mm and 18mm Open End Wrenches
- Torque Wrench
- Pliers or Vice Grips
- Hydraulic Floor Jack
- Wire Brush and/or Chemical Cleaner (to clean bolt threads)
- Die Grinder with Cut-Off Wheel or similar cutting tool (for cutting OE insulator stud)
- Anti-Seize Lubricant
- Factory Service Manual (recommended)
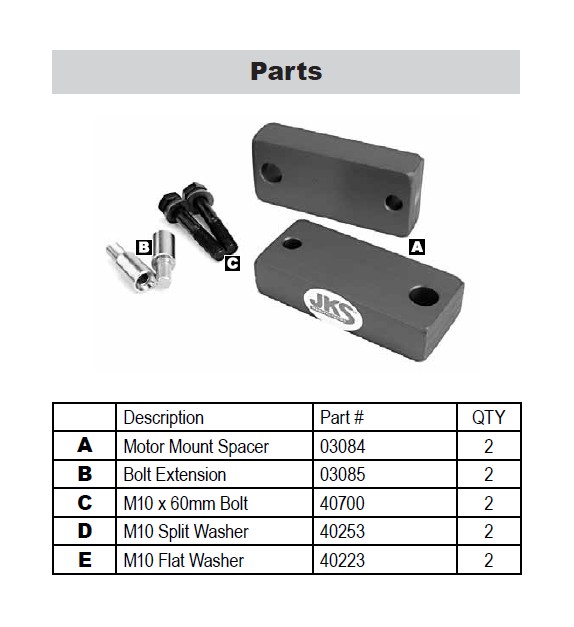
Shop Parts in this Guide
Welcome
CONGRATULATIONS on purchasing Budget Motor Mounts from JKS Manufacturing. We are committed to providing you with the best products available and your satisfaction is our first priority.
PLEASE READ these Installation Instructions carefully, and save them for future reference, as they contain important installation and maintenance information.
Important
MUST BE INSTALLED one side at a time.
MUST BE INSTALLED in conjunction with, or following, the installation of a body lift.
OE MOTOR MOUNT BUSHINGS must be in good condition. If worn or questionable, new motor mounts must be installed.
Installation
1. SUPPORT ENGINE
Place a hydraulic jack beneath vehicle and choose one of the following locations as a lifting point for engine:
Position jack beneath transmission bell housing with block of wood to distribute engine weight. – or –
Position jack beneath mounting flange of engine oil pan with block of wood to distribute weight across oil pan bolts.
IMPORTANT: Do NOT attempt to lift the engine by the engine oil pan.
Carefully raise the hydraulic jack just enough to remove the weight of the engine from the engine mounts.
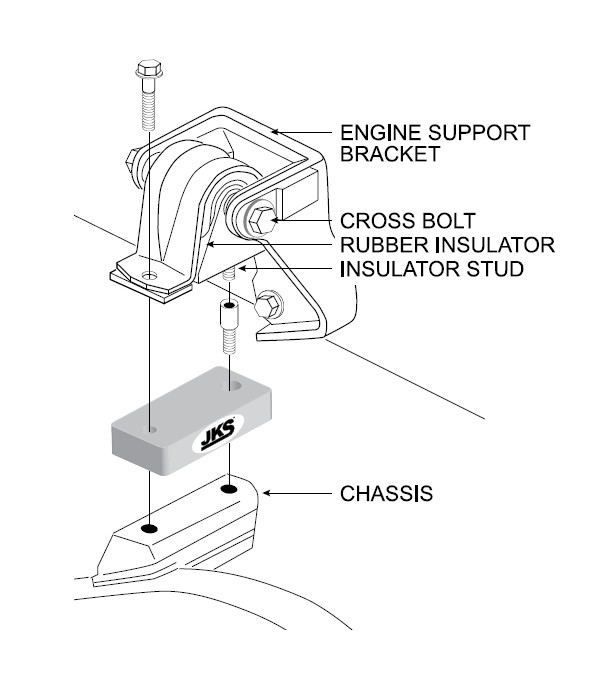
2. REMOVE OE ENGINE MOUNT
Remove nut from cross bolt that secures the rubber insulator to the engine support bracket. DO NOT REMOVE cross bolt yet.
Remove the original retaining bolt and nuts that secure the rubber insulator to the chassis. Retain original nuts.
Remove cross bolt and insulator from vehicle.
IMPORTANT: If vehicle is equipped with air conditioning, the condenser pump will not allow adequate space to remove the cross bolt. Therefore, it will be necessary to remove the entire engine support bracket assembly from the engine.
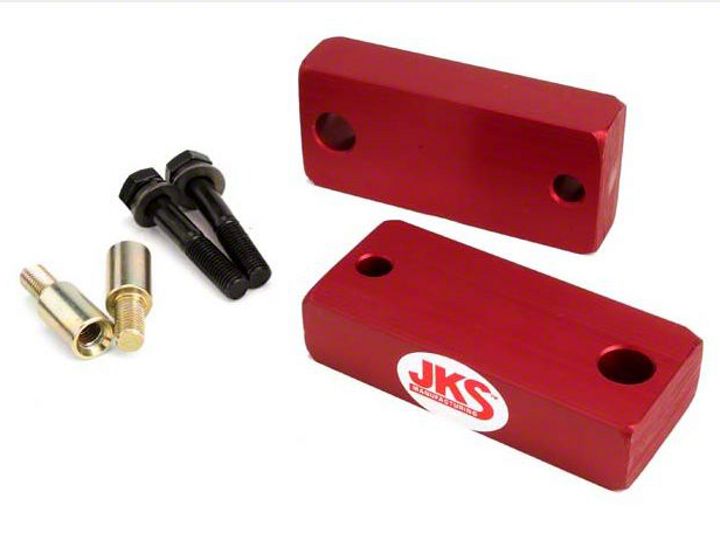
3. INSTALL MOTOR MOUNT SPACERS
Using a wire brush and/or chemical cleaner, thoroughly clean threads of stud protruding from base of rubber insulator.
Using a cutting tool, remove 1/4” from length of OE insulator stud. HINT: Use care to avoid damaging threads.
Thread supplied Bolt Extension (B) onto insulator stud. Use pliers or vice grips to ensure Extension completely threads onto stud until seated against bottom of insulator.
Slip Motor Mount Spacer (A) over the Bolt Extension (B) and re-position engine mount assembly on the chassis.
IMPORTANT: If vehicle is equipped with air conditioning, it will be necessary to reinstall the engine support bracket on the engine at this time.
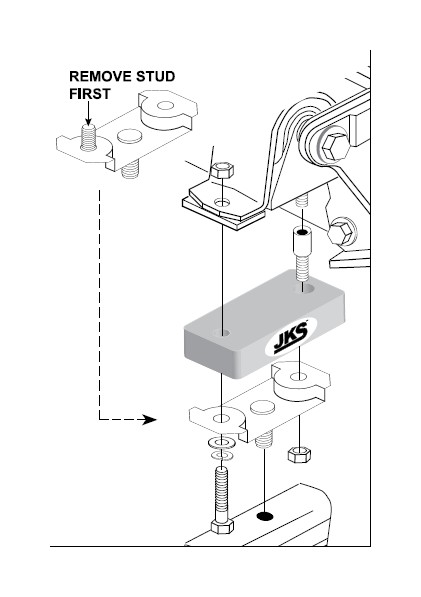
Apply anti-seize lubricant to threads of M10 x 60mm Bolt (C) and insert with M10 Washers (D&E) into remaining mounting hole.
Loosely thread the original 10mm nuts onto Bolt Extension (B) and M10 x 60mm Bolt (C) to secure engine mount to chassis.
Adjust height of hydraulic jack to align rubber insulator with engine support bracket.
Re-install original cross bolt and nut to secure rubber insulator to engine support bracket. DO NOT TIGHTEN yet.
4. REPEAT AND TIGHTEN HARDWARE
Repeat Steps 2 and 3 on opposite side of vehicle BEFORE tightening mounting hardware.
Using a torque wrench, tighten the cross bolt to 60 ft-lbs., and 10mm nuts to 30 ft-lbs.
5. CHECK FAN SHROUD CLEARANCE
Before starting engine, check for interference between the fan shroud and fan blades. If necessary, trim the fan shroud until it completely clears any interferences.
Maintenance
Check all torque specifications as part of regular vehicle maintenance schedule.

