 FREE 1 to 3-Day Delivery on Orders $149+ Details

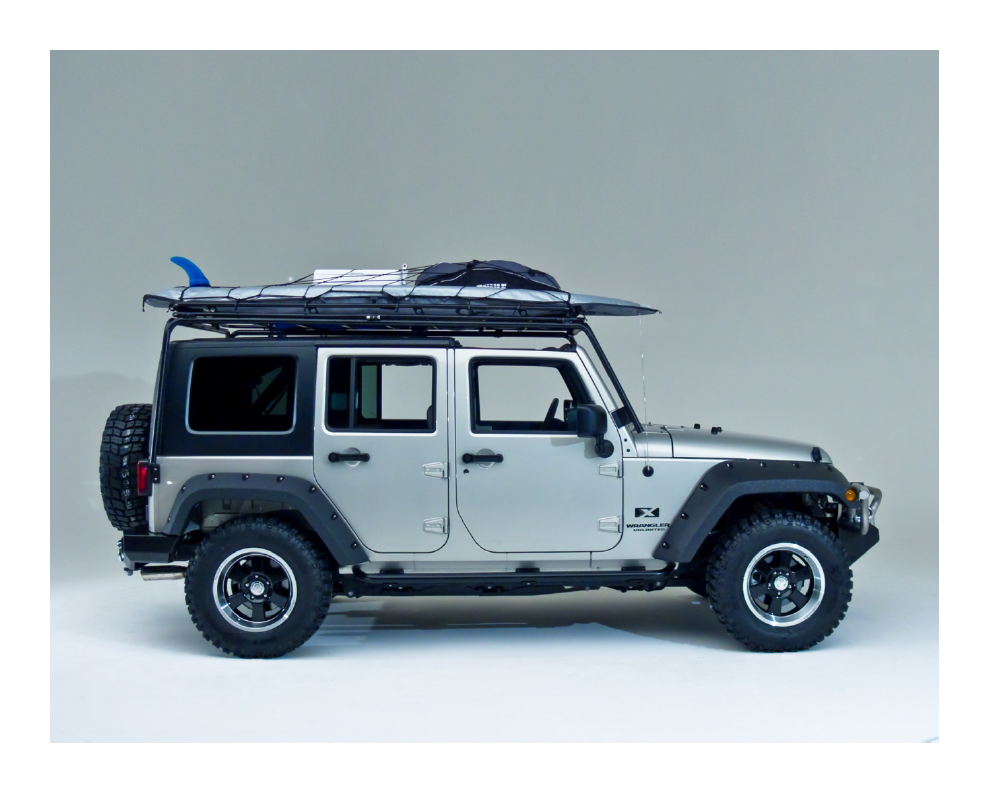
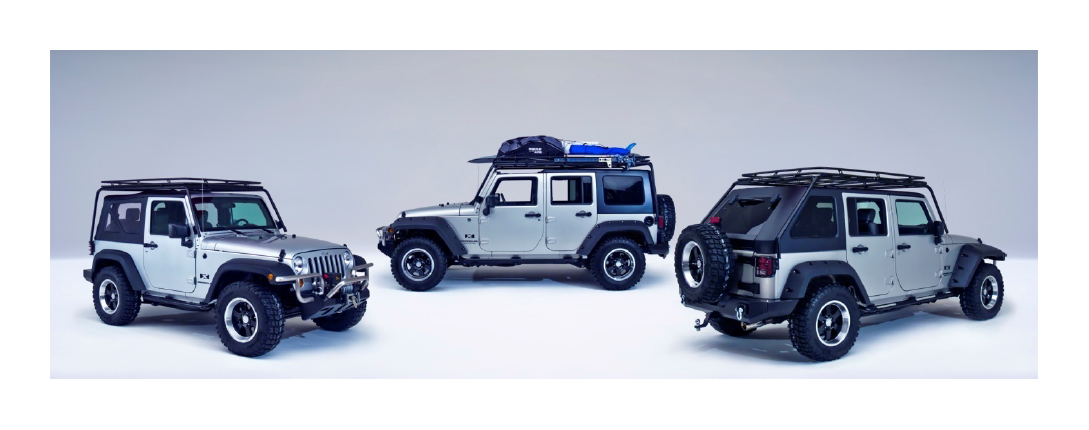
How to Install a Wild Boar Fast Back Rack on your 2007-2014 Wrangler JK 4 Door
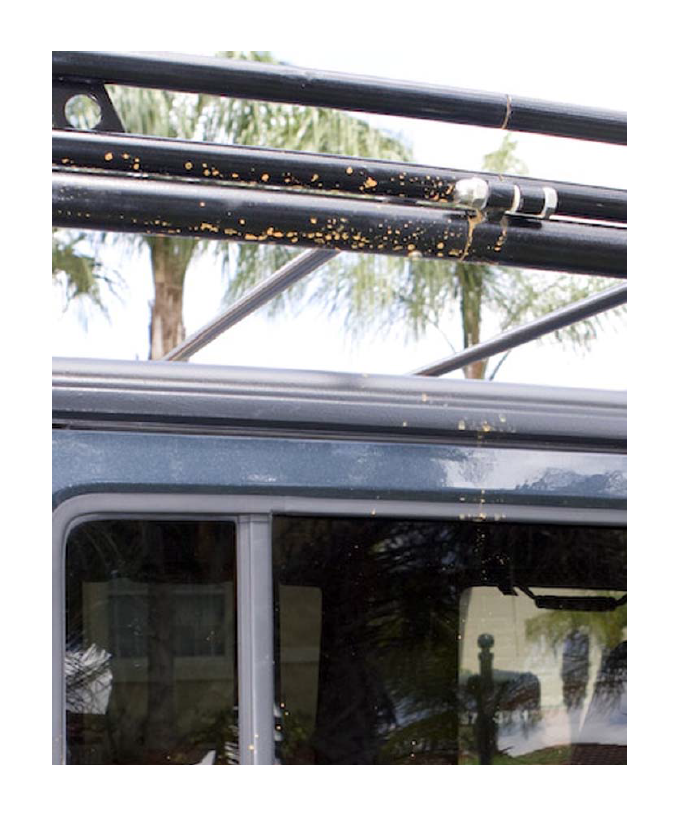
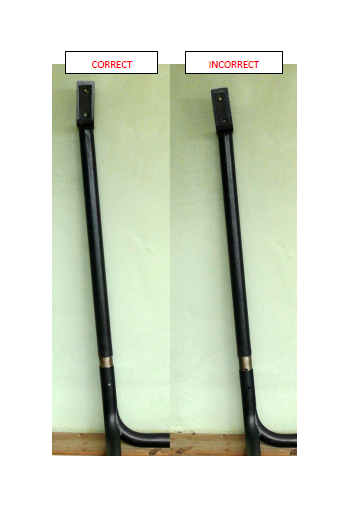
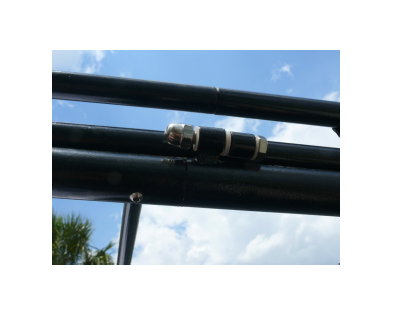
DON’T LET THIS HAPPEN TO YOU
Please read the installation manual and follow the instructions when installing your Wild Boar Cargo Rack system.
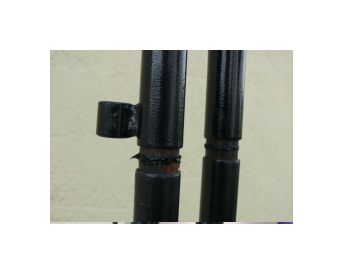
It’s true, our racks are incredibly easy to assemble and install, but that does not mean you should skip steps like using the silicone sealant to prevent things like this happening.
If you follow the installation Instructions, you will have a beautiful and functional Cargo rack system that you will enjoy for years to come.
If a part is damaged or missing or becomes damaged during use, please call us.
Running to the hardware store might seem convenient but we are happy to provide you replacement parts that are designed specifically for your cargo rack system.
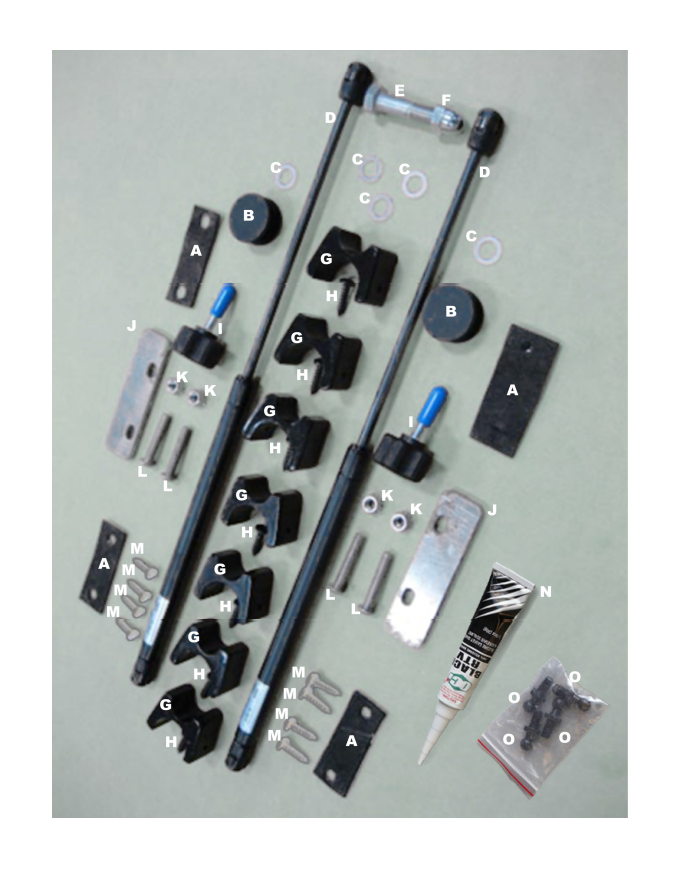
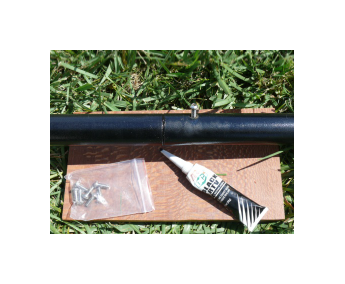
PARTS LIST AND COMPONENTS
(A). Self‐Adhesive Rubber Gasket (4)
(B). Black Plastic End Cap (Qty 2)
(C). Nylon Washers (Qty 5)
(D). Gas Shocks (Qty 2)
(E). Large ½ inch Bolt (Qty 1)
(F). Large ½ inch Round Head Nut (Qty 1)
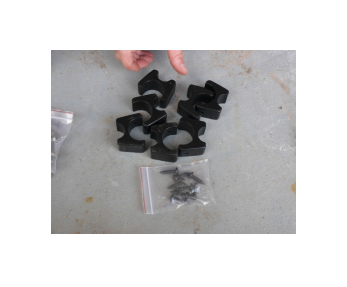
(G). Black Saddle Bumper (Qty 7)
(H). Black Phillips Head Saddle Screw (Qty 7)
(I). Spin Knob Handles (Qty 2)
(J). Mounting Plate (Qty 2)
(K). 5/16 inch Lock Nut (Qty 4)
(L). 2 inch Pan Hex Head Bolt (Qty 4)
(M). Silver Pan Hex Head Screw (Qty 8)
(N). Silicone Sealant (Qty 1)
(O). Knob Head Bolt (Qty 4)
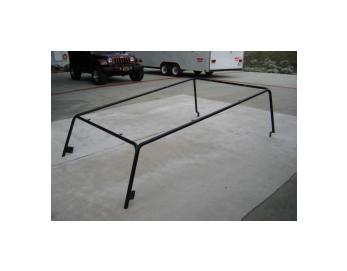
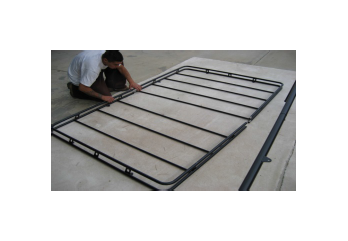
STEP 1: ASSEMBLING THE RACK FRAME
DO NOT ASSEMBLE YOUR CARGO RACK SYSTEM ON UNCOVERED CONCRETE OR PAVERS. You will scratch your finish.
1. Prep your assembly area. Lay down a large piece of carpet or an old blanket to work on, or do all the assembly on grass. Familiarize yourself with the rack pieces and assembly hardware.
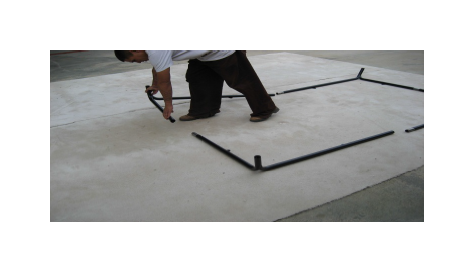
2. Place the 4 Y‐Shaped frame tubes out for assembly with the short arm facing up. You will be assembling your cargo rack frame upside down. The rear of the rack frame has the short arms angled more towards vertical, while the front of the rack frame has the short arms angled slightly out and away to match the slope of the windshield.
3. Assemble the 2 Y‐Shaped frame tubes that form the FRONT of the rack frame.
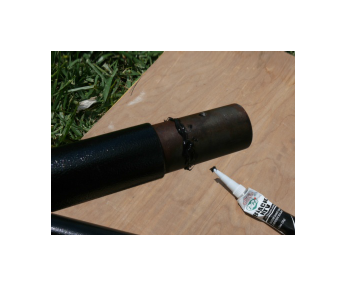
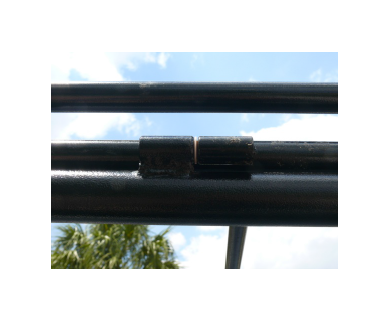
a. Use the Silicone Sealant (N) to run a bead around the male portion of the pipe fitting ½ inch in from the powder‐coated surface on the unfinished pipe.
b. Connect the two pieces with a gentle twisting motion to evenly spread the silicone inside the joint.
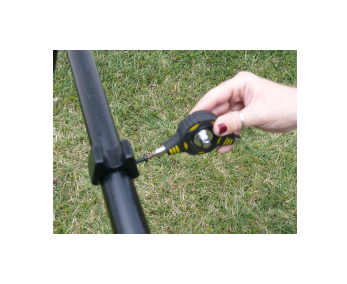
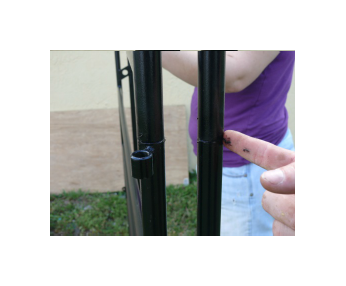
c. Use a Silver Pan Hex Head Screw (M) to connect the rack section you are working on. Apply a bit of silicone sealant around the screw hole before inserting the Pan Head Screw for extra weather‐proofing. This will also prevent your screw from falling out easily if it loosens over time. Gently wipe away any excess silicone sealant after securing the screw.

d. Use your finger to smooth the silicone around the pipe connection seam making sure it is filled evenly. If you need more silicone you can apply it now to ensure your seam is fully weather‐proofed.
4. Repeat a‐d to assemble the 2 Y‐Shaped frame tubes that form the REAR of the rack frame.
a. Use the Silicone Sealant (N) to run a bead around the male portion of the pipe fitting ½ inch in from the powder‐coated surface on the unfinished pipe.
b. Connect the two pieces with a gentle twisting motion to evenly spread the silicone inside the joint.
c. Use a Silver Pan Hex Head Screw (M) to connect the rack section you are working on. Apply a bit of silicone sealant around the screw hole before inserting the Pan Head Screw for extra weather‐proofing. Gently wipe away any excess silicone sealant after securing the screw.
d. Use your finger to smooth the silicone around the pipe connection seam making sure it is filled evenly. If you need more silicone you can apply it now to ensure your seam is fully weather‐proofed.
5. Assemble the FRONT and REAR portions of the rack frame together.
a. Connect the FRONT and BACK portions together leaving a good 2 inches of the connections exposed on both sides of the rack. DO NOT FULLY PRESS THE PIPES TOGETHER YET.
b. Use the Silicone Sealant (N) to run a bead around the male portion of the pipe fitting ½ inch in from the powder‐coated surface on the unfinished pipe on both sections of the rack frame. Since you will not be able to twist these connections, spread the bead out a bit on the connection, but remember you are sealing a small joint, not spackling the side of a house. You can always add additional sealant later to fill the groove where the pipes connect.
c. Now fully connect the FRONT and BACK portions together. You can tap the sections in place with a rubber mallet if necessary.
d. Use a Silver Pan Hex Head Screws (M) to connect the rack sections you are working on. Apply a bit of silicone sealant around the screw holes before inserting the Pan Head Screws for extra weather‐proofing. Gently wipe away any excess silicone sealant after securing the screw.
e. Use your finger to smooth the silicone around the two pipe connection seam making sure it is filled evenly. If you need more silicone you can apply it now to ensure your seam is fully weather‐proofed.
f. The top of your rack frame is now partially assembled. You are ready to install the frame legs.
6. Connect the FRONT frame legs. The two FRONT frame legs have angled windshield mounting flanges welded directly to the piping approximately 4 inches up from the leg end. These angled mounting flanges need to face in towards the rack frame when properly assembled. MAKE SURE THAT THE MOUNTING FLANGES ARE ALIGNED ANGLING IN AND BACK TOWARDS THE RACK FRAME WHEN INSTALLED. If the Bracket is angling out and away from the rack frame, you have them installed backwards. Repeat these steps for both of the FRONT frame Legs.
a. Use the Silicone Sealant (N) to run a bead around the male portion of the pipe fitting ½ inch in from the powder‐coated surface on the unfinished pipe.
b. Connect the two pieces with a gentle twisting motion to evenly spread the silicone inside the joint.
c. Use a Silver Pan Hex Head Screw (M) to connect the rack section you are working on. Apply a bit of silicone sealant around the screw hole before inserting the Pan Head Screw for extra weather‐proofing. Gently wipe away any excess silicone sealant after securing the screw.
d. Use your finger to smooth the silicone around the pipe connection seam making sure it is filled evenly. If you need more silicone you can apply it now to ensure your seam is fully weather‐proofed.
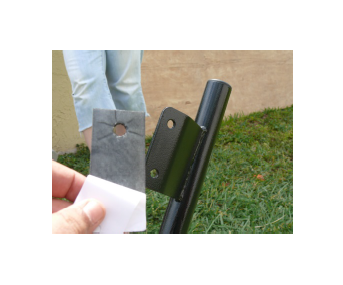
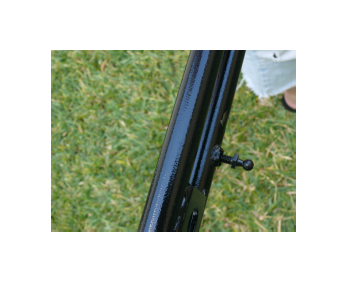
e. Peel the backing from the Self‐Adhesive Rubber Gasket (A) and attach it to the inside of the mounting flange that will be attached to your Jeep. Make sure to clean the surface thoroughly before attaching the Self‐Adhesive Rubber Gasket with a non oil‐based cleaner to ensure that the adhesive sticks properly. This will protect your Wrangler’s finish from being scratched and provide a seal against moisture and dirt from gathering between the mounting flange and the Wrangler’s body.

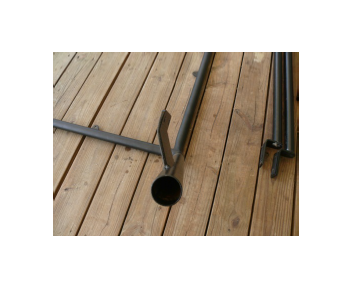
7. Install the protective End‐caps on the FRONT frame legs. Gently push a Black Plastic End Cap (B) into the open end of the Legs you just assembled. If necessary you may tap with a Rubber Mallet to seat them fully. DO NOT USE A HAMMER as you could accidentally hit too hard and chip the powder‐coat at the end of the pipe compromising its protective finish.
8. Connect the REAR frame legs. The two REAR frame legs have body mounting Brackets welded directly to the piping at the base of the leg. These brackets need to face in towards the rack frame when properly assembled. MAKE SURE THAT THE MOUNTING BRACKETS ARE ALIGNED VERTICALLY UP AND DOWN WHEN INSTALLED. If the Bracket is angling away from the rear of the rack frame, you have them installed backwards. Repeat these steps for both of the REAR frame Legs.
a. Use the Silicone Sealant (N) to run a bead around the male portion of the pipe fitting ½ inch in from the powder‐coated surface on the unfinished pipe.
b. Connect the two pieces with a gentle twisting motion to evenly spread the silicone inside the joint.
c. Use a 1 inch Pan Hex Head Screw (M) to connect the rack section you are working on. Apply a bit of silicone sealant around the screw hole before inserting the Pan Head Screw for extra weather‐proofing. Gently wipe away any excess silicone sealant after securing the screw.
d. Use your finger to smooth the silicone around the pipe connection seam making sure it is filled it evenly. If you need more silicone you can apply it now to ensure your seam is fully weather‐proofed.

e. Peel the backing from the Self‐Adhesive Rubber Gasket (A) and attach it to the side of the mounting bracket that will be attached to your Jeep. Make sure to clean the surface thoroughly before attaching the Self‐Adhesive Rubber Gasket with a non oil‐based cleaner to ensure that the adhesive sticks properly. This will protect your Wrangler’s finish from being scratched and provide a seal against moisture and dirt from gathering between the mounting bracket and the Wrangler’s body.
9. Now turn your frame right side up.
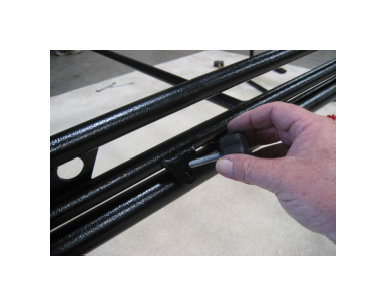
10. Install the Bolts that will anchor the Gas Shocks for the basket.
a. Install 2 of the Knob Head Bolts (O) that will secure the gas shocks for your cargo basket. Apply a bit of silicone sealant around the threaded bolt hole on the rack frame before inserting the Black Knob Head Bolt for extra weather‐proofing.
i. If you have the Cargo Rack System with a basket that tilts to the passenger side of the Wrangler:
You will install one Knob Head Bolt on the front of the rack frame 6 inches in from the passenger’s side.
You will install one Knob Head Bolt on the rear of the rack frame 6 inches in from the passenger’s side.
ii. If you have the Cargo Rack System with a basket that tilts to the rear of the Wrangler:
You will install one Knob Head Bolt on the passenger’s side approximately 6 inches in from the rear of the rack frame.
You will install one Knob Head Bolt on the driver’s side approximately 6 inches in from the rear of the rack frame.
11. Install the protective Black Saddle Bumpers.
a. Use a Black Phillips Head Saddle Screw (H) to install each of the Black Saddle Bumper (G) on the rack frame. Apply a bit of silicone sealant around the pre‐drilled screw hole on the rack frame before inserting the Pan Head Screw for extra weather‐proofing.
i. If you have the 4‐Door Square‐back Cargo Rack System with a basket that tilts to the passenger side, you will install:
2 saddle bumpers on the front,
2 saddle bumpers on the rear, and
3 saddle bumpers on the driver’s side of the rack frame.
ii. If you have the 4‐Door Fast‐back Cargo Rack System with a basket that tilts to the passenger side, or
If you have the 2‐Door Square‐back Cargo Rack System with a basket that tilts to the passenger side, or
If you have the 2‐Door Fast‐back Cargo Rack System with a basket that tilts to the passenger side, you will install:
2 saddle bumpers on the front,
2 saddle bumpers on the rear, and
2 saddle bumpers on the driver’s side of the rack frame.
iii. If you have the 2‐Door Square‐back Cargo Rack System with a basket that tilts to the REAR of the wrangler:
2 saddle bumpers on the front,
2 saddle bumpers on the driver’s side, and
2 saddle bumpers on the passenger’s side of the rack frame.
Your Cargo Rack Frame is now fully assembled. Next you will assemble your Cargo Basket
STEP 2: ASSEMBLING THE CARGO BASKET
1. Connect the FRONT and REAR portions of the Cargo Basket together.
a. Connect the FRONT and BACK portions together leaving a good 2 inches of the connections exposed on both sides of the cargo basket. DO NOT FULLY PRESS THE PIPES TOGETHER YET.
b. Use the Silicone Sealant (N) to run a bead around the male portion of the pipe fitting ½ inch in from the powder‐coated surface on the unfinished pipe on all 4 pipe joints of the cargo basket. Since you will not be able to twist these connections, spread the bead out a bit on the connection. You can add additional sealant later to fill the groove where the pipes connect.
c. Now fully connect the FRONT and BACK portions together. You can tap the sections in place with a rubber mallet if necessary.
2. Install the Bolts that will anchor the Gas Shocks on the basket.
a. Install 2 of the Knob Head Bolts (O) that will secure the gas shocks for your cargo basket. Apply a bit of silicone sealant around the threaded bolt hole on the basket frame before inserting the Black Knob Head Bolt for extra weather‐proofing.
i. If you have the Cargo Rack System with a basket that tilts to the passenger side of the Wrangler:
You will install one Knob Head Bolt on the front of the lower piping of the cargo basket approximately 16 inches in from the passenger’s side.
You will install one Knob Head Bolt on the rear of the lower piping of the cargo basket approximately 16 inches in from the passenger’s side.
ii. If you have the Cargo Rack System with a basket that tilts to the rear of the Wrangler:
You will install one Knob Head Bolt on the passenger’s side of the lower piping approximately 16 inches in from the rear of the cargo basket.
You will install one Knob Head Bolt on the driver’s side of the lower piping approximately 16 inches in from the rear of the cargo basket.
Your Cargo Basket is now assembled. Next you will attach the cargo basket to the rack frame.
STEP 3: ATTACHING THE CARGO BASKET TO THE RACK FRAME
1. Install the Nylon Washers on the rack frame Hinge Pins.
a. Place 1 of the Nylon Washers (C) on each of the Hinge Pins attached to the rack frame. You may apply a bit of grease to these pins if you like.
i. If you have the Cargo Rack System with a basket that tilts to the passenger side of the Wrangler:
Install one Nylon Washer on the Front Hinge Pin approximately 6 inches in from the front of the passenger’s side of the frame.
Install one Nylon Washer on the Rear Hinge Pin approximately 6 inches in from the back of the passenger’s side of the frame.
ii. If you have the Cargo Rack System with a basket that tilts to the rear of the Wrangler:
Install one Nylon Washer on the Hinge Pin at the rear approximately 6 inches in from the passenger’s side of the rack frame.
Install one Nylon Washer on the Hinge Pin at the rear approximately 6 inches in from the driver’s side of the rack frame.
2. Place the Cargo Basket on top of the Rack Frame. Make sure to thread the hinge pins into the sleeves welded onto the cargo basket at each end. Once the Pins are in the sleeves properly, lay the basket down on the rack fully. If you have done everything right, they basket will lie down in the saddles nicely. Watch your fingers when lowering the basket as there are no shocks attached yet to prevent it from banging shut.
3. Secure the Cargo Basket to the Rack Frame with the ½ inch bolt assembly.
a. Attach the cargo basket to the rack frame by threading the Large ½ inch Bolt (E) through the remaining two sleeves on the rack frame that are between the two hinge pins you just assembled. Make sure to use the 3 remaining Nylon Washers (C) as pictured, one between the bolt head and the first sleeve, one between both sleeves and one on the bolt between the second sleeve and the Large ½ inch Round Head Nut (F) that you will secure the bolt with. Tighten the nut and bolt snugly but do not over tighten as you want your cargo rack basket to pivot without tearing your nylon washers apart. You may dab a bit of silicone sealant inside the threads of the nut to reduce the chance of vibration wiggling the nut off over time.
4. Install the Gas Shocks that lift your cargo basket. Have someone hold your cargo basket up as you install the Gas Shocks (D) to prevent the basket from flipping over or dropping on your head as you work. Make sure to mount the thin axle of the gas shock to the frame and the thicker gas cylinder to the cargo basket. This will increase the life of your gas shocks. The gas shocks will install on the Knob Head Bolts (O) you installed earlier with a gentle push.
5. Now pull your basket down and close it. If installed properly the gas shocks will resist a bit during pull‐down and once the basket is tilted low enough they will assist in closing your basket and keeping it in the down position.
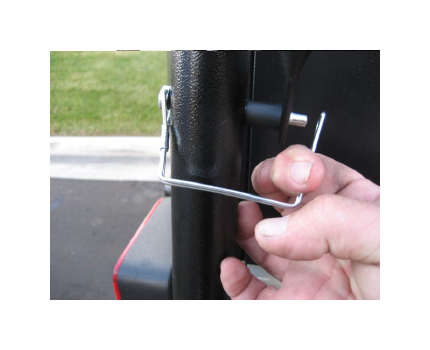
6. Install the Spin Knob Handles to lock down your cargo basket. Install the 2 Spin Knob Handles (I) by threading them through the lock down brackets on cargo basket and into the threaded holes in the rack frame. Do not over‐tighten. Just make sure they are seated nice and firm.
i. If you have the Cargo Rack System with a basket that tilts to the passenger side of the Wrangler:
You will install both of your Spin Knob Handles on the driver’s side of the rack, one towards the front and one towards the back.
ii. If you have the Cargo Rack System with a basket that tilts to the rear of the Wrangler:
You will install one Spin Knob Handle on the driver’s side of the rack.
You will install one Spin Knob Handle on the passenger’s side of the rack.
Your Cargo Rack is now assembled. Next you will prepare your Wrangler for mounting the cargo rack.
STEP 4: PREPARING YOUR WRANGLER FOR YOUR CARGO RACK
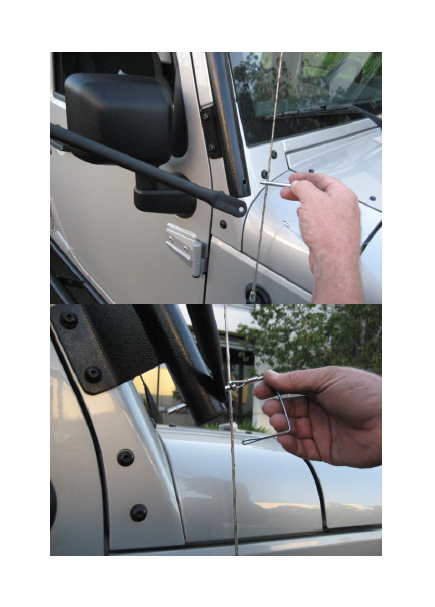
1. Unscrew the upper two Star‐Head Bolts on the windshield brackets on both sides of your Wrangler. The tool to unscrew these bolts came with your Jeep. Keep these two bolts close at hand as you will install them back in shortly.
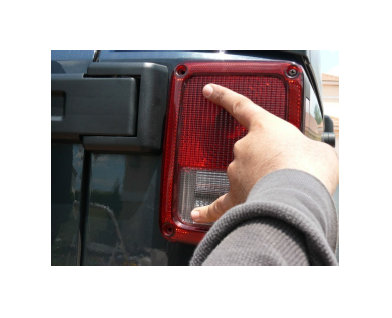
2. Remove the Taillight Housings. Remove the Taillight Housings by unscrewing the two Phillips head screws holding it to the Wrangler body. It is not necessary to detach the electrical harness.
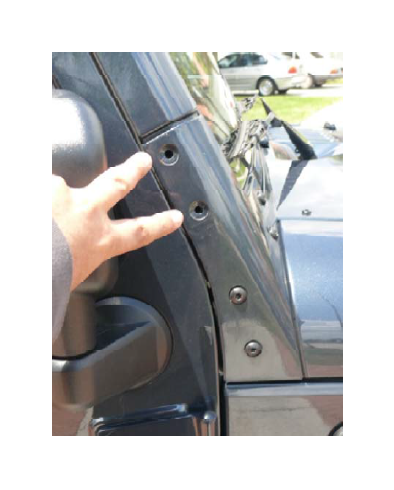
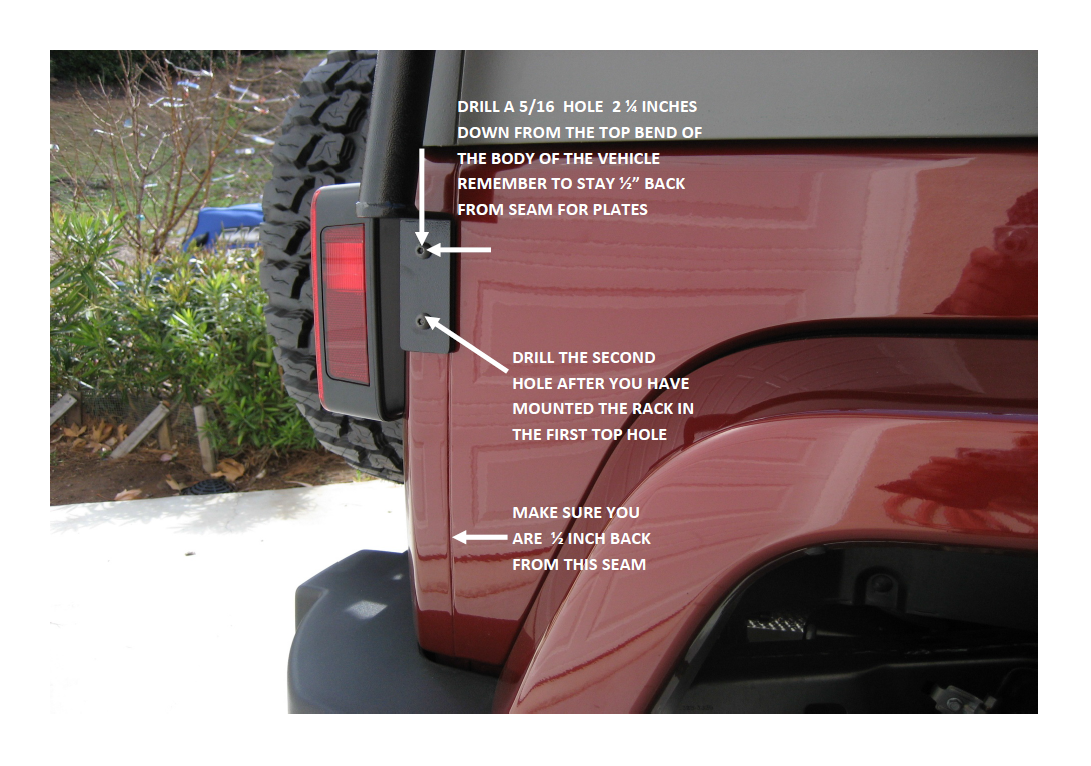
3. Drill one 5/16 inch hole for mounting the rear of the rack frame on each side of the wrangler. Make sure to drill each hole 2 ¼ inches down from the top bend of the Wrangler rear quarter‐panel body. Stay ½ inch back from the visible seam as pictured. You will drill the second hole once the rack is mounted.
4. Fold the side view mirrors in for extra safety.
5. Prepare your Rack for mounting. If you want to be extra careful, wrap the ends of your rack frame liberally with paper towels so that when you walk your frame up and over your Wrangler you can avoid any potential scratching by the mounting arms if you wobble.
Your Wrangler is now prepped to receive your Cargo Rack. Next you will mount your cargo rack to your Wrangler.
STEP 5: MOUNTING YOUR CARGO RACK ON YOUR WRANGLER
The Next Steps require that you have at least one person assist you in installing the Cargo Rack System. Keep in mind that you and your assistant should not only be able to carry and lift the cargo rack up and over the Wrangler, but also be able to hold the rack up above the jeep with one hand while screwing in the front bolts with the other. If either of you are vertically challenged or unable to do the one hand balancing act, this might be a good time to get the assistance of a third friend to help you hold it up or screw it in.
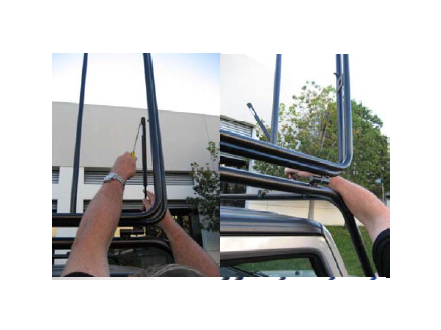
1. Walk the fully assembled cargo rack up and over the wrangler from the Rear of the vehicle. Make sure to the angled legs with the welded brackets with the plastic end‐caps go over the Wrangler first as that is the front of the cargo rack.
2. Make sure to go up and over the Side view mirrors as you walk the rack forward.
3. While holding the rack up, reinstall the 2 factory bolts back in the windshield brackets. Only hand‐tighten these bolts for now. You will return to tighten them after securing the rear of the rack, but make sure to get them back in properly at least several turns in. You don’t want them to pop out while you working on the rear of the rack.
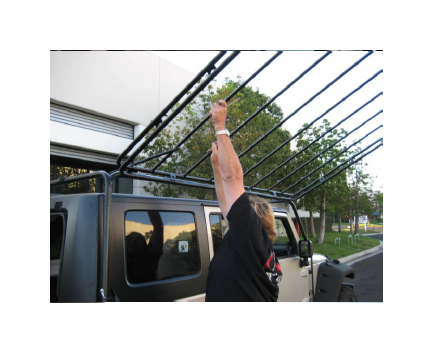
4. Walk to the back of the Wrangler while holding the rack up. Have your friend hold the cargo rack up at the rear for the next steps.
5. Install the first Bolt needed to attach each REAR mounting arm to your Wrangler.
a. Install one 2 inch Pan Hex Head Bolt (L) through the UPPER HOLE of the rear mounting bracket and the hole you drilled earlier. Apply bit of silicone sealant around the pre‐drilled upper screw hole on the rack frame mounting bracket before inserting the Pan Head Screw for extra weather‐proofing.
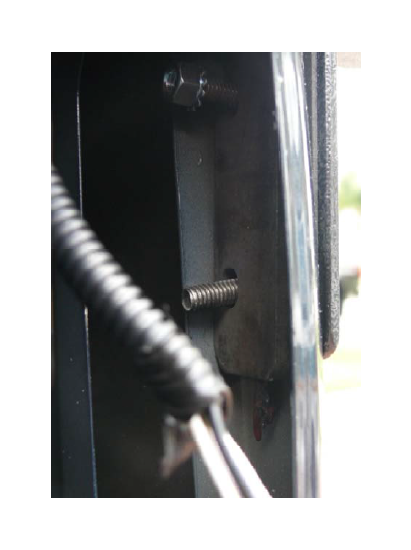
b. Place the Mounting Plate (J) on the bolt inside the body as pictured. Make sure the narrow edge of the plate is flush with the inner weld joint.
c. Secure the bolt with a 5/16 inch Lock Nut (K).
d. Repeat a, b, and c for the other side of the wrangler.
e. Now tighten the nuts & bolts you just installed fully on the rear rack arms.
6. Tighten the FRONT mounting arms fully. Use the tool supplied with your Wrangler to tighten the all 4 factory bolts on both sides of the front windshield brackets.
7. Drill the second hole needed to secure each REAR mounting arm to your Wrangler.
a. Drill the second hole through the lower bolt hole on the rear mounting bracket carefully. If you installed everything properly, the drill will punch through the sheet metal of your wrangler body and through the lower hole of the Mounting Plate (J) that you installed earlier.
b. Install one 2 inch Pan Hex Head Bolt (L) through the LOWER HOLE of the rear mounting bracket and the hole you drilled earlier. Apply bit of silicone sealant around the pre‐drilled upper screw hole on the rack frame mounting bracket before inserting the Pan Head Screw for extra weather‐proofing.
c. Secure the bolt with a 5/16 inch Lock Nut (K).
d. Repeat a, b, and c for the other side of the wrangler.
e. Now tighten the nuts & bolts you just installed fully on the rear rack arms.
8. Re‐install the Taillight Housings
Your Cargo Rack System is now completely installed. Next you will go over your rack and finish prepping it for use.
STEP 6: FINISHING YOUR CARGO RACK INSTALLATION
1. Go over your Cargo Rack and check all fittings to ensure you properly applied Silicone Sealant. If you find any fittings that look like they could use a bit more silicone sealant, go ahead and touch them up. Make sure to wipe off the excess sealant.
2. Keep the silicone sealant for future scratch repair and weatherproofing.
CARE AND MAINTENANCE OF YOUR WILD BOAR CARGO RACK SYSTEM
Periodically check your bolts and screws to make sure everything is secured properly.
Check your silicone sealant on the pipe fittings from time to time to see if a touchup is required to ensure your rack system stays beautiful and rust free for years to come.
Keep the Shock axle greased to ensure long life of your gas shocks.
Clean your cargo rack with Armor‐All once in a while to keep the powder‐coating clean and shiny and reduce oxidation. Make sure to open your cargo rack when cleaning it to get the surface of the pipes between the frame and the basket.
If your cargo rack becomes scratched, clean the damaged area with a oil free cleaner. Make sure there is no moisture present and then apply a few coats of touch up paint to the scratch.
If you lose hardware or damage a part of your cargo rack system, give us a call. We will be happy to provide you with replacement hardware or parts.
ABOUT YOUR WILD BOAR CARGO RACK SYSTEM
Whether you are a serious off‐road enthusiast, a casual weekend excursionist or a Wrangler aficionado, you know that storage space in your Wrangler is at a premium. There is not a lot of room to stow your gear without drastically reducing the interior cabin capacity. That’s fine if you are flying solo or carrying smaller items, but you need a better solution if you have passengers, camping gear, outdoor toys and other large cargo.
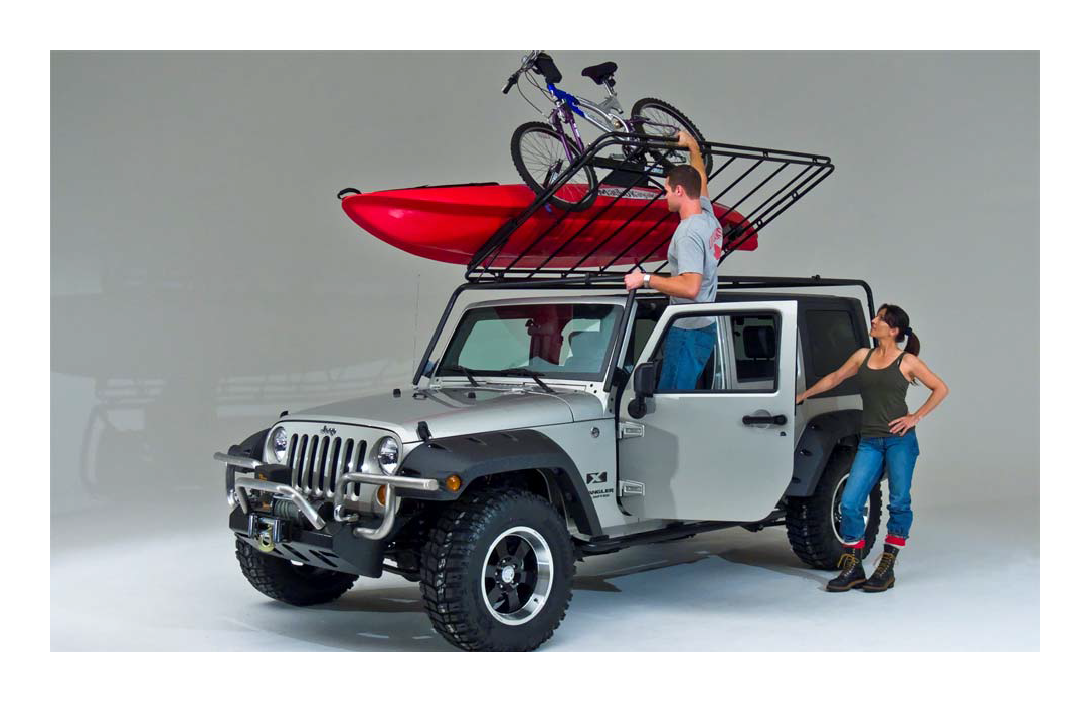
Wild Boar’s Cargo Rack Systems are the most functional cargo solutions available. Our rack systems received the Chrysler Design of Excellence award in 2001 and we have continued to enhance and improve our rack design every year since.
Our award‐winning rack systems are constructed of 1½ inch tubular steel with solid‐weld construction for durability and strength. With a black marine powder‐coat finish to withstand the elements, rubber saddle dampeners to eliminate rack rattle between the rack frame and the detachable cargo basket, quick‐release spin knobs to lock the basket down and gas‐powered shocks to hold the basket in the upright position when it is open, the 2008 Wild Boar Cargo Rack system is the ultimate in rack design and functionality.
Our Cargo Rack systems feature a low profile design. We have designed our racks with low clearance in mind. The rack design hugs the lines of the wrangler while only adding 7 ½ inches to the overall height off of the hard top (6 inches from the highest point of the soft top). The removable cargo basket contributes 3.5 inches to that number.
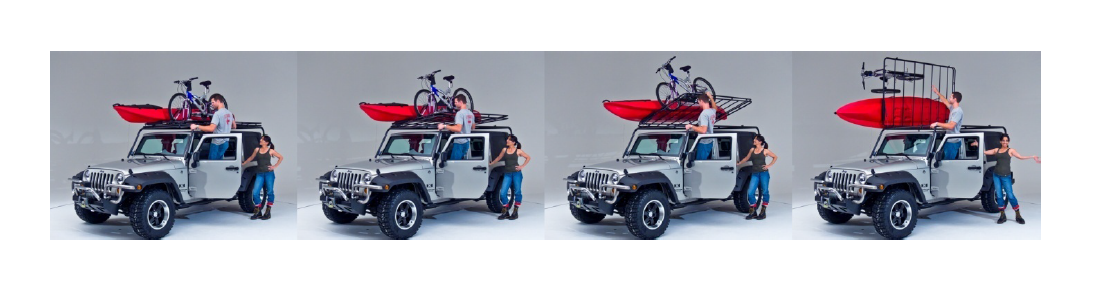
WILD BOAR CARGO RACK SYSTEMS - ADJUSTING YOUR SOFT AND HARD TOP
Jeep owners have long recognized that the problem with traditional cargo rack designs has always been how to adjust or change the top after installing a cargo rack. This has been a particularly vexing problem for owners of soft tops. Roof mounted cargo racks are not an option for soft top owners and body mounted cargo racks often require either partial rack disassembly or soft top strut support disassembly to remove the soft top.
Wild Boar’s quick‐release, tilting basket allows for the full range of soft top adjustments. No more jumping through hoops just to take your top down. Simply unlock the two spinner knob controls and the gas powered shocks help tilt the basket up and out of the way. Adjust your soft top and push the basket down in place and lock the spin knobs and you are done.
Hard top adjustments are just as convenient. Wild Boar’s Cargo Rack design allows all standard and aftermarket hard tops to slide through the back of the rack frame unhindered. If you have a Jeep Freedom top, or a Wild Boar Fastback T‐Top, there is ample clearance below the cargo basket for you to adjust your over‐head panels. And you can always tilt the basket up and out of the way for even more room.
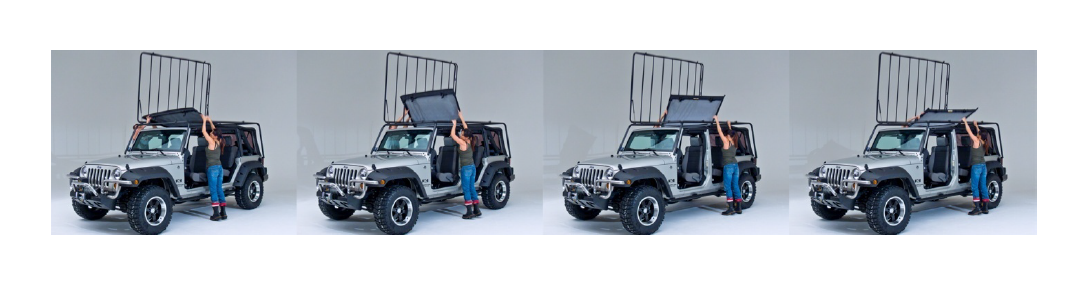
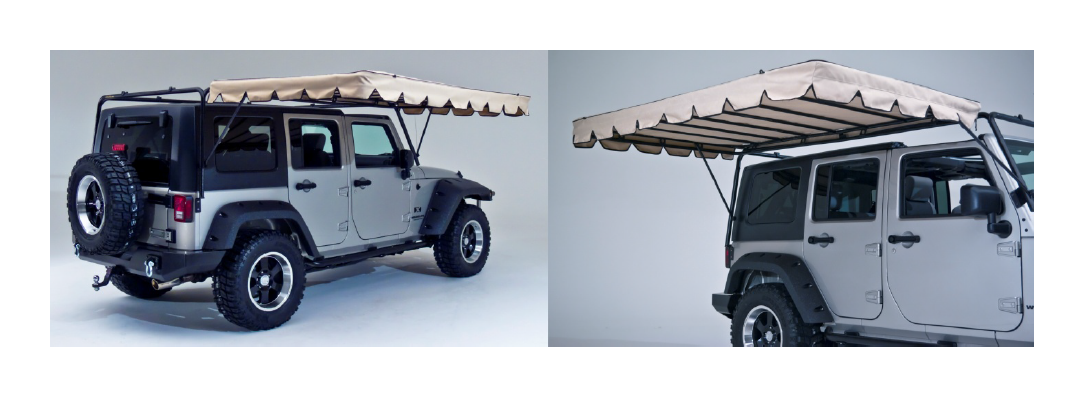
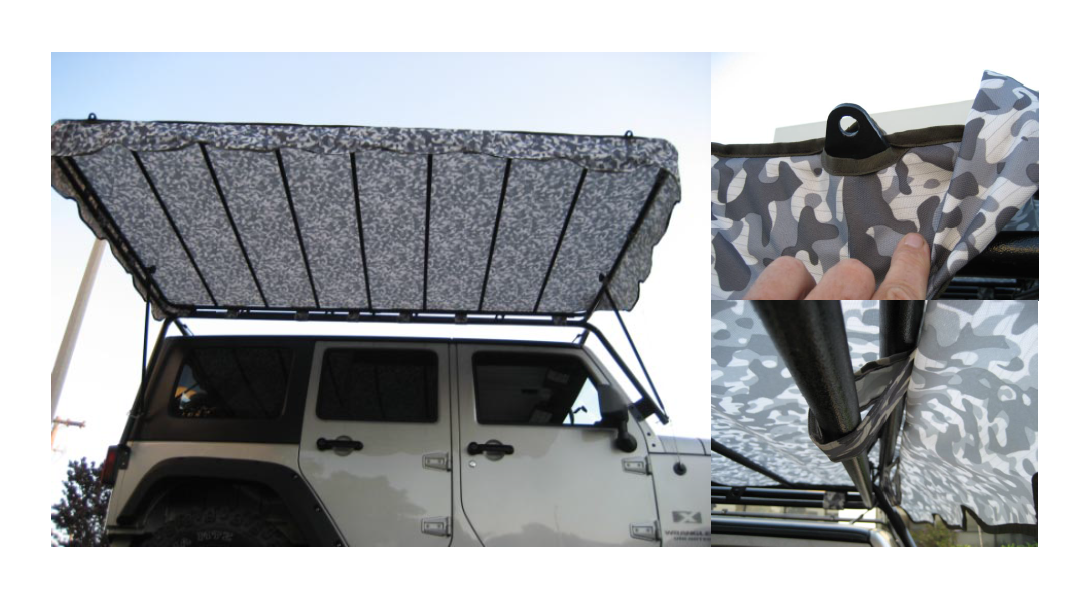
OPTIONAL CANOPY ACCESSORY FOR YOUR WILD BOAR CARGO RACK SYSTEM
Wild Boars patent‐pending rack design offers even more utility. The quick‐release tilting basket opens a full 180 degrees to accommodate an optional Wild Boar canopy accessory. 2007 model cargo racks for the JK 2‐door tilt the basket to the rear of the vehicle while all of the new ’08 models for both 2‐door and 4‐door Wrangler TJ and JK models tilt the basket to the passenger side of the vehicle.
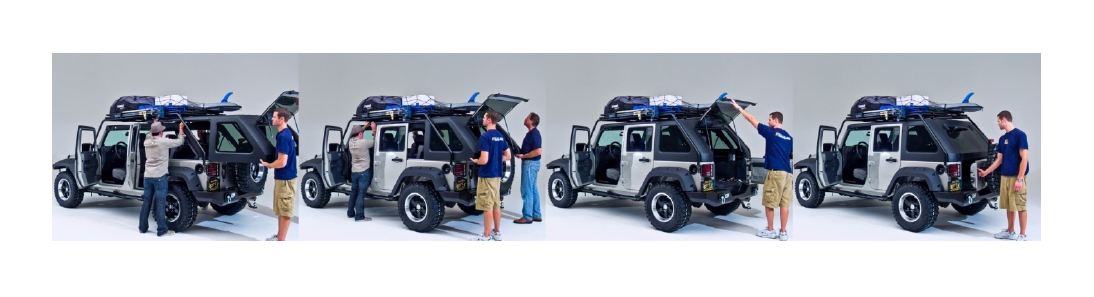
OPTIONAL CANOPY INSTALLATION INSTRUCTIONS
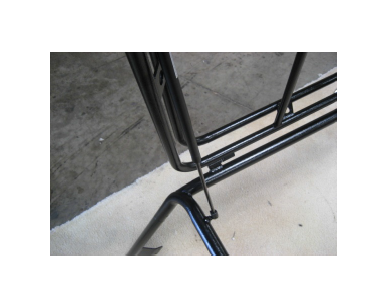
1. Drill the Front Anchor Point for the Basket Support
a. Drill a 5/16 inch guide hole 1.5 inches up from the bottom of the front of the rack frame on the passenger side of your Wrangler.
b. To protect from scratching your rack finish, you can wrap masking tape around the pipe and mark it before drilling.
c. Drill this hole through the frame arm front to back. Drill slowly with even pressure so that you do not slip.
d. Install the Support arm with the locking pin as indicated in the picture. Make sure the locking pin goes through the support arm, then the rack frame from front to back of your Wrangler
2. Open the Cargo Basket
a. Open your Cargo Basket by releasing the Spin Knobs and tilting it up.
b. Take the Spin Knops to the Passenger side of the vehicle. You will use these to mount the Basket Support Arms to the Cargo Basket at a later point in the installation process.
3. Release the Gas Shocks that are supporting the Cargo Basket in the upright position.
• Using a Flathead Screwdriver, gently release the locking clasp on the Gas Shocks and detach them from both the front and rear of the Cargo Basket.
a. Lower the Cargo Basket to the Passenger Side of Your Wrangler. Make sure to control the basket so that it does not slam down and cause injury or damage to your rack or vehicle. The cargo basket will be supported by the rack frame while you work.
4. Remove the 2 Round Knob‐Head Screws that held the Gas Shocks to the Cargo Basket and store them in a safe place. You will need them to reattach your gas shocks when you remove your canopy.

5. Attach the Front Basket Support that you installed on the rack frame earlier with one of the Spin Knob Handles on the front of the Cargo Basket as pictured.

6. Attach the Rear Basket Support Arm with one of the Spin Knob Handles on the rear of the Cargo Basket in the same manner.

7. Dri ll the hole for the Basket Support Arm’s rear Locking Pin on the Rear Rack Frame.
a. Using a piece of Masking tape to both mark and protect your finish, pivot the rear Basket Support Arm and determine where on the Rack Frame you will need to drill a hole. This will vary Depending on which Cargo Rack you have purchased.
b. Mark the hole and drill another 5/16 inch guide hole through the Rear Rack Frame Arm back to front. Drill slowly with even pressure so that you do not slip.
c. Install the Support arm with the locking pin as indic ated in the picture. Make sure the locking pin goes through the Rack Frame, then the Support Arm from back to front of your Wrangler.
8. Install the Canopy Cover
a. Install your Canopy as pictured.
b. Make sure to wrap the Canopy’s Velcro Ties around the lower bar of the basket.
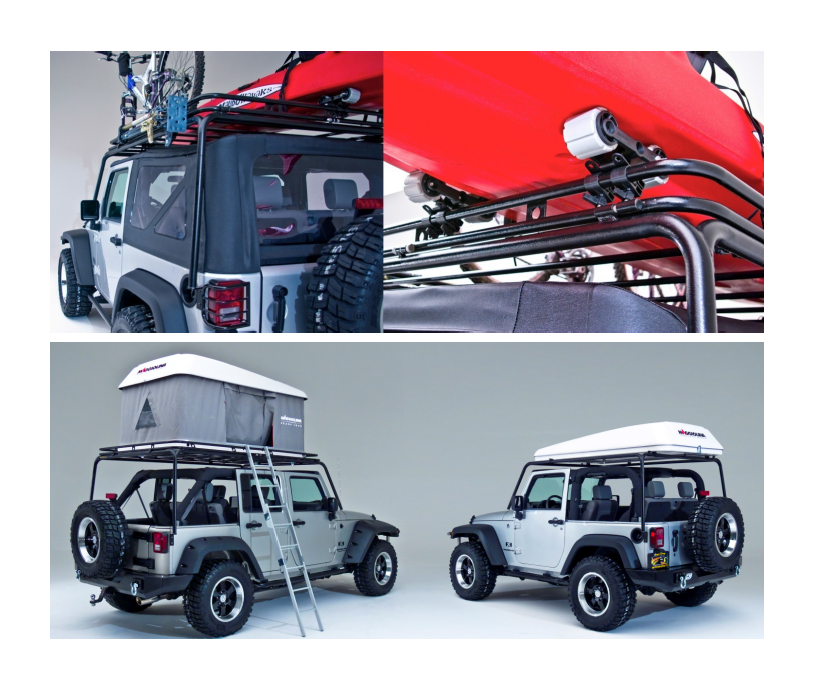
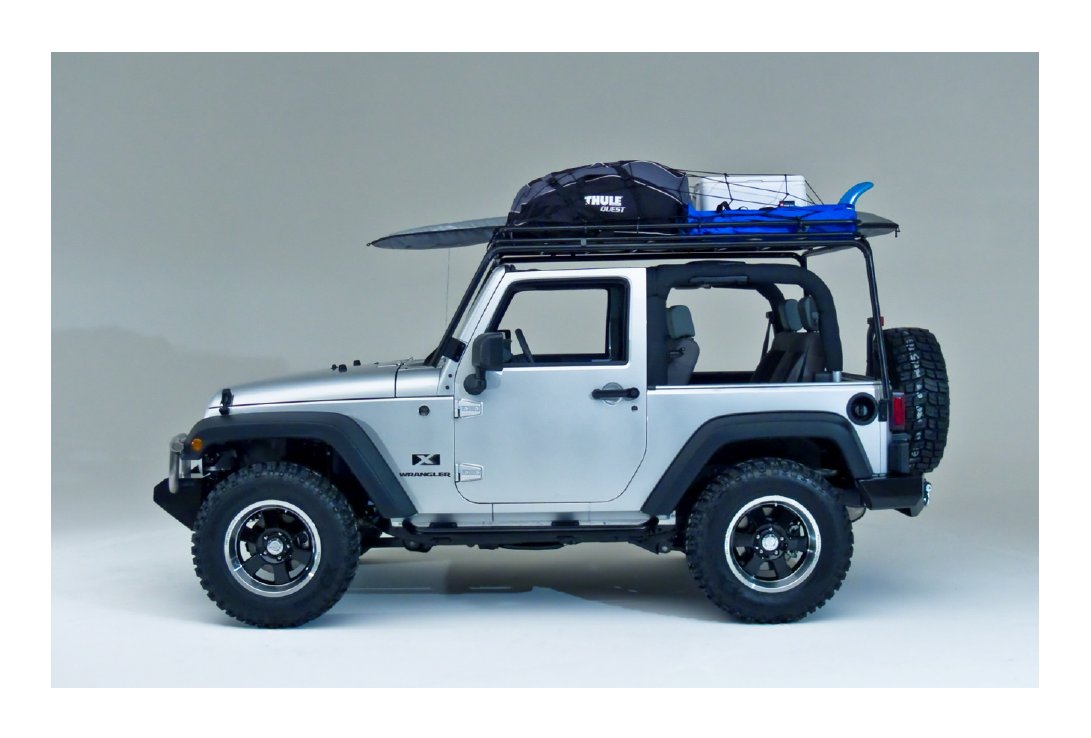
MOUNTING COMPATIBLITY & CARGO RACK ACCESSORIES
Our rack systems are compatible with a variety of Hi-Lift, Thule, Yakima, and AutoHome clamp & mounting systems.
Wild Boar offers a full range of rack accessories to help take full advantage of your new Cargo Rack system:
• Overhead Lighbars
• Cargo Rack Side Lights
• AutoHome camper-tops
• Cargo Canopies
• Short Cargo Rack Pads
• Long Cargo Rack Pads
• Cargo Straps
• Bungie Style Cargo Netting
• Rubicon Step-up Side Bars
• Rockcrawler double pipe Step -up Combo Bars
WILD BOAR CARGO RACK SYSTEMS - RECOMMENDED USAGE GUIDELINES
Wild Boar Cargo Rack Systems have a recommended operational (moving) capacity of 250 lbs and a stationary capacity of 1000 lbs.
While our racks can handle a lot more weight, we don’t recommend you exceed these numbers as you may increase your vehicle’s roll-over risk.
The manufacturer of your vehicle has a specified GVW (gross vehicle weight) limitation. This is based on stock shocks & springs, tire dimensions, body strength and other specifications.
Aftermarket parts, such as oversized tires, lift kits, and shock replacements will further alter the GVW limitations and the vehicle’s safe operational center of gravity. You must remember that any load that you place on top of your vehicle will significantly change the center of gravity, handling, maneuverability and braking characteristics of your Wrangler and may increase the vehicle's tendency to roll over.
Always keep this in mind as you stow gear on your cargo rack. Be sure to distribute the weight evenly with heavier cargo placed near the center of the cargo basket. Make sure to ALWAYS secure the cargo fully with cargo nets, straps & tie-downs. The last thing you want to have happen is to arrive at your campsite in the great outdoors only to discover that some of your gear is actually camping somewhere along Interstate-75.
Do not exceed the manufacturer's cargo weight recommendations or you may put your vehicle and yourself in danger and of course NEVER operate the vehicle with anyone standing, sitting, or even securely tied down on top of your cargo rack.

WILD BOAR CARGO RACK SYSTEMS - EASE OF ASSEMBLY
Wild Boar Cargo Rack systems are incredibly easy to assemble and install. With only 4 points of installation, two of which use the existing front windshield brackets that are used for mounting, you will be up and running in no time. Just grab a friend, a drill with a 5/16” bit, a 1/2” wrench, and an Allen wrench and a rubber tapping mallet and follow the directions and your rack will be assembled and installed in approximately 30 to 45 minutes.

Despite the intuitive design, we still recommend that you read the installation instructions and follow them carefully. Something as simple as installing the Gas Shocks upside down, or failing to seal the pipe fittings with the provided silicone sealant, can cause you frustration down the road.
WILD BOAR CARGO RACK SYSTEMS - WARRANTY
Wild Boar Cargo Rack systems all come with a one year nationwide warranty. If your Wild Boar Cargo Rack system fails during normal operations you are covered. This warranty doesn’t cover obvious misuse or mistreatment of your cargo rack, so we don’t recommend you convince 9 people to stand on top of your rack for a picture, but we believe in our products and will cover any issues that arise from normal use. If you do damage part of your cargo rack system, we also offer replacement parts.
WILD BOAR CARGO RACK SYSTEMS - AVAILABLE CARGO RACKS
The 2008 Wild Boar Cargo Rack Systems are available for the following wrangler models:
• Wild Boar Square-back Cargo Rack Systems for the 2 Door Jeep Wrangler YJ / model years ‘86-‘95
• Wild Boar Square-back Cargo Rack Systems for the 2 Door Jeep Wrangler TJ / model years ‘97-‘06
• Wild Boar Square-back Cargo Rack Systems for the 2 Door Jeep Wrangler TJ / Limited model years ‘04-‘06
• Wild Boar Square-back Cargo Rack Systems for the 2 Door Jeep Wrangler JK / model years ‘07
• Wild Boar Square-back Cargo Rack Systems for the 4 Door Jeep Wrangler JK Unlimited / model years ‘07
• Wild Boar Fast-back Cargo Rack Systems* for the 2 Door Jeep Wrangler JK / model years ‘07
• Wild Boar Fast-back Cargo Rack Systems* for the 4 Door Jeep Wrangler JK Unlimited / model years ‘07
*Wild Boar Fast-back Cargo Rack Systems are designed for the Wild Boar Fast-back hard top product line but can be used with standard square-back soft and hard tops.

