FREE 2 or 3-Day Delivery on 10,000+ Items. Details

Talk to Wrangler Enthusiasts
1-877-870-8556
M-F 8:30A-11P, Sat-Sun 8:30A-9P
Logo Image
$20K Sweeps! 10 Chances to Win! Enter Daily >
The ExtremeTerrain Show is Back! Register Now >

Weathertech No-Drill Mud Flaps; Front and Rear; Black (18-23 Jeep Wrangler JL, Excluding Rubicon & Models w/ Safety Group Package)

Item J138844-JL
Call a Wrangler Enthusiast at 1-877-870-8556
M-F 8:30A-11P, Sat-Sun 8:30A-9P
$0.00
Market Price $128.99 You Save 13% ($17.09)
Our Price

$111.90 (set of 4)

FREE Shipping

Will this fit your Vehicle?

Select a different vehicle Help?
Update or Change Vehicle
Ship to: Ashburn - 20149
Sorry, please enter a valid US or CA postal code
We're sorry, zip can't be updated at this time.
    Create a list
    Add to New List

    Saved - View your saved items

    We're sorry. We couldn't save this product at this time.

    or use

      Video Review & Installation

      Merideth: Hey, guys. So, today we're checking out the WeatherTech No-drill Mud Flaps for the front and the rear in black, fitting all 2018 and newer Sport JL Wranglers. So, protecting the body on your Wrangler is probably high up on your priority list and these molded splash guards are gonna be a perfect solution for that. Now, these will mount up right inside of the inner fender well and will be perfect for the JL owner who's looking to keep the side of their Wrangler protected from any dirt or debris that may kick up and potentially harm the paint on the body. These will be especially great if you've upgraded to a more aggressive tread tire or a wider tire that's kicking up a lot more debris than your factory one was.Now, I would also just keep in mind that these do hang a little lower than the fender, of course, to catch that debris there and are made of a molded plastic material, so they're not gonna have much give like other rubber options would. So, if you are concerned about your departure angles as well as your clearance when you're taking your Wrangler off-road, I would just make a note of that while shopping around. Nonetheless, these are going to be very durable and able to handle their own, especially against any kickup made of a molded thermoplastic material with a custom fit to perfectly fit on your Wrangler creating a very seamless look with the fender.Not to mention, these are going to require no modification. You don't have to do any drilling, as it says in the name. And they're going to have a very clean look with a factory-style textured finish to them. So, they're gonna match with all the other trim that's already on your JL, thus creating a very finished look in my opinion.Now when it comes to prices, kit will come in at roughly $100 for the set of 4. Now, when taking a look at some other options in the category, some of the less expensive choices will usually have a universal fit or will be a little bit more flexible made of a rubber material. Now, those as well as some other options may also require a little bit of modification in order to install them as to where this kit is very straightforward with no drilling and modification. Now some other choices may come with just the front or just the rear as where this is both, once again, making this a one-stop-shop. So, overall, I think if you're looking for a quality mud flap that's going to create a very seamless look on your JL and be very durable holding up to any kickup that it comes in contact with, then this is a great choice.Now, as far as install is concerned, I'm gonna give this a one out of three wrenches on the difficulty meter, taking you about an hour to get the job done with some basic hand tools. Now, the tools that you will need will include a pop clip removal tool or a flathead screwdriver. You're also gonna need a Phillips head screwdriver and an eight and seven-millimeter socket with a ratchet. Now, one of our customers here has actually installed this on his JL and is gonna walk you through the process step by step. Let's go ahead and get into the install.Man: All right. Today we're installing WeatherTech no-drill mud flaps on a 2021 Jeep Wrangler JL. Now, step one tells us to thoroughly wash our vehicle. This is a Jeep. I don't know why you would wash it. Step two, we're gonna park on level ground. So, I'm in my garage where the ground is level. And we're gonna turn the wheels fully left and we will install the driver's side first. I've already installed in the driver's side and now I'm gonna show you step by step on the passenger side. Step three tells us to locate the plastic rivets. So, now we're gonna show where the rivets are.The first step here is to remove these rivets, so these first two rivets here we're gonna take out. I don't have a plastic fastener removal tool. So, I'm gonna use a flathead screwdriver instead. And it just involves kind of working up under it to get to go. These will not be reused. And they will be damaged removing them, but that's okay. You can remove this and throw them away. I can work them out with the flathead, but I find it's easier having a little pry bar here. I can get up under it and take it out a lot quicker. Even though it breaks, it's okay. The back is gonna come out in a second. I'll show you how to do that. So, we're only gonna do these first two here. So, I'll do this one with just the flathead.All right. We're gonna use a pry bar. You could also use a home claw hammer. There's enough space here if you turn the wheel the way we've done here to get in there with the claw and work this thing out. It's gonna get broken, it's okay. It's not gonna be reused. It's gonna be trashed. So, if you're following the instructions, that was step four.Step five, now we're gonna remove these three little plastic ones. So, one, two and three. These also will not be reused. These come out a lot easier. And these we'll be able to do just with the flathead. If you have the actual rivet tool remover, it's a lot easier of a process. And the back of that we'll be able to get it out of here in a second. The pry bar or a claw hammer would help here too. Just makes it a little easier getting it out of there once you get it loosened. I would definitely use the flathead though to get it started.All right. Now we move on to step six, which tells us to pull this liner out. So, basically, you just kind of bring it out just a little bit so we can get in there and work. All right. Step seven, we're gonna take one of the supplied kits of hardware. This is the 48MF581. This kit it comes with a... First the 581 kits. So, out of that kit, we're gonna take these two clips. And these clips will hook on right down here. Let's see if we can get this for you to view it. So, right here, see these little parts that come down. So, we still have that little piece there we need to take out. So, these little clips will just slide out from underneath. You want the flat side facing forward, the kind of hook side to the back. [inaudible 00:06:49] Just get them over the hole. It may not cover the hole perfectly, but that's okay. The screw will still work its way in there. Here they are.Then you're gonna take the kit, 48MF583. Now, this kit, you use half of it on each side. And so this one has a similar kind of a clip. This one's clip is gonna go on this liner here. Let's get it back out here. It'll go on the liner on this hole right here. And we will slip it on. Same principle. Flat side out. The side of the hook to the inside. And just make sure that you can...that it goes over the hole or that the hole can be seen through it.All right. So, now we will put the liner back in behind there. So, we're kind of back to how we started. See the holes they all line up. Now we're gonna take the mud flap. So, we're on step eight. And the mud flap will...it's gonna sit on just like that. So, the first one we'll do is take from the 583 kit, it's gonna be the longer screw out of all the bags, but it's gonna go into the top hole right here. So, get it in there. And you can start turning it by hand. This one is an eight-millimeter socket is what's gonna take on this one. You can also use a 5/16ths, but the 8-millimeter fits nice and snug. The 5/16ths fit a little loose. So, you wanna tighten the bolt towards snug, but you don't wanna tighten it because we need some wiggle room here to get everything else attached. So, I'm just using the socket in my hand just to get it turning, get it on there just so it holds it in place.So, now we'll move to step nine. So, step nine, you're gonna take kit 48MF586. And this one, you're gonna use half of the kit on each side. And this one has a screw, a washer, and a little nut. So, you're gonna take the screw and the washer together. These are gonna go in the back hole down here. So, it's gonna go through the hole of the mud flap, and then this hole down here you're gonna insert it. You can hit your finger in behind it because that's what we're gonna use to put the nut. So, get it through there, reach around behind there, and put the nut on it. And you can either turn the nut on the back to get it started or take a screwdriver and turn the front. But this one we're gonna do the same thing we did to this first bolt. And we're just gonna tighten it most of the way, but we're not gonna make it snug. Again, we need some wiggle room.Now step 10 takes us back to the two screws that came out of kit 48MF581. That's where we put the two clips right here. So, we're going to put these screws in now. These screws will use a seven-millimeter socket. You can also use a 9/32s, but again, the 7-millimeter is snug, the 9/32s is just a little loose. And I'm just gonna do it by hand to get them started, and then I'll switch to the ratchet. So, we do both of these. And we'll put them in most of the way, but, again, not snug.Now that we have all of these on, we're gonna move to the back page of the instructions. So, step 11. There's a plastic fastener that comes in this last kit, 48MF565. And there's gonna be two of them. You'll use one on each side. And they're gonna go in this bottom hole right here. And so if you left everything a little loose, then you shouldn't have any trouble getting this to line up. And this just goes on there and you're just gonna push it through. So, you might have to kind of wiggle around to get all the holes to line up, and then you wanna just push it in there. All right. There it goes. And just push it all the way in nice and snug. See, I'm just able to do that with my hand. You don't really need a tool for that.Now that everything is in place, now we can tighten them. So, here on the back, if you put your hand on the back, you can just kind of hold that nut in place. You don't need to put a tool in the back. The nut has some serrations on it that'll kind of hold on. So, just using your screwdriver, just a number two Phillips. Just put it on there nice and snug. And now we will take our ratchet here. It has eight-millimeter which will be used on this screw here. I'm gonna turn it until it's tight. So, now we'll use our ratchet to tighten this one down. This one, again, needs an eight-millimeter which you can also use the 5/16ths. So, I'm just gonna turn it till it's snug. I'm not gonna over-tighten it. And then these last two bolts we use a 7-millimeter which you can also use the 9/32nds. And again, we're gonna make them snug, but there's no competition to make them the tightest in the world.All right. And there we go. That is all it takes to install it. All right. Now we are going to be installing some WeatherTech no-drill mud flaps on the rear of a 2021 Jeep Wrangler JL. So, step one says to thoroughly wash our vehicle. This is a Jeep and I don't see any sense in washing it. Step two is park on level ground. We're in our driveway. We're at some level. And this is the driver's side.Step three is to locate the areas we're gonna be working. So, there is a plastic fastener right here we're gonna be removing, and then there are two hex bolts down here. Those are the locations we're gonna be working on. Step four, we're gonna remove these items. I do not have a trim clip remover, so I'm gonna use a flathead screwdriver here to get up underneath this and pop it loose. We will not be reusing this, and so if it gets damaged in removal, it's okay. It can be difficult to remove with just a screwdriver, so I have a pry bar that I'll use now that I have it lifted up. And it's just a small pry bar. And there we go. So, we removed it. Again, it won't be reused, so if it's damaged, it's okay.And now these bolts, these are gonna require an eight-millimeter socket. If you have a 5/16ths, that'll work as well but the eight-millimeter does fit nice and snug. So, we're gonna remove these bolts. There's not a lot of room to work in here, so you can get away with a deep socket or a small extension. Is that one loose? [inaudible 00:14:52] All right. I'm gonna remove these bolts completely.Now step five tells us to pull back this upper cover, fender cover. And the hardware kits that these mud flaps come with, the 48MF561, there's three of these bags. Each bag does have two sets of the screws, washers, and clips. So, we're gonna take the first one. And you wanna install the clip, the flat side facing towards us, towards the wheel. And this will slip on... It's hard to see, but there's a little tab down here. It's going to slip on this tab. And just make sure that the holes lineup once you have it on there. So, that looks good.All right. We'll snap back [inaudible 00:15:58] where it came from. Now this bottom fender, so, we're still on step five. We're gonna pull back this bottom fender here now. And there is a clip right down here. Right in here. It's kind of hard to see. Let me adjust the light so that you can see it in there. So, there's this clip down here. To get this clip out, your flathead screwdriver is gonna help you out and just get in there and just get it to slide off. There it goes. We're not gonna reuse it, so I don't have to fix that right now. The other clip... So, I'll go ahead and put that back in for now. The other clip over here is when we move on to... Oh, I'm sorry. We have to finish step.So, step five was removing that clip, step six is gonna be to replace that clip with one of them that came in our kit. And again, flat side facing the tire. We'll slip this on there. Again, just make sure that the holes line up with each other. So, make sure that that screw is gonna be able to go all the way through. It's kind of hard to see it from this angle. So, what I'm gonna do is actually take one of the screws and just poke it in there and make sure that it fits in and it does. So, I know that I'm lined up.So, step seven is we're gonna deal with this bolt over here. I find this one is easier to do if I lay on the ground and do it from underneath. So, I'm gonna use safety glasses here so I don't have any debris falling in my eye. But we're gonna use the flathead screwdriver again. And we're just gonna pop that clip out of there. There it goes. And then we're gonna place another one of the clips that came with our hardware kit, again, with the flat side facing towards the tire. I'm gonna slide it on there. And making sure that the holes line up.Okay. Now we move on to step eight. Step eight, we take our mud flap and it's gonna nest right in here just like that. So, we're gonna take out of our hardware kit we want our screws with a washer and we'll go in this top hole first. And we're gonna put this screw in here. And I usually just like to start them by hand just to get them in place, then we'll take our stubby screwdriver with our number two Phillips head and go ahead and screw this in. We don't want to tighten it all the way. But get in there enough so that the mud flap is not gonna fall. There's plenty.So, now step nine we're gonna do the same thing. We're gonna take another one of our screws and a washer and we're gonna do it in the hole that's right here. It can be kind of hard to see, but I can feel it there. And wiggling around a little bit to get them to line up. There we go. From underneath, I could see the tip of the screw kind of helped me line it up. So, I'm gonna take my stubby number two Phillips head screwdriver and get that started, but not tightening it all the way down. We're still in step nine and we're taking our last screw and washer and we're going into the last hole. It's way over here. And then again with my number two Phillips head. And now that all three have been started, we can tighten them all down. Tighten them till they're nice and snug, but not overtightening. And then back to the first screw. All right. There we are. Nice and snug. And that's it. The installation is complete.Merideth: So, that is going to wrap it up for my review and the install of the WeatherTech No-drill Mud Flaps for the front and the rear end black fitting all 2018 and newer sports JL Wranglers. For more videos and products just like this, remember to always keep it right here at extremeterrain.com.

      Product Information

      Features, Description, Reviews, Q&A, Specs & Installation

      Features

      • Rugged Protection
      • Stop Rocks and Grime in Their Tracks
      • Laser Measured for a Perfect Fit
      • Black Finish
      • No Drilling Needed for Installation
      • Comes with Flaps for Both the Front and Rear
      • Limited Lifetime Warranty
      • Fits 2018-2023 Jeep Wrangler JL, Excluding Rubicon and Models with Safety Group Package

      Description

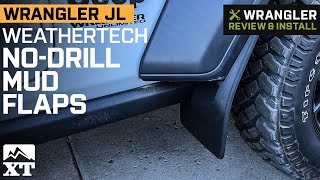
      Guard Against the Grime. With the Jeep Wrangler No-Drill Mud Flaps, you don’t have to worry about debris, rocks, or anything else messing up your Wrangler’s undercarriage. Coming in a set of four to protect both the front and rear of your vehicle, these flaps have an attractive and subtle black finish that perfectly meshes with your vehicle’s default coloring.

      Durable Construction. Made by Weathertech, the Jeep Wrangler No-Drill Mud Flaps are made using laser-based DigitalFitTM technology that ensures they perfectly match the contours of your Wrangler. This translates to added protection as there are no gaps or missed spots where grime can sneak past.

      Easy Installation. No drilling or tool work is required to fit the Jeep Wrangler No-Drill Mud Flaps. Instead, you get to take advantage of WeatherTech’s proprietary QuickTurnTM fastening system. Made using rust-resistant stainless steel, this system allows you to secure the mud flaps in place using factory screws and without having to make any modifications to your vehicle.

      ISO-Certified. These mud flaps are made in are made by a company that has achieved ISO/TS 16949 quality certification.

      Limited Lifetime Warranty. WeatherTech is so confident in the quality of its Jeep Wrangler No-Drill Mud Flaps that it offers a limited lifetime warranty to guard against material defects or manufacturing problems. The warranty activates on the date of purchase and is only viable for the original buyer and vehicle the parts are installed in.

      Application. The Jeep Wrangler No-Drill Mud Flaps are designed to fit 2018-2023 Jeep Wrangler JL Sport vehicles.

      Installation Difficulty. The mud flaps come with the simple QuickTurnTM fastening system and make use of your factory screws, making installation easy enough for beginners. The parts take about 1-2 hours to fit.

      Fitment:

      Details

      Weathertech 110097-120099

      CA Residents: WARNING: Cancer and Reproductive Harm - www.P65Warnings.ca.gov

      Installation & What's in the Box

      Installation Info

      What's in the Box

      • (4) Mud Flap
      4.8

      Customer Reviews (175)

        Questions & Answers

        10 More Questions

        Will It Fit My Wrangler

        • JL Rubicon 2 Door - 23
        • JL Rubicon 4 Door - 23
        • JL Wrangler 2 Door - 18, 19, 20, 21, 22, 23
        • JL Wrangler 4 Door - 18, 19, 20, 21, 22, 23
        • JL Wrangler 4xe 4 Door - 21, 22