FREE 1 to 3-Day Delivery on Orders $149+ Details

How to Install Vision X Windshield Light Mount System (07-17 Wrangler JK) on your Jeep Wrangler
Installation Time
45 minutes
Tools Required
- 8mm Allen Wrench
- 10mm Wrench/Socket (Light Bar Mounting)
APPLICATION GUIDE
1) At this time this kit has been tested to fit the 2007-14 Jeep JK
WARNING: Bolts, Nuts, & Washers are Stainless Steel. Do Not Use Pneumatic or Power Tools to Tighten & Loosen Mounting or the Threads Can Seize
INSTALLATION INSTRUCTIONS
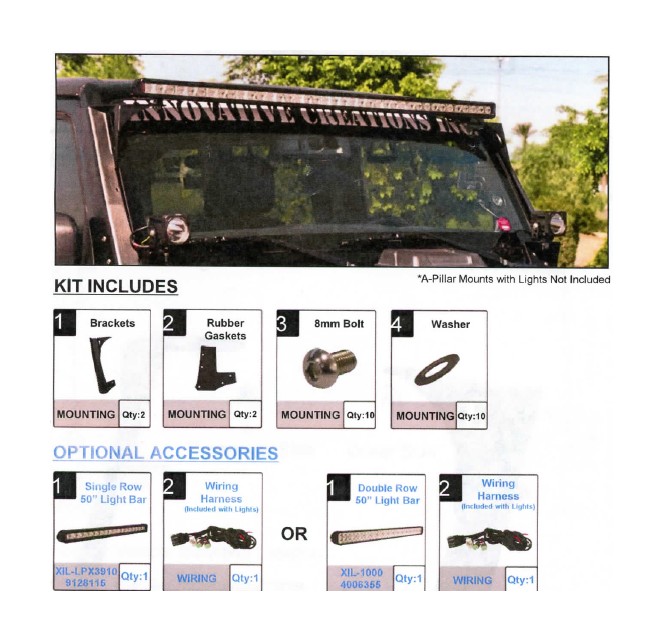
As with many other high-tech products, this VISION X Jeep JK Windshield LED Light Bar Mount requires a bit of attention before you can use it. Please read the accompanying information carefully first.
1) Open the hood of the vehicle and disconnect the negative battery terminal.
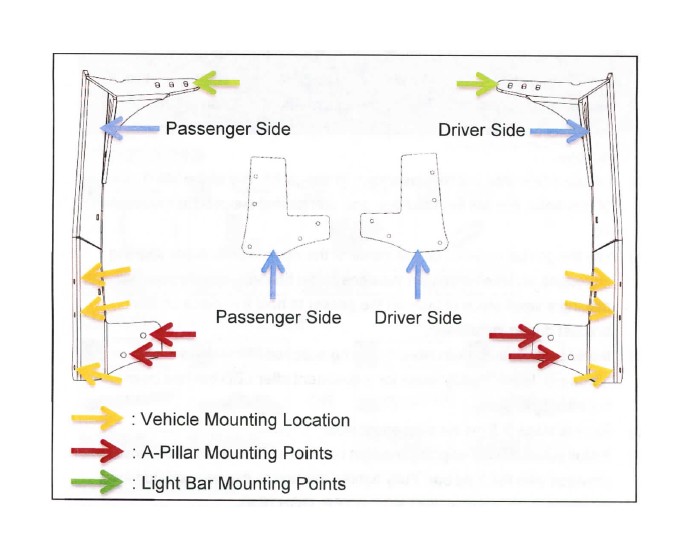
2) Starting on the driver side, locate and remove the two forward facing T-40 Torx head windshield bolts and three top/outer Torx head bolts retaining the windshield hinge to the windshield. Take care while removing bolts as they may be painted in place making them difficult to remove.
3) Locate driver side bracket, as shown in image A1, five of the M8-1 .5 x 30mm bolts, five M8 flat washers, and one gasket supplied in hardware kit.
4) Lay the gasket material on the inside of the driver side bracket aligning the edges and the holes with the ones in the bracket. We recommend placing a small piece of tape on the gasket to hold it in place on the bracket during installation.
5) Install bracket to the windshield utilizing supplied M8 stainless hardware, leave slightly loose for adjustment after LED bar has been installed.
6) Repeat steps 2-5 on the passenger side.
7) Install your LED bar aligning the light bar feet with the hole locations provided with the light bar. Fully tighten the feet to the windshield hinge locations to 75 inch/lbs. (DO NOT OVER TIGHTEN)
8) Align the LED bar making sure to leave enough room between the bar and the windshield to access the mounting bolts. Adjust and tighten.
9) Wire your LED light bar to the specifications provided in the instructions with the light. Wiring may be secured to the slots provided along the leading edge of the brackets with cable ties.
10) It is recommended to re-torque all mounting hardware periodically to ensure safety and longevity of your new LED Light bar mount.
IMAGE (A1): MOUNTING POINTS