FREE 1 to 3-Day Delivery on Orders $149+ Details

How to Install Smittybilt SRC Classic Rear Bumper w/D-Rings, Hitch & Tire Carrier, Textured Black

Shop Parts in this Guide
INCLUDED COMPONENTS
IMPORTANT INFORMATION
- Holes may need to be drilled through the side of the frame
- Will accommodate up to 35” tires
- Factory bumper and tire carrier will need to be removed to install the carrier
- The 3rd brake light will need to be re-located. Location may vary due to tire size.

SUPPORT BRACKET INSTALATION INSTRUCTIONS
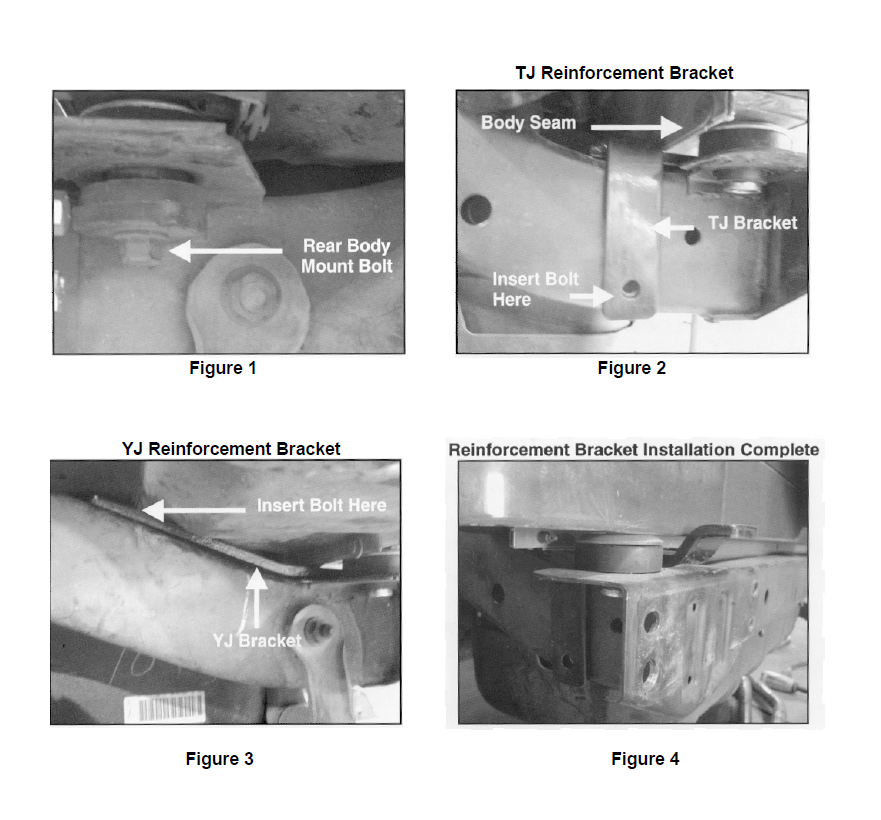
1. Remove factory bumper and rear body mount on both sides (Figure 1 ).
2. The use of a pry bar and some assistance will be needed to install the Reinforcement Brackets. Place pry bar between the body and frame, lift body and remove body mount. "CAUTION": Be extremely careful not to damage the paint or body when lifting.
3. Use vise grips to bend body seam above the frame rail forward toward front of Jeep (Figure 2). This will allow clearance for Reinforcement Bracket. NOTE: If Jeep has a body lift this step is not required.
4. Lift body with pry bar and slide Reinforcement Bracket between body and frame rail.
5. TJ Wrangler: Locate (1) 1/2”-20 x 1 1/4" Hex Head Bolt, (2) 1/2" Flat Washers, and (1) 1/2" Fender Flange Lock Nut. Insert Bolt with Flat Washer through hole in the bottom of frame. Go through hole in the side of frame and through Reinforcement Bracket. Secure Bolt with the rest of the hardware listed in this step (Figure 2). Do not tighten at this time. Repeat steps 2-5 for opposite side.
YJ Wrangler: Locate (1).1/2"-20 x 1 1/4" Hex Head Bolt, (2) 1/2" Fender Flat Washers, and (1) 1/2" Fender Flange Lock Nut. Insert Bolt with Flat Washer through hole in the top of frame. Go through hole in the top of frame and through Reinforcement Bracket. Insert Fender Flange Nut through the hole on the bottom of the frame and hand tighten at this time (Figure 3). NOTE: Taping the Flange Nut to a wrench before inserting into the frame will ease the installation. Repeat steps 2-5 for opposite side.
6. Position Bumper in place and start bottom bolts using (2) 7/16"-14 x 1 1/4" Hex Head Bolts or (2) M12 x 35mm Hex Head Bolts (depends on the year model), (2) 7/16" Flat Washers, and (2) 7/16" Lock Washers. Do not tighten at this time.
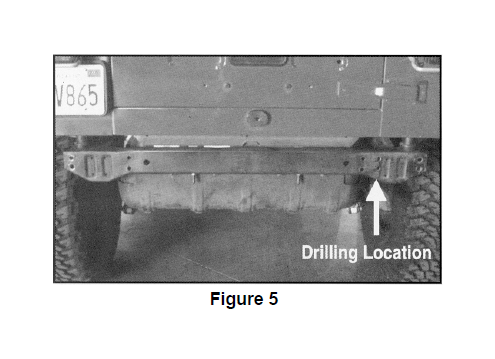
7. 97 TJ's have holes on the inside of the frame rail. These holes are not on 98-on TJ's and are not required. These are optional and will require dropping the fuel tank to reach the installation of the inner Metal Plates. However if you would like to install the inner Metal Plates, they must be drilled to 7/16".NOTE: Measure the distance on the mounting bracket and match these measurements on the frame or you may mount the outer four holes to the frame and use the holes on the bracket as a template to mark the drilling locations (Figure 5). Remove Bumper and set aside. Drill the frame holes to 7/16". CAUTION: Use extreme care in assuring the locations you drill are correct. Before drilling be sure to check the backside of the frame for possible hazards or obstructions.
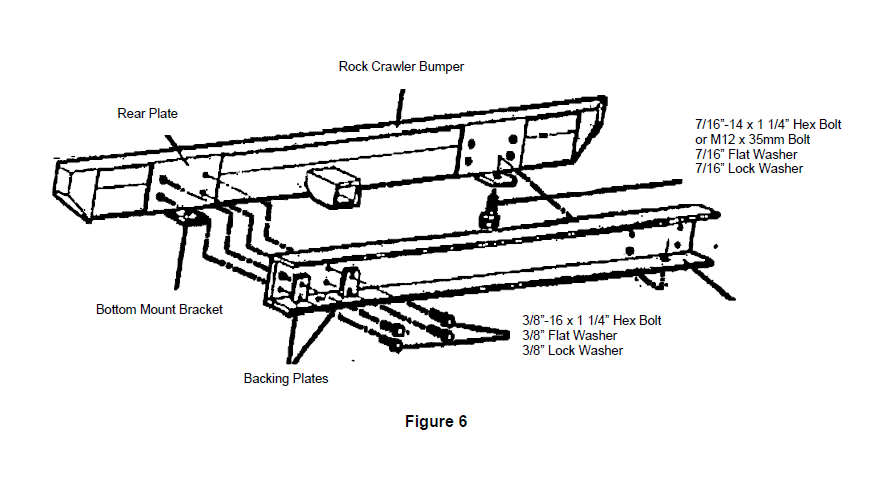
8. Position the new bumper against the back of the vehicle frame and reinstall Hardware listed in Step 6. Locate (8) 3/8"-16 x 1 1/4" Hex Head Bolts, (8) 3/8" Flat Washers, (8) 3/8” Lock Washers, and (4) Backing Plates. Secure Bumper to frame by using the hardware listed in this step (Figure 6). Do not tighten hardware at this time.
9. Locate (4) 1/2"-20 x 1 1/4" Hex Head Bolts, (4) 1/2" Lock Washers, and (4) 1/2" Flat Washers. Carefully start all four bolts through the top of the Reinforcement Bracket into top of Bumper. Tighten all hardware at this time.
Illustration is for reference only, styles may vary with application
TIRE CARRIER INSTALLATION INSTRUCTIONS
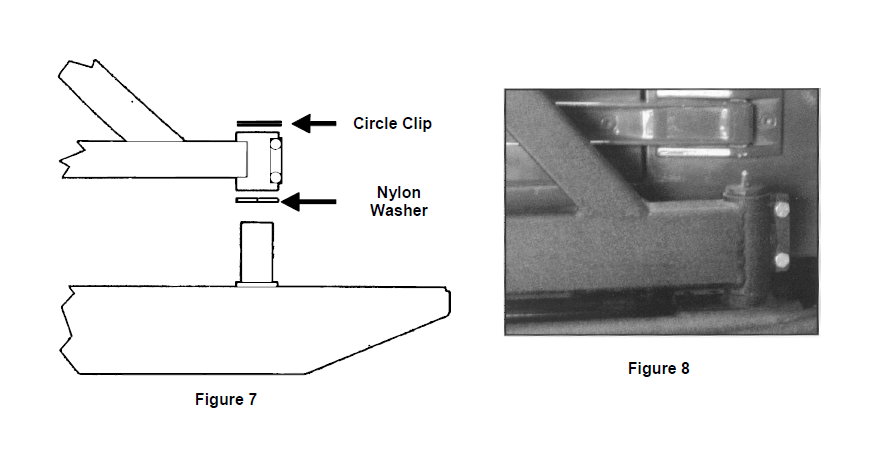
10. Insert Nylon Washer and install the Tire Carrier to Bumper. Once the Tire Carrier is assembled, close it and secure it with the already installed (2) 3/8"-24 x 1" Hex Head Bolt, (4) 3/8" Flat Washers, and (2) 3/8" Lock Nuts (Figure 7 & 8). Tighten hardware at this time.
11. Install the Circle Clip to the top of the Post on the Bumper. Once installed, use a grease gun to lubricate the pivot.
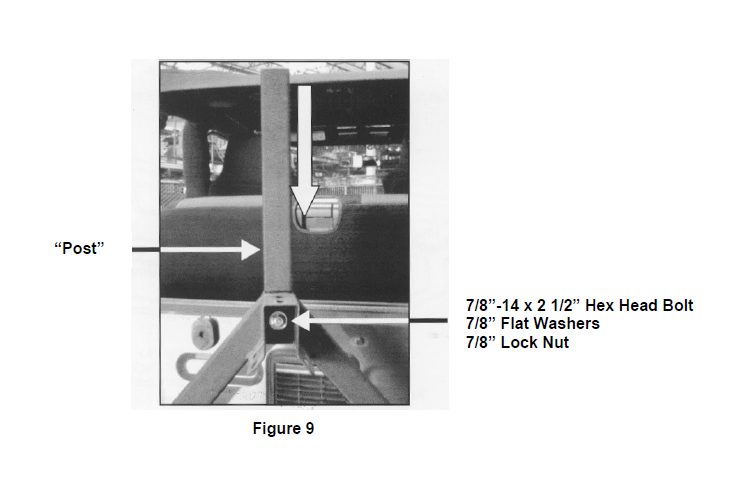
12. Locate Post, (1) 7/8"-14 x 2 1/2" Hex Head Bolt, (2) 7/8" Flat Washers, and (1) 7/8" Lock Nut. Insert Post into Tire Carrier and secure it with hardware listed in this step (Figure 9). Tighten hardware at this time.
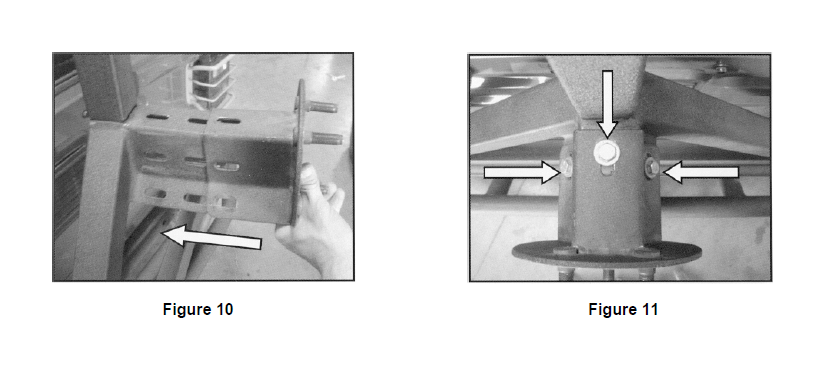
13. Locate Mounting Bracket, (3) 3/8"-24 x 1" Hex Head Bolts, (6) 3/8" Flat Washers, (3) 3/8" Lock Nuts. Slide Tire Support Bracket into Tire Carrier until holes line up and secure it with hardware listed in this step (Figure 10 & 11). NOTE: There are two sets of holes on the Tire Carrier; these are used for oversized tires.
14. It may be necessary to install the rubber bushing / spacer using the #10 x 1” Phillips Pan Head Sheet Metal Screw anywhere on the tire carrier frame as needed to prevent rattling and/or metal-to-metal contact. The location of the bushing / spacer may vary with vehicle and area requiring it..