FREE 1 to 3-Day Delivery on Orders $149+ Details

How to Install Smittybilt SRC Cage Kit - 7 Piece - Gloss Black on your 1997-2006 Wrangler

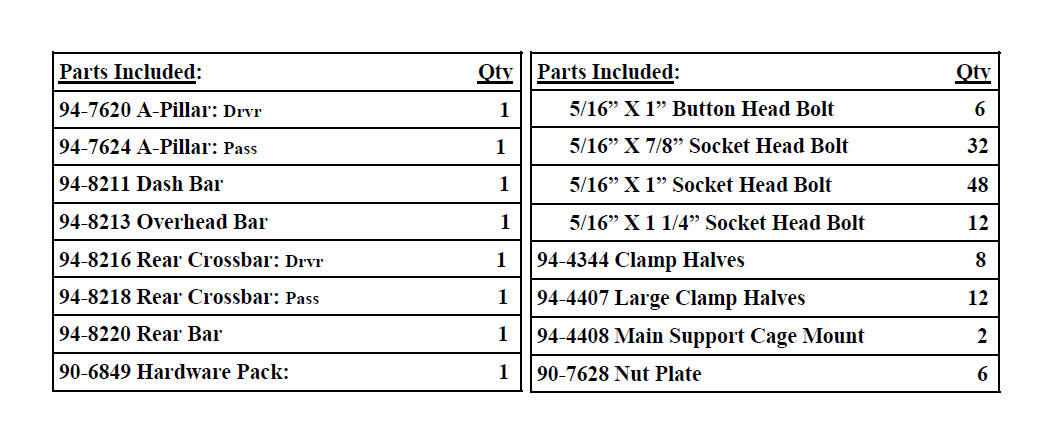
Shop Parts in this Guide
IMPORTANT!: This kit will not work in conjunction with a factory sound bar.
INSTALLATION:
Step 1: Unbolt and remove the soft top or hard top. Including door surrounds and all hardware.
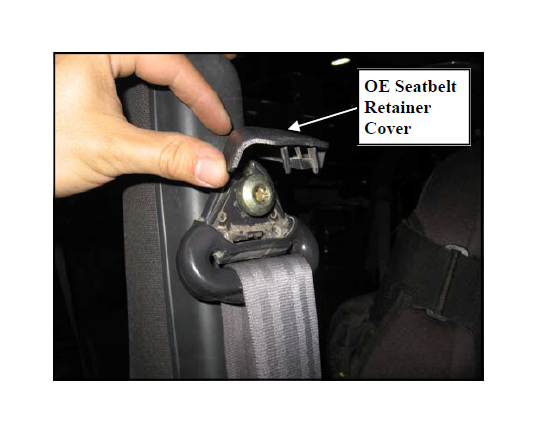
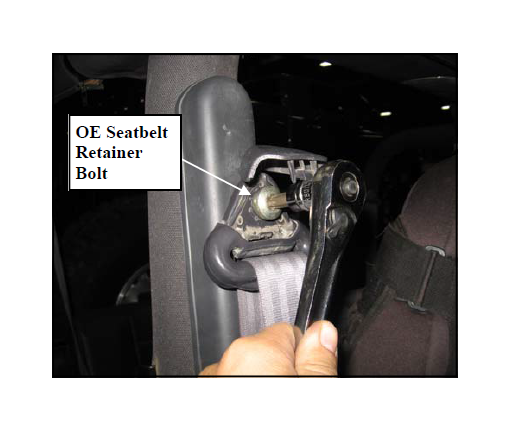
Step 2: Carefully, open all the plastic seat belt shoulder strap retainer covers.
Step 3: Unbolt and remove the front driver and passenger shoulder straps. Save hardware for reinstallation.
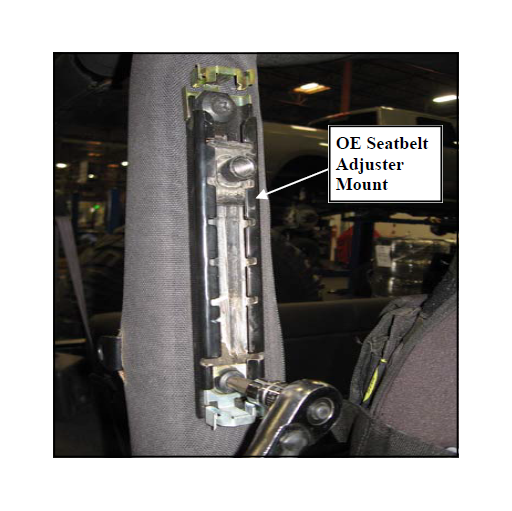
Step 4: Unbolt and remove the shoulder strap adjuster mounts from the vehicle. Save hardware for reinstallation.
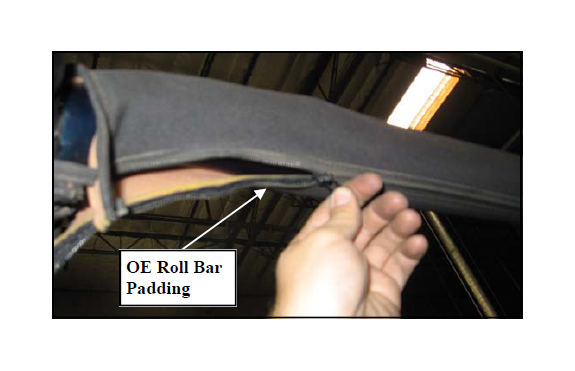
Step 5: Remove the padding from the sound bar.
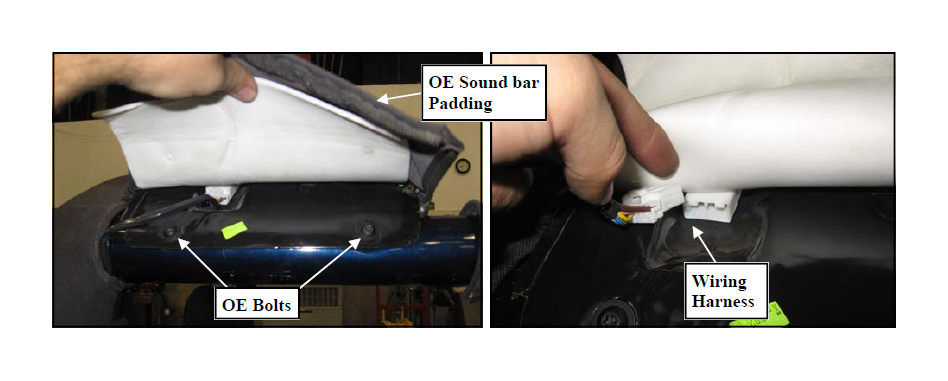
Step 6: Pull the padding to one side of the side support bars to reveal the OE sound bar bolts and wiring harness. Unclip the wiring harness.
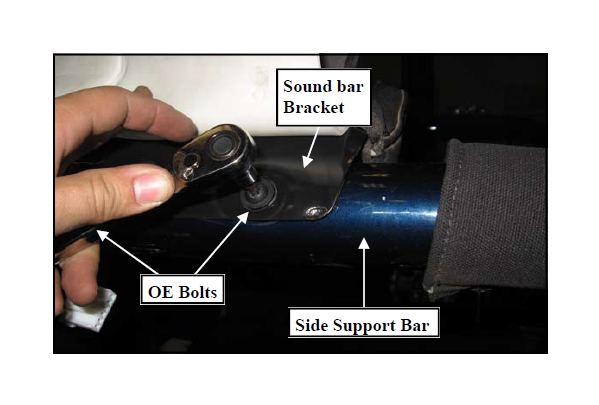
Step 7: Remove the (2 per side) OE bolts connecting the OE side support bars to the soundbar bracket.
Step 8: Unzip and remove all factory padding from the factory roll cage.
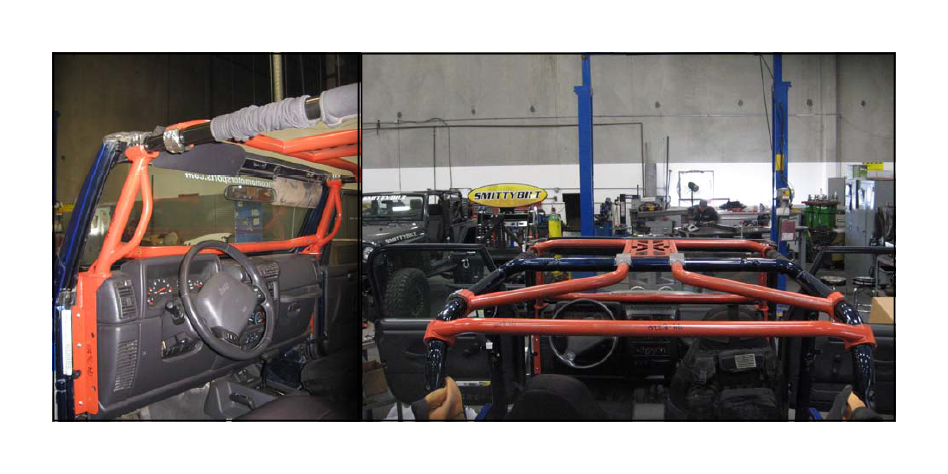
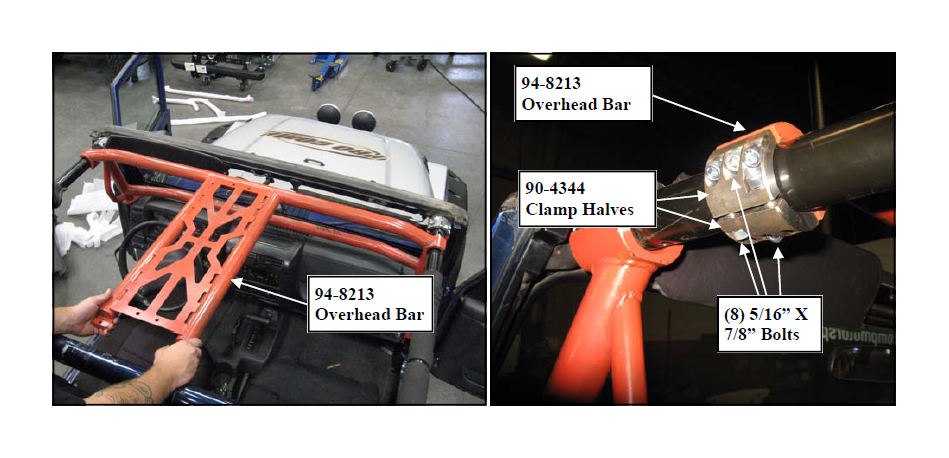
Step 9: Install the overhead bar (94-8213) over the OE driver and passenger side support bars. Secure the overhead bar to the side support bars using the (90-4344) clamp halves, and (8 per side) 5/16” X 7/8” bolts. NOTE: If the overhead bar (94-8213) will not fit properly loosen the side support hardware to achieve proper alignment.
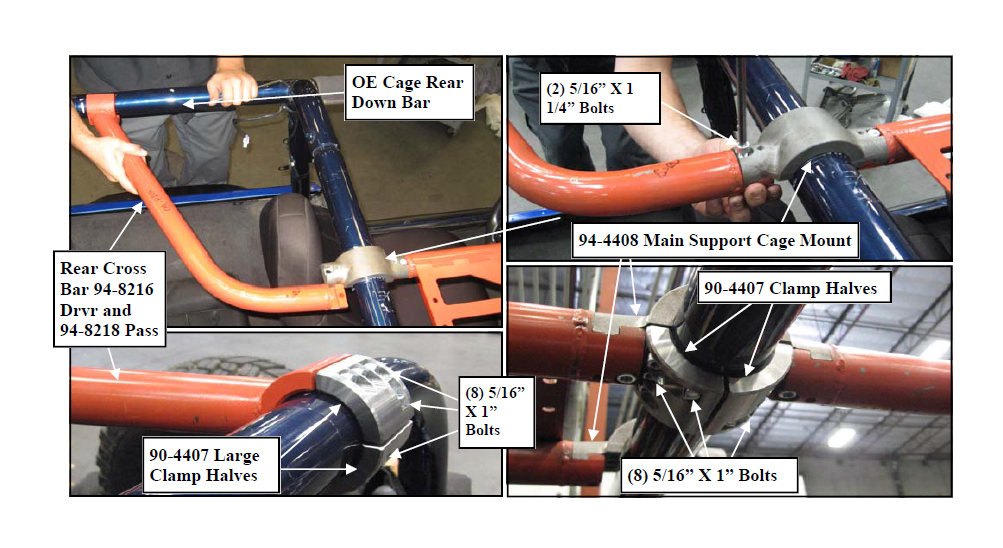
Step 10: Install the main support cage mounts to the OE cage main support hoop . (94- 4408).
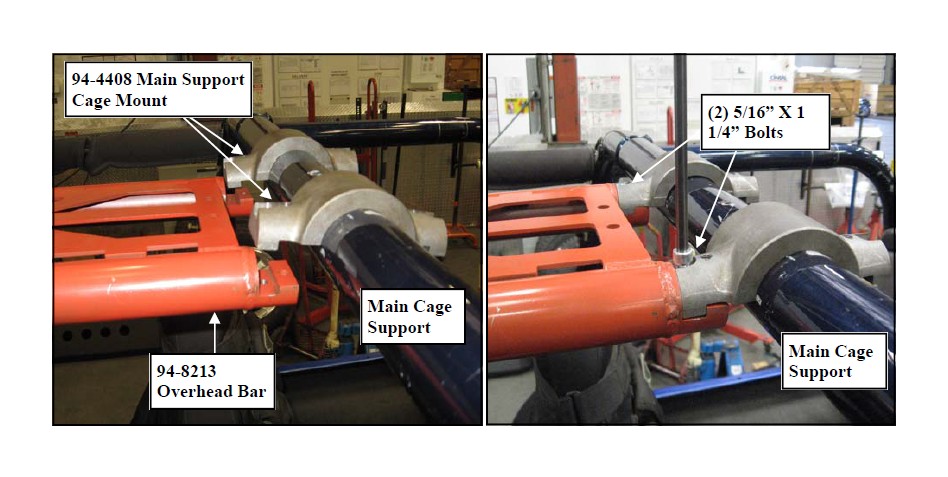
Step 11: Slide the overhead bar (94-8213) back and interlock the clamps with the Main Support cage mounts (94-4408). Secure using the (2 per side) supplied 5/16” x 1 1/4” bolts.
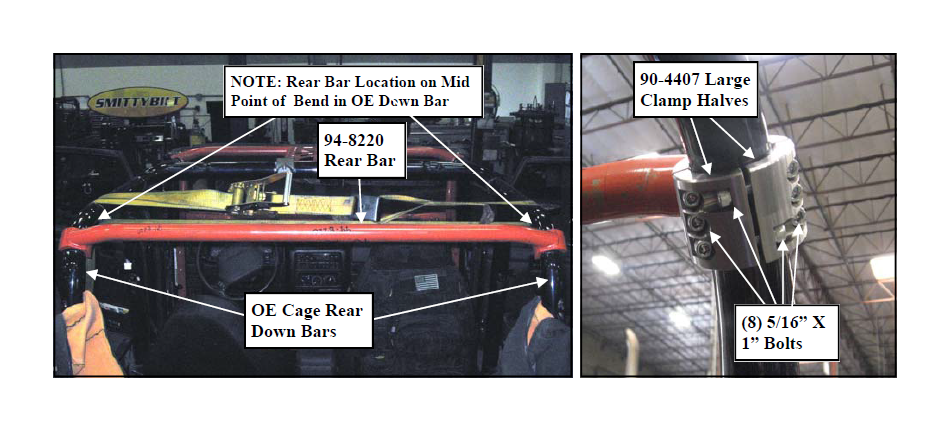
Step 12: Install the rear bar (94-8220) to the rear down bars of the OE roll bar. Secure to the OE rear down bars using the (90-4407) large clamp halves, and (8 per side) 5/16” X 1” bolts. The rear bar (94-8220) should be positioned at the mid point of the bend in the OE rear down bars.
NOTE: Due to the fact that the OE cages vary in width, an 1” to an 1 1/2” from the factory, the rear bar was intentionally built small. You will need to pull the sides of the OE cage together using a ratchet strap to achieve proper fitment of the new rear bar. Also the bolts that retain the rear of the OE cage to the floor may need to be loosened.
Step 13: Install the rear cross bars (94-8216 Drvr and 94-8218 Pass) to the OE main cage. Secure to the OE rear down bars using the (90-4407) large clamp halves, and (8 per side) 5/16” X 1” bolts. Secure the main cage support mounts using the (2 per side ) supplied 5/16” X 1 1/4” bolts. NOTE: They will need to be slid in from the center out.
Step 14: Remove the doors from the vehicle. Save the hardware for reinstallation.
Step 15: Remove the (2 per side) Phillips head screws retaining the speaker covers and remove the speaker covers from the vehicle.

Step 16: Remove the (4 per side) Phillips head screws retaining the speakers. Unclip the wiring harness and remove the speakers from the vehicle.
Step 17: Unbolt and remove the (3 per side) bolts attaching the dashboard to the vehicle.
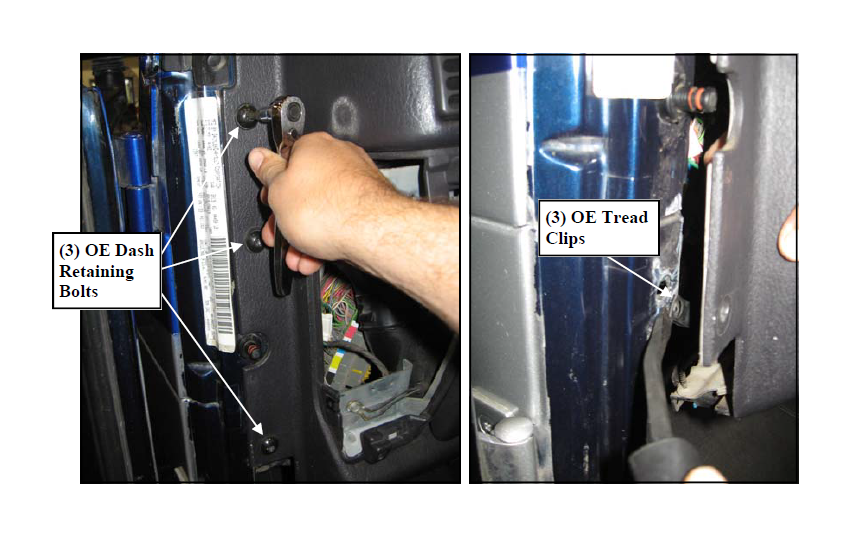
Step 19: Carefully, pull the dashboard back far enough to access the (3 per side) tread clips. Remove all the tread clips and push the dashboard back.
Step 20: Tighten the OE side support bars to windshield hardware. Clamp the A-pillar mounts (94-7620 Drvr and 94-7624 Pass) to the OE side support bars. Secure to the side support bars using the (90-4344) clamp halves, and (8 per side) 5/16” X 7/8” bolts. Leave hardware loose and slide the clamps as far forward as possible.
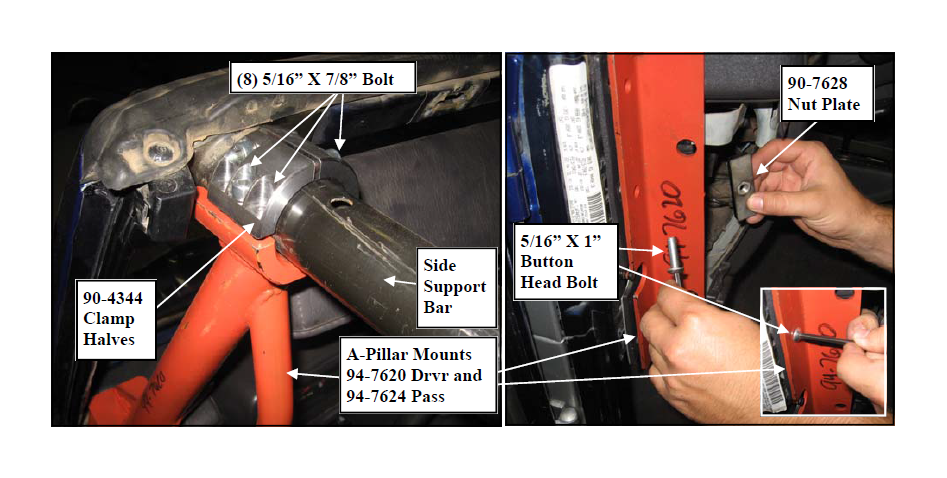
Step 21: Line up the holes in the dash with the holes in the lower A-pillar mounting plates. Secure the lower A-Pillar mounting plates to the dash using the (3 per side) provided nut plates (90-7628) and (3 per side) 5/16” X 1” button head bolts.
NOTE: Due to variances in the vehicles from the factory, these holes may need to be opened up.

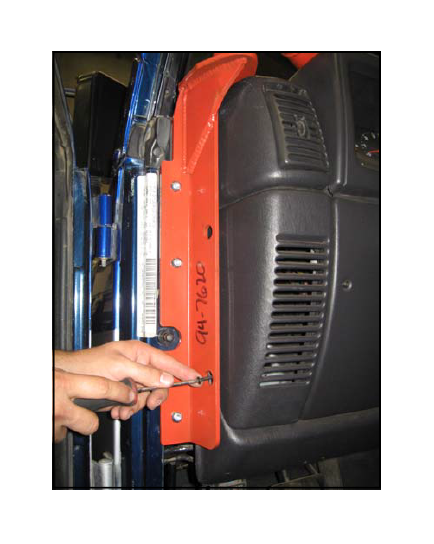
Step 22: Install the dash bar (94-8211) by rotating up and forward as shown above. Secure the dash bar to the A-Pillar mounts using the supplied (2 per side) 5/16” X 1 1/4” bolts.
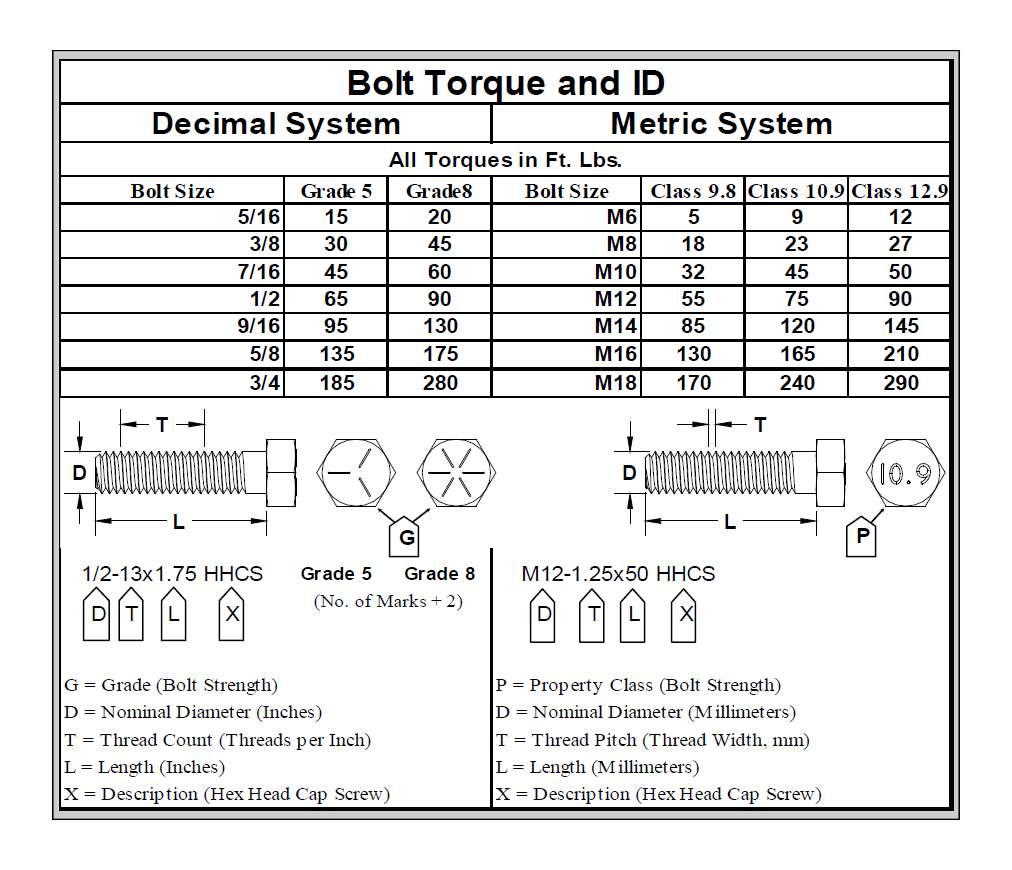
Step 23: Torque all OE hardware according to manufacturers specifications or the supplied hardware according to the torque chart on page 9.
Step 24: Reinstall the previously removed speakers and speaker covers using the previously removed OE screws.
Step 25: Reinstall the previously removed front shoulder strap adjuster mounts using the previously removed OE hardware.
Step 26: Reinstall the previously front seat belt straps to the adjuster mounts using the previously removed OE hardware. Re-attach the seatbelt wiring harnesses.
Step 27: Properly reinstall all the previously removed roll bar padding. Installation is now complete. NOTE: Some cutting and rearranging of the roll bar padding will be necessary.