 FREE 1 to 3-Day Delivery on Orders $149+ Details

How to Install Smittybilt Hard Top Hoist on your 87-18 Jeep Wrangler YJ, TJ, JK & JL
Read all instructions before starting assembly
• Professional installation of winch is recommended.
• Knowledge of building, structure design and code is required.
• If you are unsure of any step of winch install please contact Smittybilt or consult a professional contractor.
• Always wear ANSI approved safety glasses.
• A minimum of a 7' ceiling is required. Ceiling height requirement will vary depending on height of vehicle and winch mounting location.
• Winching is dangerous . Use caution.
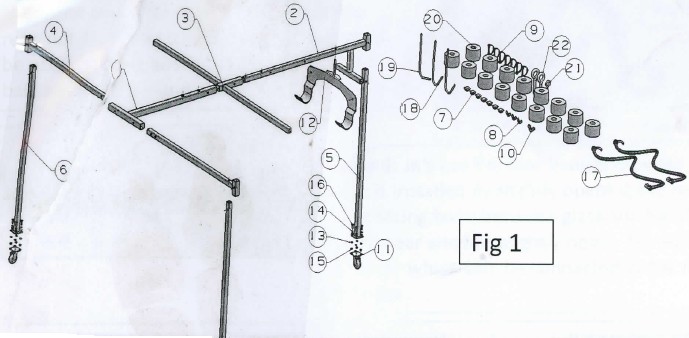
Step 1: Unpack and lay out all components according to the exploded view. Fig 1 2
Step 2: Fit all telescoping parts together and secure with pull pin. Make sure the welded nut on the T-section is towards the ground. Install all foam cores, their final position can be adjusted once you start to hook up the top. One foam core will be installed on the rear leg when used as a dolly.
Step 3: Loosely install J-hooks. Thread the wing nut on the J-hook till 3 threads are exposed past the nut.

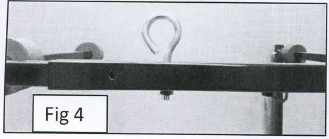
Step 4: Install the main eyebolt. Make sure the nut on the T-section is towards the ground and the eye bolt will drop thru the t-section and thread into the welded nut. Note: There are two welded nuts on the T-section. The front one is for short tops (TJ) and the rear nut if for long tops( 4 door). Either can be used, find the position which best balances your top and components.
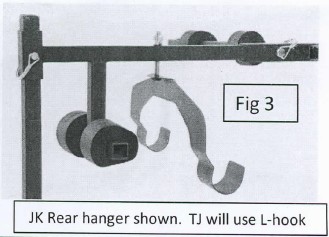
Step 5: JK's use the rear hanger showing in fig 3 this is installed by slightly opening the rear glass and fitting hook between glass and hardtop. Keep rear window slightly open. TJ's will use the L-hook which can be connected to the rear of the top
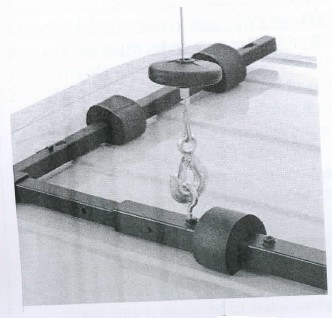
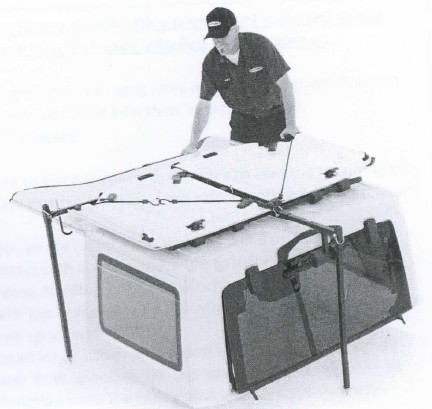
Step 6: Use your freedom top panels as a template and position foam cores to support the panels. Use bungee cord to hold panels to hoist during storage, they can hook around the J-hooks and eyebolt.
Note: Legs can be installed to use hoist as hardtop dolly. Legs can be removed when storing top in raised position.

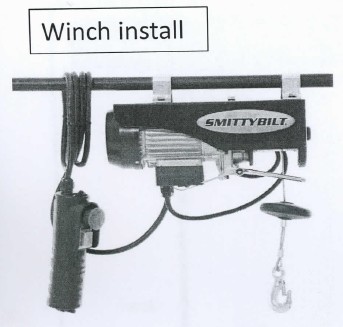
Winch install
Read all instructions prior to install. Winch is powerful and can damage your top , garage, or wall if you do not follow instructions or use common sense. Professional installation is recommended. If any you are unsure of any step contact Smittybilt or a local contractor.
1. Find the best location for the winch motor. Use a stud finder to locate joist behind drywall if needed. Mark the center of the joist.
• Keep winch as close to jeep as possible so you can reach the controls while manipulating the top onto or off the jeep.
• You need to tie into a minimum of two 2x4 studs/joists when mounting.
• Make sure your joists have adequate support to support a minimum of a 400 lb. load.
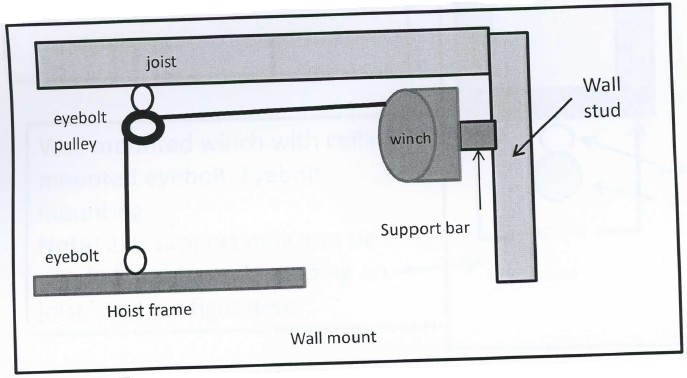
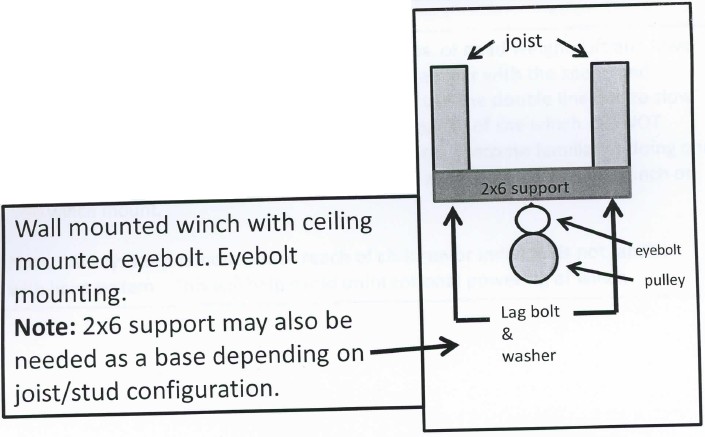
• If wall mounting , mount winch as high as possible.
• Use wall mount for ceilings under 9 ft., use ceiling mount for ceilings above 9 ft. This is only a suggestion and mounting position will vary depending on garage style and vehicle height.
• If an extension cord is used, use the shortest extension as possible. Use at least 14 gauge extension cord.
2. Build a winch mounting bracket/support bar. Size will vary depending on joist configuration. Commonly joist will have a 16" or a 24" center to center measurement . You can use the included support bar for 16" stud centers. Most commonly used are 1%2" pipe or unistrut, available at most hardware stores if you need specific length other than the supplied 16" stud support bar.
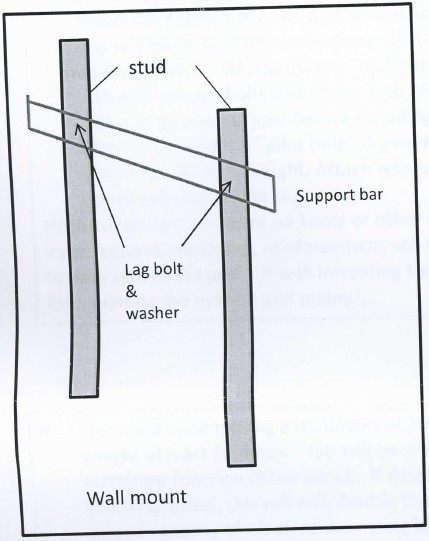
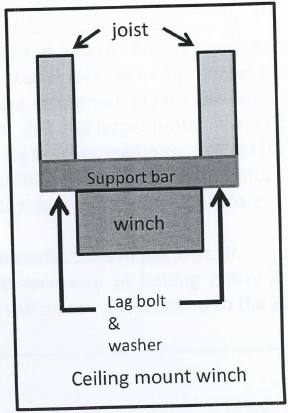
Install the support bar. Locate the best spot and find the two or more studs you will be using. The can be done with a stud finder. Mark the center of the stud. 3/8"x4.5" (M10x110mm) lag bolts are recommended for 2x4 joists, included. Longer bolts should be used with 2x6 and larger joists. Always drill a pilot hole into the joist before installing lag bolts or eyebolts. 3/8"(M10) lag bolts would use a Y4" pilot hole. A general rule is to have lag bolt go into joist/ stud % of the height. Attach winch brackets to support bar before completely tightening support bar.
Note: Make sure there are no knots or other imperfections in the joist. If imperfections are found , reinforcement will be necessary by bolting 2x4 or 2x6 to each side of the joist. If wall mounting the winch, use a 2x6 bolted to the joist for mounting the eyebolt and pulley.
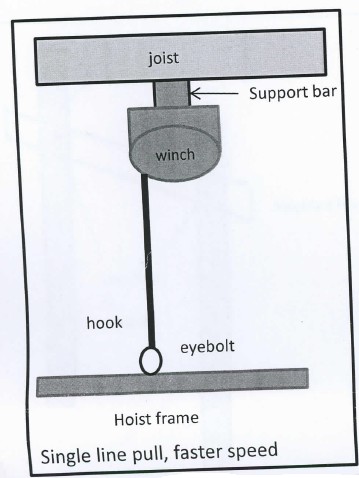
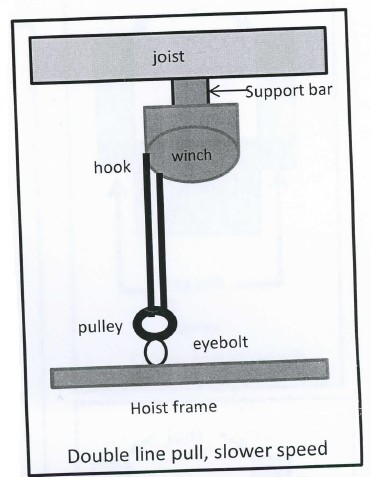
4. Test hoist system using a minimum of 200 lbs. of dead weight. Lift and lower weight at least 10 times. You will become familiar with the speed and start/stop function of the winch. If desired, use the double line pull to slow winching speed, this will also double the capacity of the winch. DO NOT exceed capacity of winch or mounting location. Become familiar to doing one smooth pull when lifting or lowering top to avoid damage to top , winch or winch mount.
Note: Always keep remote out of reach of children or individuals not familiar with hoist system. This will help avoid unintentional powering of winch.
Attaching hoist to jeep top
Note: Hoist will not be perfectly balanced when empty. A Ballast weight added to the rear will help stabilize hoist during hookup. A plastic milk jug with water can be attached to the rear.
Step 1: Open doors and remove all hard top hardware securing top to the jeep. Disconnect any washer fluid lines or wiring.
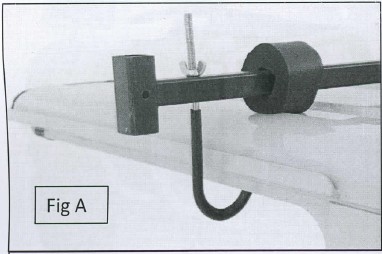
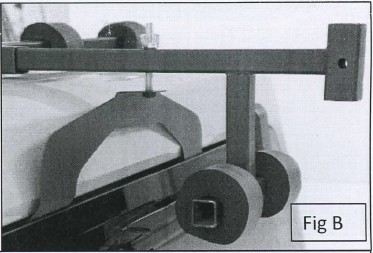
Step 2: Position J-hooks under the edge at the front of the top. Fig A
Step 3: For JK, open rear window and hook the rear hanger between rear glass and hardtop. For TJ, use L-hook. Some aftermarket tops may use either rear attachments. Tighten all wing nuts, but do not over tighten. Fig B
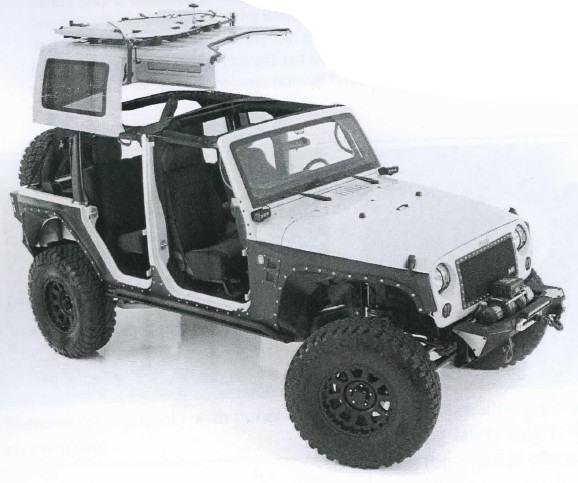
Step 4: Lift the top slowly and use one hand to balance top until it clears the body. Make sure the top balances, it will help install if top sits slightly lower in the rear. Balance can be changed by changing the eyebolt position.
Note: The rear window can be opened up, it will rest against the foam cores in the rear. When using hoist as a dolly, make sure foam core is attached to rear leg and positioned so that the rear window rests against the foam core.
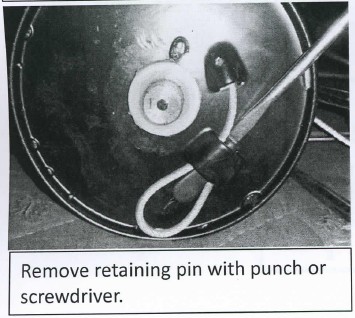
To install floating safety stop ( only needed if you have a winch with a permanent mounted safety stop and an extra safety stop in the kit. If floating stop is already installed , skip to step 6.
1. Unspool winch cable.
2. Remove cable from winch drum by removing the two center screws on the winch cover. Remove cover from winch by gently sliding it to the side about an inch then removing cover.
3. Use a punch to tap the retaining pin out of its socket.
4. Remove cable and install safety stop.
5. Reinstall cable by reversing order. Make sure to use a hammer and punch to seat the retaining pin.
6. Install cable clamps on winch cable. One will go on each side of the safety stop to prevent it from moving.
7. Position safety stop so that it is about 6" above the highest position you will stop the winch at. This prevents the hoist from coming in contact with the winch. Failure to install safety stop correctly can cause damage to winch, hardtop, hardtop hoist and winch mounting location. The safety stop is designed to make contact with the brake lever on the winch, by depressing the brake lever, it will cut power from the winch when spooling "IN/UP".
8. Test safety stop by slowly spooling in an unattached cable. Make sure winch stops when safety stop contacts brake lever. This will cut power from spooling "IN" but you will still have power to spool "OUT". Winch will resume normal function once the safety stop is away from the brake lever.

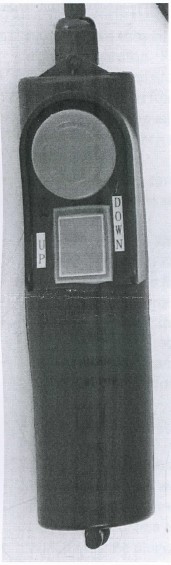
Safety lockout remote.
Push lockout button "IN" to lock the remote. This will disable the rocker switch.
Twist lockout button clockwise and button will pop up indicating that it is in operation mode.
You can now raise or lower the winch by pressing the rocker switch.
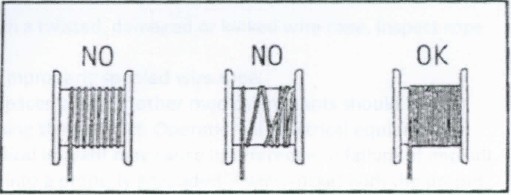
Note: Always make sure the wire rope is spooled correctly on winch drum.
Caution: WARNING
• Always make sure all fasteners , wires and fluid lines are disconnected before removing hardtop. Rubber seals may stick, break them loose before lifting.
• Use caution when lifting top, pay attention to rear glass, open glass slowly and allow it to rest on foam cores gently to avoid damage to glass.
• When lifting, keep all body parts away from the underside of the hardtop.
• Always check winch and hoist hardware before each use. Do not use winch if cable is damaged. Always align jeep carefully before lifting top to avoid top from shifting and hitting jeep. It is helpful to mark the garage floor with tape to assist with vehicle alignment.
• Use caution when lifting the top. Take care to not over lift, always stop winch before hook/pulley reaches the winch. Damage to top , ceiling or wall will occur.
• Never use winch to lift people or live animals.
• Be aware of all surrounding objects or obstructions before lifting.
• Never stand under the top when stored in the raise position. Keep children , pets, and people away from the underside of the top.
• Do not lift more than the rated load capacity. Be aware of dynamic loading. Dynamic( moving) loads may create shock loads which can exceed the load capacity .
• Do not operate hoist with a twisted, damaged or kinked wire rope. Inspect rope before each use.
• Do not operate with an improperly spooled wire rope.
• WARNING: People with pacemakers or other medical implants should consult their physician before using this product. Operation of electrical equipment in close proximity to a medical implant may cause interference or failure of implant.
• Winch must be plugged into a properly grounded 3-wire socket with the proper amperage capacity.
• Do not use hoist outdoors or in wet environment.

