 FREE 1 to 3-Day Delivery on Orders $149+ Details

How to Install Smittybilt Extended Brief Top on your 1997-2006 Wrangler

Shop Parts in this Guide
INSTALLATION INSTRUCTIONS:
Before you begin, the temperature of the Brief should be above 70 degrees Fahrenheit. We suggest laying the Brief in the sunlight for 1 hour before installation.
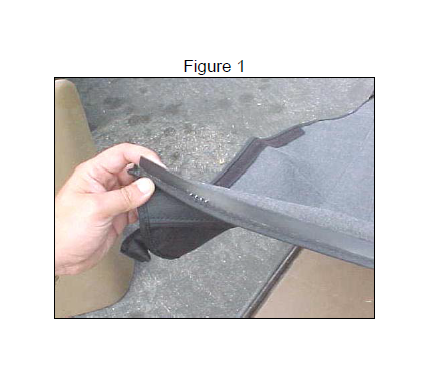
1. Locate the rubber blade on front edge (Figure 1).
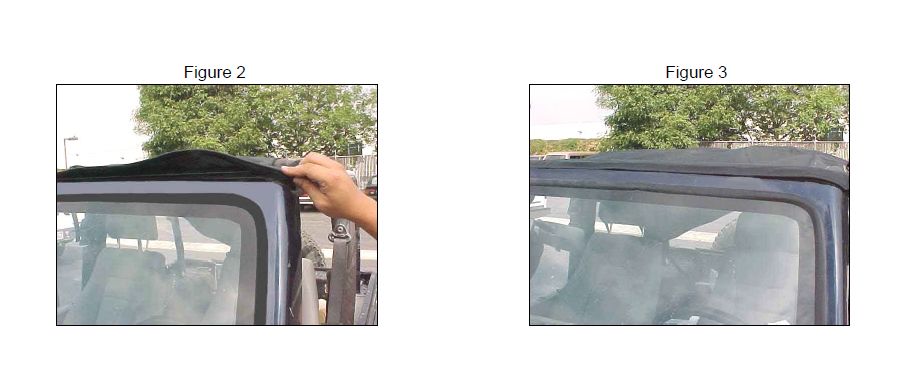
2. Place the Brief on top of Jeep. Insert rubber blade into Windshield Channel, working from one side of vehicle to the other (Figures 2 & 3).
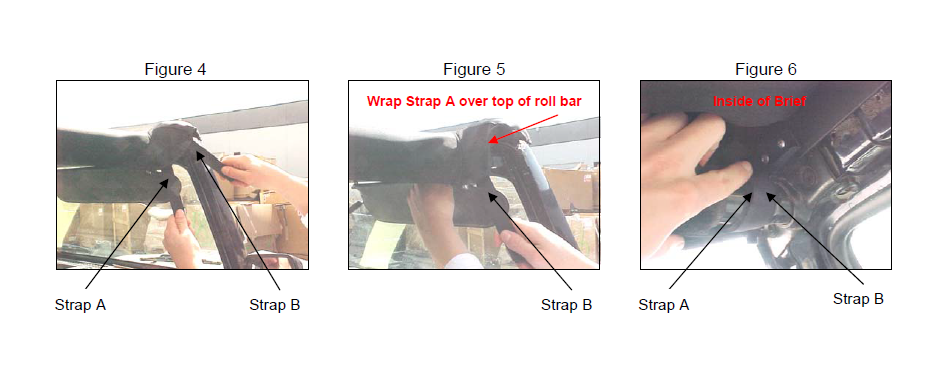
3. Locate 2 Velcro straps in each front corner of the Brief (Figure 4)
• Wrap Strap A over the top of the bar towards the inside of the vehicle (Figure 5). The Velcro of Strap A should be facing outward from the roll bar.
• Strap B wraps around the outside of the roll bar.
• Attach Strap B to Strap A on the underside of the roll bar (Figure 6).
• Do both driver and passenger sides of the vehicle.
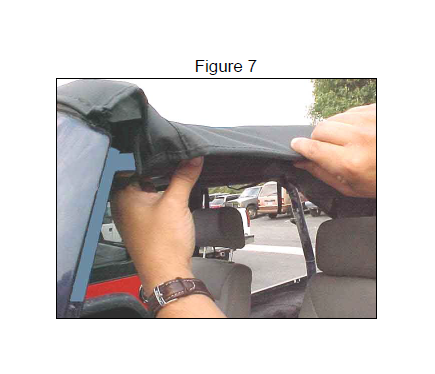
4. Locate the Velcro flaps on each side of the roll bar. Open and wrap flaps around roll bar, pull tight and press together to close (Figure 7). Do both driver and passenger sides of the vehicle.
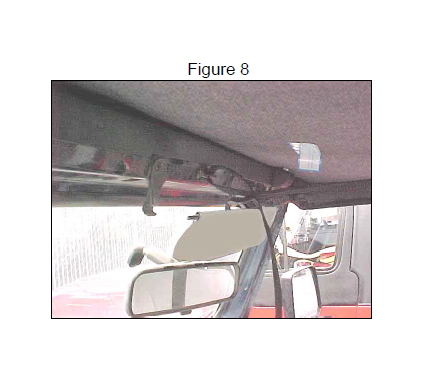
5. Locate the center strap along the central roll bar. Run the center strap around the rear and under the central roll bar forward to the Footman Loop near the top center of the windshield. Run strap through Footman Loop and feed strap through its buckle securely (Figure 8).
NOTE: The rear straps can be fastened in two different methods:
Option 1 shows how to attach the Brief to your vehicle using J-Clips.
Option 2 shows how to attach the Brief to your vehicle around the rear shoulder seat belts.
Option 1 (with J-Clip)
6. Feed the rear corner straps through the J-Clips (Figure 9) and place the J-Clip under a convenient attachment point, such as a rear corner rail or floor loop (Figure 10).
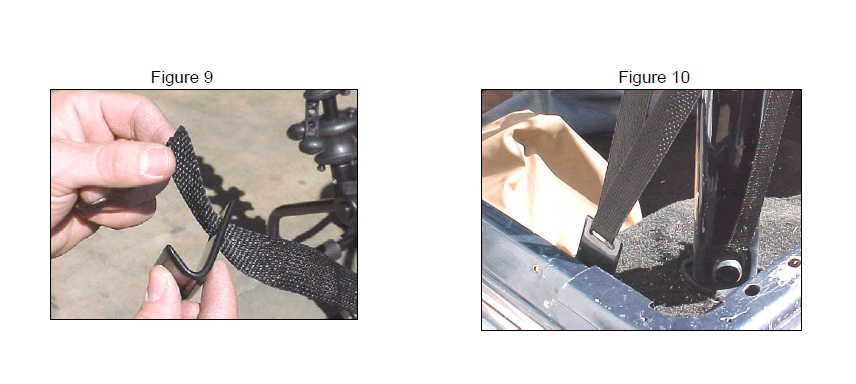
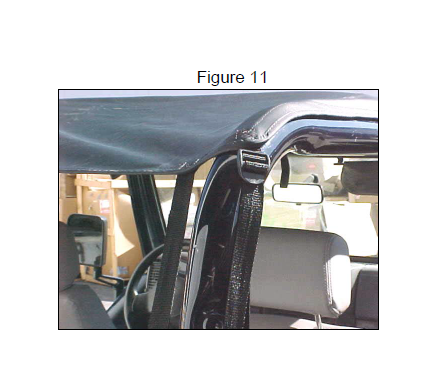
7. Wrap the straps around the roll bar or seat belt shoulder harness. Feed the loose end through the buckle and pull tight (Figure 11). Be sure not to interfere with the seat belts safety and operation. Place the strap under the seat belt. Never install over the seat belt strap.
8. Locate the two side straps near the central roll bar. For each side, wrap the straps around the vertical roll bar, then feed the loose end through the buckle on the other end and pull tight (Figure 12). Tighten all straps (including center strap). Tie off loose strap ends.
9. Re-adjust Velcro and tighten all straps to assure a wrinkle-free fit.

Option 2 (without J-Clip)
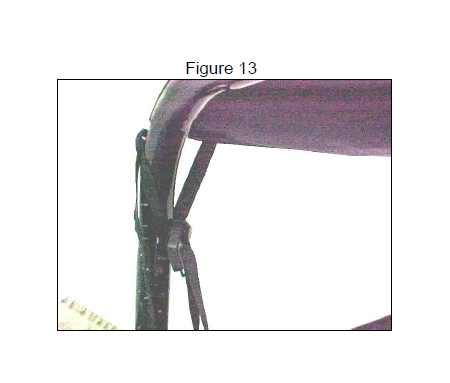
10. Wrap the straps around the seat belt shoulder harness and roll bar. Feed the loose end through the buckle on the other end and pull tight (Figure 13). Be sure not to interfere with the seat belts safety and operation. Place the strap under the seat belt. Never install over the seat belt strap.
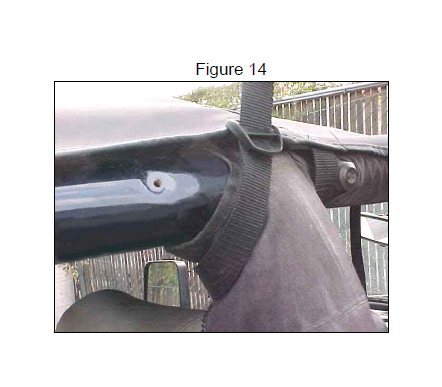
11. Locate two straps in the middle of each side of the Brief. For each side, wrap the straps around the vertical roll bar, then feed the loose end through the buckle on the other end and pull tight (Figure 14). Tighten all straps (including the center strap). Tie off loose strap ends.
12. Re-adjust Velcro and tighten all straps to assure a wrinkle-free fit.
13. Installation is now complete
LIMITED WARRANTY
Smittybilt (The Company) warrants to the original purchaser of this product that should the product or any part thereof, under normal use and conditions, be proven defective in material or workmanship within the warranty period of 1 year from the date of purchase, such defect(s) will be repaired or replaced (At the Company’s option) without charge for parts or labor. To obtain repair or replacement within the terms of the warranty, the product is to be delivered with proof of warranty coverage ( e.g. dated bill of sale, receipt), specification of defect, freight pre-paid with Returns Good Authorization Number from Smittybilt to place of purchase. Items returned to Smittybilt Automotive without an Returns Authorization Number will be refused and returned to sender at the senders expense.
This warranty does not apply to any product or part thereof which, in the opinion of the Company, has suffered or been damaged through altercation, improper installation, mishandling, misuse, neglect accident or acts of nature. THE EXTENT OF THE COMPANY’S LIABILITY UNDER THIS WARRANTY IS LIMITED TO THE REPAIR OR REPLACEMENT PROVIDED ABOVE AND, IN NO EVENT, SHALL THE COMPANY’S LIABILITY EXCEED THE PURCHASE PRICE PAID BY THE PURCHASER FOR THIS PRODUCT.
This warranty is in lieu of all expressed warranties and liabilities. ANY IMPLIED WARRANTIES, INCLUDING ANY IMPLIED WARRANTY OF MERCHANTABILITY SHALL BE LIMITED TO THE DURATION OF THIS WRITTEN WARRANTY. ANY ACTION FOR BREACH OF ANY WARRANTY HEREUNDER INCLUDING ANY IMPLIED WARRANTY OF MERCHANTABILITY MUST BE BROUGHTH WITHIN A PERIOD OF 90 DAYS FROM DATE OF ORIGINAL PURCHASE.IN NO CASE SHALL THE COMPANY BE LIABLE FOR ANY CONSEQUENTIAL OR INCIDENTAL DAMAGES FOR BREACH OF THIS OR ANY OTHER WARRANTY, EXPRESSED OR IMPLIED,WHATSOEVER. No person or representative is authorized to assume for the company any liability other than expressed herein in connection with the sale of this product. Some states do not allow limitations on how long an implied warranty lasts or the exclusion or limitation of incidental or consequential damage, therefore above limitations may not apply to you. This warranty gives the purchaser specific legal rights. The purchaser may have additional rights, which vary from state to state.
Some states do not allow limitations on how long an implied warranty lasts or the exclusion or limitation of incidental or consequential damage, therefore above limitations may not apply to you. This warranty gives the purchaser specific legal rights. The purchaser may have additional rights, which vary from state to state.
Care and Maintenance Information
To keep your product looking new and for the maximum possible wear, it requires periodic cleaning and maintenance.
FABRIC – The fabric should be washed using soap, warm water and a soft bristle brush. Rinse with clear water making sure to remove all soap.
WINDOWS – DO NOT use a brush on the windows. Wash the windows with a well water soaked sponge or soft cloth and a mild dishwashing detergent. Never wipe the windows when they are dry.
ZIPPERS – To keep the zippers operating smoothly keep them clean and lubricated by using a silicone type of lubricant.
SNAPS – Keeping the snaps cleaned and lubricated with silicone will help prevent the snaps from sticking.
