 FREE 1 to 3-Day Delivery on Orders $149+ Details

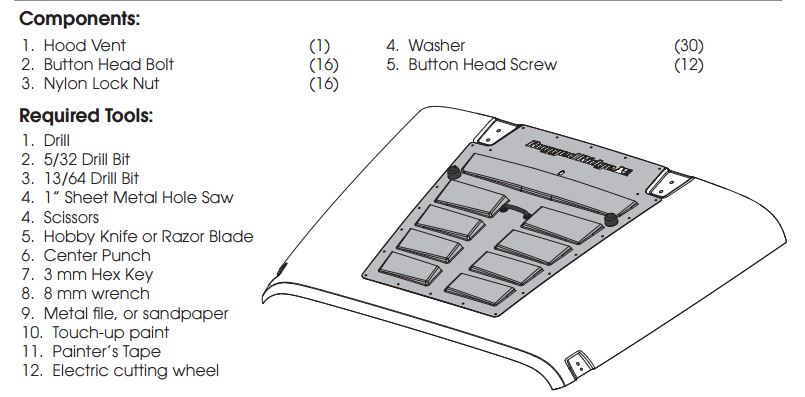
How to Install a Rugged Ridge Hood Vent Insert - Black on your Jeep Wrangler
Installation Time
2 hours
Tools Required
- Drill
- 5/32 Drill Bit
- 13/64 Drill Bit
- 1” Sheet Metal Hole Saw
- Scissors
- Hobby Knife or Razor Blade
- Center Punch
- 3 mm Hex Key
- 8 mm wrench
- Metal file, or sandpaper
- Touch-up paint
- Painter’s Tape
- Electric cutting wheel

Shop Parts in this Guide
WARNING
To prevent bodily injury, wear eye protection and use extreme caution during entire installation of this product.
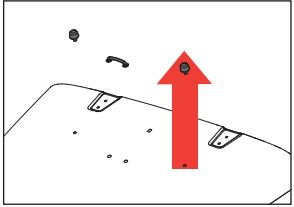
1. Remove hood from vehicle and place on safe working surface such as a table, sawhorse, or a large piece of cardboard.
2. Remove windshield washer nozzle, windshield bumpers, and footman loop.
3. Clean hood with a soft, lint-free cloth and isopropyl alcohol.
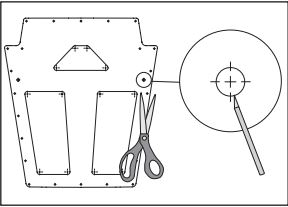
4. Use scissors to cut around outside edge of template.
5. Use a sharp hobby knife or razor blade to cut out windshield bumper holes.
6. Place template on hood and align template by temporarily placing windshield bumpers through windshield bumper holes. Do not push windshield bumpers in enough to snap.
7. Further secure template by taping edges down with painter’s tape in three or four locations.
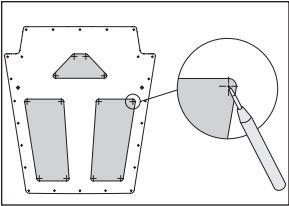
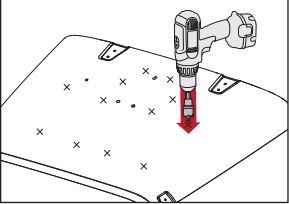
8. Use an automatic center punch, or a punch and hammer, in center of four marked locations in each cutting area. If using a punch and hammer, be careful not to dent your hood.
9. Remove template.
10. Use a drill and 1” sheet metal hole saw to drill holes in each location marked with center punch.
WARNING: Some hole locations are above support structure “X-brace.” It is OK for hole saw pilot bit to drill through X-brace, do not drill through X-brace completely.
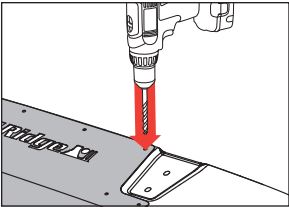
11. Use painter’s tape to connect each 1” hole with a straight line of tape around outside edges of each hole as shown in template.
12. Carefully use an electric cut off wheel, or rotary tool and metal cutting wheels, to cut top layer of hood sheet metal along inside edge of painter’s tape.
WARNING: Be careful not to cut the underlying Xbrace.

13. Use metal file or sand paper to smooth out rough cut edges in hood sheet metal. Coat exposed metal with touch-up paint to prevent rust.
14. Position Hood Vent on hood, and temporarily reinstall windshield bumpers to ensure proper positioning.
15. Using Hood Vent as a guide, drill holes in top and bottom 4 corners using 13/64 drill bit. Temporarily install 4 bolts, 4 nuts, and 8 washers through these drilled holes, do not over tighten.
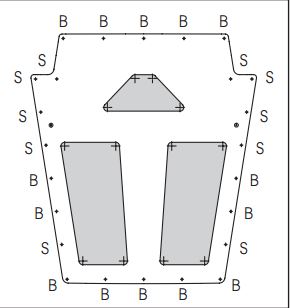
16. With Hood Vent bolted in corners, use Hood Vent itself as a guide to drill remaining holes. Refer to cutting template and guide shown. All holes marked with a “B” for Bolt should be drilled using 13/64 drill bit. All holes marked “S” for Screw should be drilled using 5/32 drill bit. As you go, install a bolt, and nut into each “B” hole, tightening them to finger tight. Try to only drill the “S” holes through hood sheet metal, not through the X-brace.
17. Once all holes are drilled, remove Hood Vent and hardware. Coat all exposed metal with touch-up paint to prevent rust.
18. Replace hood vent. Install windshield bumpers and footman loop.
19. Install bolts in “B” holes using supplied bolts, two washers, and nyloc hex nut. Install all bolts to finger tight before tightening with wrench and hex key. Do not overtighten.
20. Install screws in “S” holes using supplied screws and one washer. Do not over tighten.
21. Reinstall hood onto Jeep.


