 FREE 1 to 3-Day Delivery on Orders $149+ Details

How to Install Rugged Ridge Heavy Duty Monster Complete Steering Linkage on your 1997-2006 Wrangler

Shop Parts in this Guide
Installation Instructions:
(1) (ALL) Properly secure vehicle. Place in gear or park and set emergency brake. For further safety block tires.
(2) (TJ-XJ-ZJ) Remove old steering linkage. DO NOT alter the position of the front wheels or steering wheel during the removal. Keeping these components in the original position will allow you to keep your front end alignment as close to original as possible. Prior to installation run a tape measurer from passenger side knuckle (inner) to Driver’s side knuckle (inner) and note length. If knuckles are moved by accident you will be able to return to the correct position by using this measurement. After any steering modification an alignment by a professional shop is recommended.
(YJ 87-95) Remove old steering linkage. It may be necessary to move one wheel - knuckle outbound to remove original steering linkage. Prior to doing this run a tape measurer from passenger side knuckle (inner) to Driver’s side knuckle (inner) and note length. You will need this measurement to return your steering to its original position. After any steering modification an alignment by a professional shop is recommended.
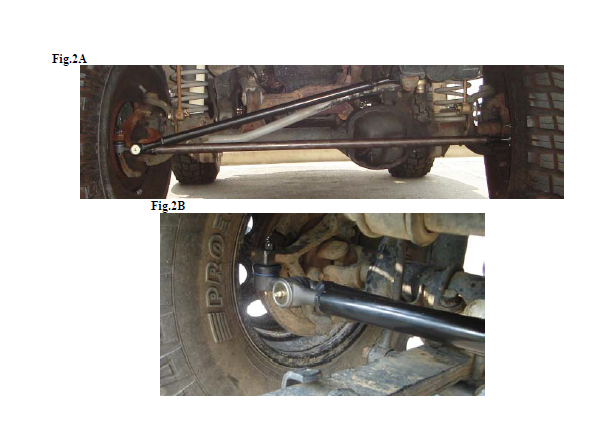
(3) (TJ-XJ-ZJ) Attach H/D Cross-Over steering as shown below (Fig.2A). The dual attachment point tie-rod end (18043.27) should be mounted to the passenger side knuckle. With tubes and tie-rod ends installed turn all keeper nuts full out (Fig.3). By turning the H/D center tubes clock wise or counter clockwise adjustments to the lengths can be made. Adjust until all mounting holes are aligned. Attach castle nuts and torque to 60ft-lbs for all locations. During adjustments it is important to keep the front wheels and pitman arm in the original position.
(YJ 87-95) Insert the new H/D Cross-Over steering. Start at the knuckle that has been moved outbound and slide over leaf springs (Fig.2B). The dual attachment point tie-rod end (18043.28) should be mounted to the passenger side knuckle. Using the measurement taken in step 2 return the wheel & knuckle back to the correct position. With tubes and tie-rod ends installed into knuckles and pitman arm turn all keeper nuts full out (Fig.3). Adjustments to lengths are made by turning the H/D center tubes clock wise or counter clockwise. Adjust until all mounting holes are aligned. Attach castle nuts and torque to 60ft-lbs for all locations. During adjustments it is important to keep the front wheels and pitman arm in the original position.
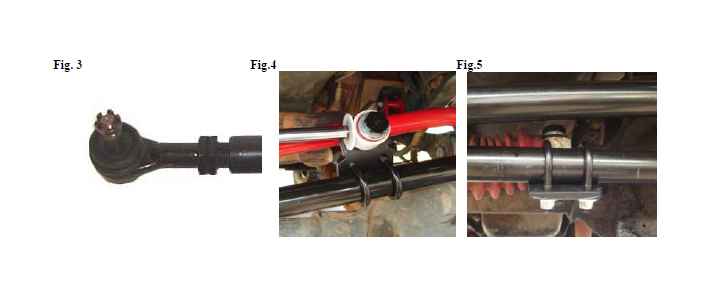
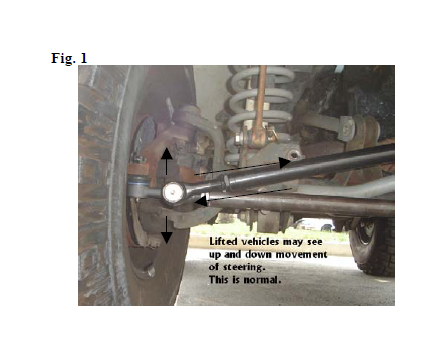
(4) (ALL) Double check all castle nuts for proper torque setting and insert cotter pins and grease fittings. Add additional grease if needed. After grease has been inserted remove nipples and insert supplied plugs. These plugs are to reduce damage when used off-road. Attach H/D steering stabilizer bracket and position so that no interference with any other steering component or engine oil pan occurs during full suspension cycle. The brackets damper attachment bar is bent to allow for any number of positions. The bracket may be turned 360degs as the mounting holes are squared to the size of the u-bolts. If your choose to reusing the old damper it’s tapered bolt will need to be cut off and the new bolt used that is supplied with the kit. Also the bracket will need to be mounted so that when the Jeep is sitting with wheels straight there is enough movement in the dampener to allow for full left and full right turns with no binding or bottoming out. By not moving the damper’s piston during removal you will be able to determine where the bracket should be located on the drag-link. Tighten stabilizer nut to 45ft-lbs. The above images are for reference use only (Fig.4 and 5). The images supplied show one stock height YJ and a 6” lifted TJ. You will need to determine the proper orientation for your vehicle set-up
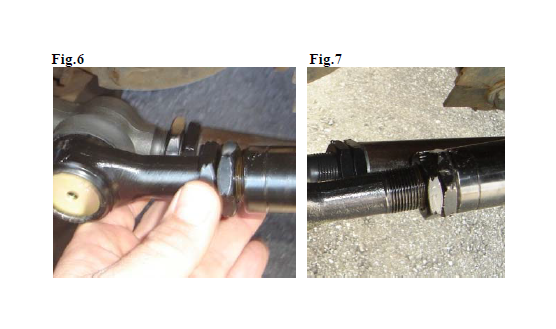
(5) (ALL) With steering wheel and steering knuckles aligned tighten the first keeper nut on all tie-rod ends. NOTE: DO NOT TIGHTEN BOTH NUTS TOGETHER! The first keeper nut must be tightened before starting the second nut. The assistance of a second person may be needed to insure that both of the first nuts are properly tightened on each tube (Fig.6). With the first nuts secured proceed with tightening the second set of keeper nuts. Again the assistance of a second person may be needed to insure that the second keeper nuts are properly tightened (Fig.7). Remember that the nuts must be tightened independently of each other for them to perform properly. If listed steps are not performed the keeper nuts could back out allowing the tubes to rotate and upsetting your alignment. It is recommended that a quality thread lock be used (soft set). After all nuts have been tightened double check to make sure no keeper nuts have loosened during the tightening procedure. Check all nuts at least 3 times.
WARNING: All KEEPER NUTS SHOULD BE INSPECTED PRIOR TO DRIVING TO INSURE THAT NONE HAVE LOOSENED DURING INSTALLATION. Failure to tighten keeper nuts correctly can result in the tie-rod ends slowly backing out and upsetting your alignment. If not properly maintained and inspected damage may result. It is the owner’s responsibility to check that all bolts and or keeper nuts are tight and with in listed torque specs after first 10-20 miles of driving and should be rechecked after 200 miles or after all off-road trips.
(6) (ALL) After complete safety inspection proceed with road test avoiding traffic. Inspect bolts and tighten if needed. Have a certified 4WD shop or a qualified alignment shop perform the final alignment and double check all work performed for proper safety.
DISCLAIMER: Rugged Ridge - OMIX-ADA has supplied this part with the understanding that the purchaser is solely responsible for there vehicle and any modification made beyond original factory standards. Rugged Ridge - OMIX-ADA is not responsible for any injuries to the owner or damages to vehicle for improperly installed components, unsafe driving and or misuse of supplied components.
