 FREE 1 to 3-Day Delivery on Orders $149+ Details

How to Install Rubicon Express 5.5 In. Spring Over Conversion Suspension System on your Wrangler
Tools Required
- Basic mechanics hand tools
- Jack stands and floor jacks
- Pitman arm puller
- Drill motor and bits
- Welder
- Grinder
- Spray paint
- Grease
- Brake fluid
Safety Warning:
Suspension systems or components that enhance the off-road performance of your vehicle may cause it to handle differently, on and off-road, than it did from the factory. Care must be taken to prevent loss of control or vehicle rollover during sudden maneuvers. Failure to drive the vehicle safely may result in serious injury or death to driver and passengers. We recommend you always wear your seatbelt, drive safely and avoid quick turns and other sudden maneuvers. Constant maintenance is required to keep your vehicle safe. Thoroughly inspect your vehicle before and after every off-road use.
Installation Warning:
We recommend that certified technicians perform the installations of our products. Attempts to install these products without knowledge or experience may jeopardize the safety of the vehicle. These instructions only cover the installation of our products and may not include factory procedures for disassembly and reassembly of factory components. Read instructions from start to finish and be sure all parts are present before disassembling the vehicle. Included instructions are guidelines only for recommended procedures and in no way are meant to be definitive. Installer is responsible to insure a safe and controllable vehicle after performing modifications. Do not perform test drives on public roads with partially completed installations. Always double and triple check your work before use.
KIT CONTENTS:
INSTALLATION:
Note: This is a spring over kit, not a complete conversion system, and typically requires more components depending on budget and desired out come. Since the kit requires accurate and sound welding of spring perches, it is not recommended for the novice. This kit basically moves the leaf spring perches to the top of the axle, markedly increasing lift and flexibility. This arrangement can retain a stock-type ride quality by retaining the original spring, however rear axle wrap and spring longevity will be a problem. Other issues, like steering linkage, driveshafts (a CV-type driveshaft is strongly recommended for this application, shocks and bump stops will need to be addressed). Steering will typically need an ‘S” link at the very least to clear the right front leaf spring, or better yet a high steer system. Net lift from the conversion is minimum 5.5-inches. For greater durability, and a total of 7-inches of lift, we recommend running Rubicon RE1445 (rear) & RE1444 (front) 1.5” Extreme-Duty Springs.
1. Before you begin, make certain you can safely support vehicle by the frame and are working on a stable, level surface.
2. With vehicle supported remove wheels.
3. Front and rear axles will now need to be removed:
A. Disconnect brake lines, E-brake cables and breather tube.
B. Disconnect shocks.
C. Remove rear track-bar. (will NOT be reinstalled)
D. Disconnect front track bar at axle.
E. Remove rear driveshaft.
F. Disconnect front driveshaft at pinion.
G. Disconnect front vacuum lines.
H. Disconnect drag link at pitman arm.
I. Remove U-bolts.
J. Remove leaf springs and lower axles.
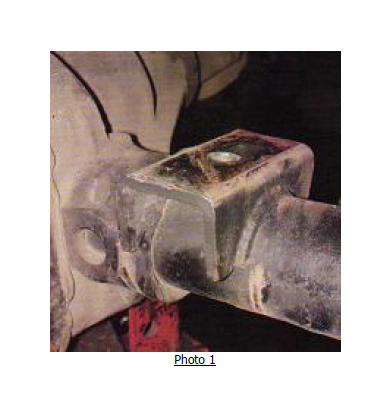
4. Weld on new spring perches – refer to Photo 1 for typical front:
A. Remove paint on areas to be welded.
B. Set width to match factory spring location.
C. Tack perches in place before final welding.
D. Set front perches 4-5 degrees more positive than stock. (pinion will rotate down)
E. Set rear perches so pinion rises approximately 8-9 degrees for CV driveshafts (recommended), or if you’re attempting to use a longer factory type, 2.5 degrees from stock for standard driveshafts.
F. Make sure angles are proper and perches are aligned before welding.
G. Weld perches using caution not to use excessive heat while still maintaining good penetration.
H. Paint new perches to prevent rusting.
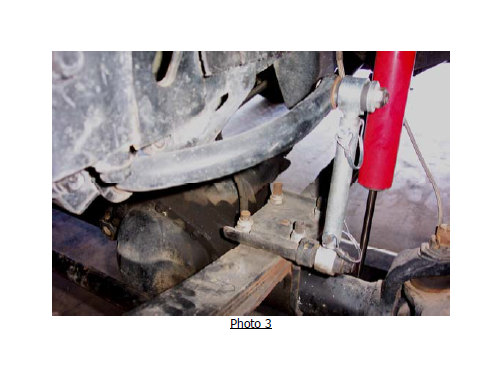
6. Install leaf springs – refer to Photo 3 for typical front:
A. Remember to grease all bushings.
B. Place leaf springs on top of axles and bolt to factory shackles and spring hangers.
C. Put spring plates on top of springs.
D. Raise up axles into place and install u-bolts (we recommend using new u-bolts).
E. Use factory torque specs for all u-bolts and spring bolts.
7. Install longer front and rear shocks
8. Install brake lines:
A. Install lines with banjo fittings on front calipers.
B. Install supplied anchor bracket to frame to secure upper mount. Use E-clips and self-tapping screws.
C. Install rear line in the same fashion as the stock line.
D. Bleed entire brake system with D.O.T 3 fluid or better.
9. Relocate emergency brake cables (stock to 1.5” springs):
A. Route passenger side cable over spring and through rubber muffler mount. Abandon clamp to body.
B. Route driver side over spring and to lowest portion of factory frame mount. Drill a new ½”hole to receive housing end. Readjust cable tension.
10. Install rear driveshaft:
A. Install slip yoke eliminator kit and new CV driveshaft according to instructions enclosed with those products.
B. If attempting to use factory driveshaft, have shaft lengthened and rebalanced by a competent shop.
C. On ‘94-95 models we recommend switching pinion yokes to the 1310 series to gain ¾” drive line length. Always use fresh yoke straps and keep u-joints greased.
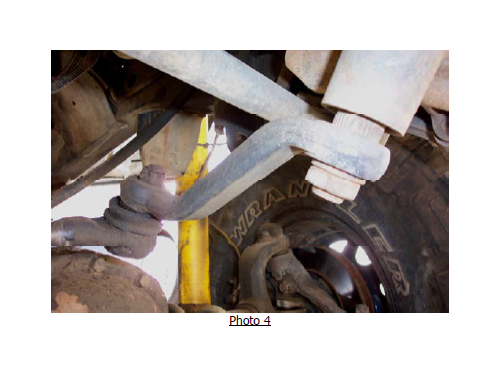
11. Install pitman arm- refer to Photo 4:
A. Use pitman arm puller to remove pitman arm. Do not attempt to remove pitman arm with a hammer or torch!
B. Install supplied drop pitman arm and torque to factory spec.
12. Wheel alignment:
A. Typically no alignment is necessary other than centering steering wheel
B. Rear track bar will not be reinstalled.
C. Depending on axle and suspension configuration, If you are re-Installing a front track bar, you may need to fabricate a track bar bracket or use RE1630 for a YJ D30.
13. Check all your work and check all bolts for tightness.
14. Install wheels and tires and lower vehicle.
15. Test drive and recheck bolts after the first 50 miles and after every off-road excursion.
