 FREE 1 to 3-Day Delivery on Orders $149+ Details

How to Install a Putco 50 in. Luminix Light Bar Bracket on your Jeep Wrangler

Shop Parts in this Guide
Congratulations on your purchase of a high quality PUTCO product. Should you need any application or technical assistance, feel free to call us at: 1-800-357-9261 Monday-Friday 8:00 a.m. - 5:00 p.m. (Central Standard Time) Contact your PUTCO dealer for other quality accessories.
Please read all instructions before installation and to verify that all parts are included.
Bracket Installation
1. Remove bracket kit from packaging. Check to see if all parts from above kit contents table are included.
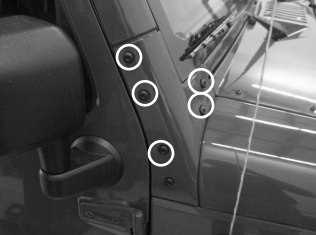
2. Remove Bolts shown if Figure 1 and set aside for both driver and passenger sides. Use T40 Torx Bit to remove.
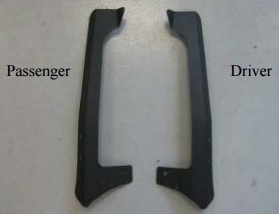
3. Place rubber spacers under driver and passenger bracket and install using factory hardware. Tighten Down Using T40 Torx Bit. Driver and passenger brackets are shown in Figure 2.
4. Mount light bar between brackets. Tighten with 7/16" wrench (These brackets are designed for a Putco 10050 or 10055 Light Bar)
5. See Light Bar Installation Instructions for wiring installation.
LIMITED 90 DAY WARRANTY
Putco guarantees it’s Stainless Steel and Aluminum products against defects in workmanship and material for as long as you own your vehicle. All painted products have a 90 day warranty on the painted surface. Any defects resulting from faulty material or workmanship will be warranted by Putco and repaired or replaced at our discretion. Putco assumes no extra labor costs. Damages caused by freight carriers, improper installation, misuse, collision, or neglect will not be warranted by Putco.
