 FREE 1 to 3-Day Delivery on Orders $149+ Details

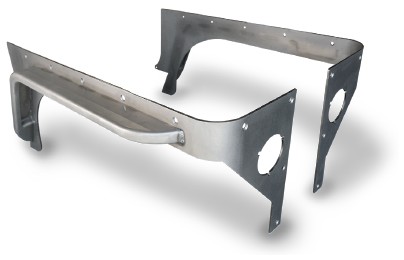
How to Install Poison Spyder Comp Cut Crusher Corner Guards - Bare Aluminum on your Wrangler
Tools Required
- Primer & paint (unless Corners have already been painted or powder-coated)
- Fine tip felt marker (Sharpie® or similar)
- 7/32 hex key (Allen wrench) or hex socket
- 9/16 combination open end/box end wrench and/or socket with ratchet
- Drill motor with 3/8” & 17/32” (optional) drill bits
- 1” hole saw (optional) & 4-1/2” hole saw (optional if installing LED taillights)
- Auto-punch or center punch with hammer
- C-Clamps, welding clamps or similar, and/or a helper
- Pneumatic body saw, nibbler, electric jig-saw with bi-metal blade, or die grinder with cut-off wheel
- Various hand tools for R&R of fuel filler, license plate frame, taillights, flares, etc. (will vary by vehicle)
APPLICATIONS
These installation instructions apply to the following Poison Spyder products:
11-04-040 CJ-7 Crusher Corners - Comp Cut (Steel) 11-04-040-ALUM CJ-7 Crusher Corners - Comp Cut (Aluminum)
11-04-047 CJ-7 Crusher Corners - Comp Cut - 3” DeFender Flares (Steel)
11-04-047-ALUM CJ-7 Crusher Corners - Comp Cut - 3” DeFender Flares (Aluminum)
13-04-040 YJ Crusher Corners - Comp Cut (Steel) 13-04-040-ALUM YJ Crusher Corners - Comp Cut (Aluminum)
13-04-053 YJ Crusher Corners - Comp Cut - 3” DeFender Flares (Steel)
13-04-053-ALUM YJ Crusher Corners - Comp Cut - 3” DeFender Flares (Aluminum)
14-04-040 TJ Crusher Corners - Comp Cut (Steel) 14-04-040-ALUM TJ Crusher Corners - Comp Cut (Aluminum)
14-04-053 TJ Crusher Corners - Comp Cut - 3” DeFender Flares (Steel)
14-04-053-ALUM TJ Crusher Corners - Comp Cut - 3” DeFender Flares (Aluminum)
PARTS LIST
(1) Driver Side Crusher Corner
(1) Passenger Side Crusher Corner
(1) Comp-Cut Crusher CornerTM Hardware Kit
PN: HWKIT-14-04-040 includes:
(20) 3/8-16 X 1 SS Flat Head Cap Screw
(20) 3/8-16 Gr8 Nylon Insert Lock Nut
(20) 3/8 SAE Hardened Flat Washer
(2) 3/8-16 Nut-sert
VEHICLE PREPARATION
Do these steps for both sides:
1. Be sure to start with a clean vehicle. Installation is easiest with the hard or soft top removed. If there is any carpet along the inside wheel well, remove or pull it out of the way.
2. Remove any plastic flares on the rear of the vehicle. Remove the OE taillights.
3. Remove the gas cap and plastic gas filler bezel (reinstall gas cap at this time).
4. If there are any license plate brackets, remove them at this time.
Notes:
• On ’04 and later TJ/LJ’s you will need to remove the plastic tailgate hinge covers.
• Some early CJ’s with OE roll bars have bolts that run through the side of the tub. These will need to be removed at this time (new holes will need to be re-drilled through the roll bar plate).
• If you are welding the Crusher Flares to the Crusher Corner, weld them PRIOR to painting/powder coating the Crusher Corners or installing them on the vehicle.
CRUSHER CORNERS INSTALLATION
Do these steps for both sides
1. Park vehicle on a level surface and set the emergency brake. Wear eye protection beyond this point.
2. Position Crusher Corner into place on the rear corner of the Jeep and check for proper fitment.
3. Apply masking tape to the Jeep’s body sheet metal around the edges of the area that will be covered by the Crusher Corner. This is simply to protect the paint during these steps and will be removed prior to final installation. It is not necessary to cover the entire area with tape, just the areas around the edges where the edge of the Crusher Corner is likely to contact the sheet metal either intentionally or accidentally.
4. Clamp the Crusher Corner to the body using either a C-clamp or similar device (double check all mounting positions for correct alignment).
5. Check for proper tailgate clearance and operation.
6. Using a sharpie marker, mark all of the 3/8” mounting holes along the side and back of the Crusher Corner. Mark the LED tail light hole. Use the sharpie to trace the lines of the corner on the body where you will need to cut. You will need to remove all of the support in the inner wheel well area.
NOTE: Installing Comp Cut Crusher Corners on 03 and up TJ requires the relocation of the charcoal canister.
7. Using a center punch and a medium sized hammer, punch the center of the marked holes.
8. Remove the clamps and remove the Crusher Corner from the Jeep. Paint or powder-coat the Crusher Corner before final installation.
9. Check carefully for any obstructions/wires on the inside of the Jeep where the holes are to be drilled.
10. Use a sharp 3/8” drill bit to drill out the holes that were previously marked. Be sure to remove any metal debris or burrs from around the holes.
11. On driver/passenger bottom rear mounting hole closest to tailgate, an access hole will need to be drilled by drilling all the way through the tub (this will only be necessary on non-Comp Cut installations). Then, from inside the tub, use a 1” hole saw centered on the previously drilled through-hole. The resulting 1” hole provides access to the lock nut that will be installed there. Spray exposed bare metal with clear-coat. A CJ7 rubber body plug or generic 1” rubber plug from the hardware store can be used to plug the hole after installation is complete.
OPTIONAL: If desired, rather than cutting the 1” access hole you may install the supplied 3/8” nut-serts in these locations. Only use the supplied nut-serts if you are familiar with how to properly install them. They will require a 17/32” drill bit and a Nut-Sert Installation Tool. Note that we recommend using a professional Nut-sert install tool such as the “MarsonTM Giant Threadsetter”, if one is available. If a proper nust-sert install tool is not available, a make-shift one may be fashioned using a hex bolt, oversized nut and washers, as shown in the “Nut-Sert Installation Tool Instructions” PDF file which may be downloaded from the Poison Spyder website Tech Library section. On Jeep TJ & LJ, it may be easier to use nut-serts at the forward-most hardware locations on either side as well, so we have provided 2 additional nut-serts for this purpose, in the hardware kits for those vehicles.
12. If installing Comp-Cut corners, use a pneumatic body saw or other suitable tool to cut along the previously-marked cut lines. De-bur the cut edges with a grinder or file. It is recommended to spray an aerosol clear coat over the areas where exposed metal shows through. Comp Cut corners require the relocation of the tailgate hinges on TJ’s and YJ’s as well as the relocation the rear body mount on all vehicles
13. If installing the LED taillights, cut out the hole using a 4.5” hole saw or pneumatic body saw. Be sure to check for wiring behind the sheet metal prior to cutting. Spray the exposed cut edges with clear-coat to prevent rust.
14. Using the supplied hardware, re-install the Crusher Corner into place. Loosely install flat head cap screw, flat washer (on the back side) and lock nut. Do not tighten hardware at this time (allow the Crusher Corner to “float” until all hardware is loosely installed). Once all hardware is in place, carefully align the Crusher Corner into place, then tighten all hardware using the 7/32 hex key and 9/16 wrench.
15. If installing LED taillights, continue with Poison Spyder’s separate instruction sheet that came with your LED taillights (if purchased through Poison Spyder) or may be downloaded in PDF form from the Tech Library section of our website.
16. Remove the protective masking tape that was applied at the beginning of these steps.
17. Re-install the now-painted or powder coated Crusher Corners (make sure paint is dry before installing).
18. Re-install any OE pieces that will be re-used (flares, gas filler bezel, license plate bracket or OE taillights).
Congatulations! You have completed installation of your Poison Spyder Crusher Corners.

