 FREE 1 to 3-Day Delivery on Orders $149+ Details

How to Install Poison Spyder Cage Lower A-Pillar Kit on your Wrangler

Shop Parts in this Guide
Thank you for purchasing a Poison Spyder Customs Cage Lower A-Pillar Kit for your Jeep YJ. The Poison Spyder fabricated Lower A-Pillar makes it easy for home fabricators to design a cage around the Jeep’s factory dash, where a full tube-to-the-floor A-Pillar is not possible. Installation does require specialized skills and tools, such as welding. If you are not confident in your mechanical skills, please seek the help of a professional to perform the installation. Please read through these entire instructions before proceeding with installation.
PARTS LIST
Please check your packages immediately upon arrival to ensure that everything listed is included, and to check for damage during shipping. If anything is missing or damaged, call Poison Spyder at (951) 849-5911 as soon as possible.
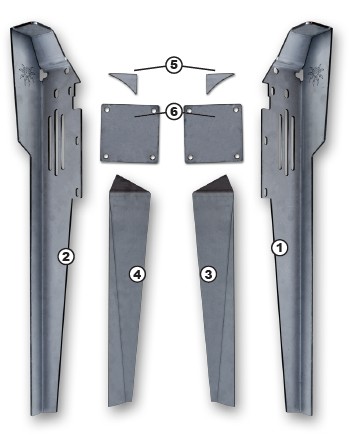
(1) YJ Lower A-Pillar Left 1
(1) YJ Lower A-Pillar Right 2
(1) YJ Lower A-Piller Inner Plate Left 3
(1) YJ Lower A-Piller Inner Plate Right 4
(2) A-Pillar Top Gusset 5
(2) A-Pillar Foot Plate 6
INSTALLATION INSTRUCTIONS
This Kit is intended to be integrated into a more complete cage, either of your own design or Poison Spyder’s Trail Cage or Full Cage Kit. These Notes do not cover the rest of your cage install. It is imperative that the installation, and the rest of the cage design and fabrication, are done by a professional fabricator/welder.
1. Clean ALL bare metal pieces provided in the kit, using a clean rag and brake cleaner. This will ensure an easier, cleaner installation and better welds later in the installation.
2. Weld the Inner Plate to the inside of each Lower A-Pillar. Align the bottom and two long side edges of the Inner Plate and the Lower A-Pillar. It is not necessary to put a continuous bead all the way around the Inner Plate. Stitch-welding in 1” increments will yield plenty of strength. If a full weld is desired for aesthetics, stitch-weld in increments to keep the assembly from warping during welding. The result will be a fully boxed bottom section of the Lower A-Pillar.
3. Weld the Top Gusset onto each Lower a-Pillar. It will fit into the only open 90º bend at the top end of the A-Pillar.
4. Park vehicle on a level surface and set the emergency brake. Remove existing cage components, plastic covers, or any other equipment that will be in the way. Use welding blankets to protect the dash and interior of the Jeep from weld splatter.
5. Along either side of the Jeep’s dash there are four bolts going into the firewall, which match the slotted bolt pattern found on the A-Pillars. Remove these bolts from both sides.
6. Install the Lower A-Pillars into place using the three bolts you removed during in the previous step. The mounting holes in the A-Pillars are slotted to allow for vertical adjustment. Leave the bolts only snug enough to hold the A-Pillars in place but loose enough to allow them to slide up and down within the slots.
7. Position the Foot Plates beneath each A-Pillar. Make sure the plates are positioned so that the A-Pillar lands as close to the center as possible, but so the bolt holes that must be drilled through the floor are correctly located away from any obstructions underneath the floor. Tack-weld the A-Pillars to the Foot Plates.
8. Drill the four bolt holes into the Jeep’s floorboards, using the holes in each of the Foot Plates as your drill guide. Bolt the Foot Plates into place (hardware not included in Kit).
9. Continue with the rest of your cage fabrication. Attach the tubular upper A-pillars of your cage to the top surface of the Poison Spyder Lower A-Pillar. Only tack weld this joint during initial fabrication. Wait until the entire cage is complete, to remove the cage and fully weld all of the seams that were only tack-welded during initial assembly.
Congratulations, you have completed the installation of your Poison Spyder Lower A-Pillar Kit!
