 FREE 1 to 3-Day Delivery on Orders $149+ Details

How to Install Poison Spyder 50 in. Rigid E or SR Series LED Light Bar Mount (97-06 Wrangler TJ) on your Jeep Wrangler
Thank you for purchasing Poison Spyder products for your Jeep. Installation is fairly simple with the right tools and good mechanical abilities. If you are not confident in your mechanical skills, please seek the help of a professional to perform the installation. Please read through these entire instructions before proceeding with installation.
IMPORTANT: Completely install and remove these items prior to painting or powder coating. This will allow you to check for fitment or do any clearancing or fitting ahead of time, to reduce the chance of damage to the finish during final installation. Poison Spyder Customs Inc. is not responsible for costs for or damage to paint or powder coat finish under any circumstances, including paint or powder coat of incorrectly shipped or defective parts.
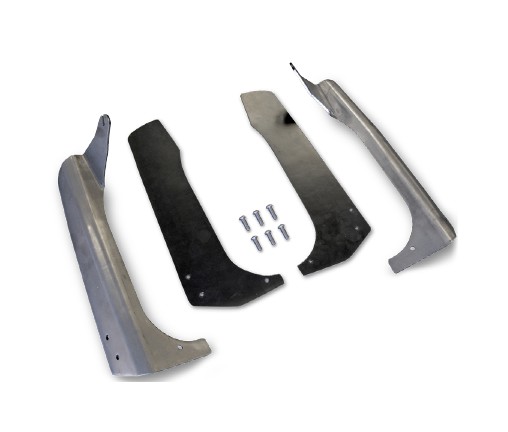
PARTS LIST
Please check your packages immediately upon arrival to ensure that everything listed is included, and to check for damage during shipping. If anything is missing or damaged, call Poison Spyder at (951) 849-5911 as soon as possible.
(1) Driver Side TJ A-Pillar Light Bar Mount
(1) Passenger Side TJ A-Pillar Light Bar
Mount
(1) Driver Side TJ A-Pillar Rubber Liner
(1) Passenger Side TJ A-Pillar Rubber Liner
(6) 5/16-18 X 1 SS Button Head Cap Screw
INSTALLATION NOTES
• If the Light Bar Mounts were received bare, they will need to be painted or powder coated prior to final installation. However it is a good idea to test-fit prior to paint, in order to ensure proper fitment to ensure against damage to the paint or powder coat upon final installation.
• Remove the three factory bolts at the lower corners of the windshield brackets that correspond to the holes in the mounts. Do not remove the lower-most bolt on each side— leave those in place while installing the light bar mounts.
• Place the supplied rubber liners between the mounts and the Jeep’s A-pillar before bolting them on. Use the supplied 5/16-18 X 1 SS Button Head Cap Screws to secure the mounts to the Jeep. Make alignment adjustments to the rubber liners as the bolts are tightened.
• Install the light bar into the tabs at the top of the mounts AFTER the mounts have been installed on to the Jeep. It may be necessary to loosen the mount bolts slightly in order to slide the light bar studs into the slots. Once everything is installed and aligned, re-tighten all hardware.
• This product is designed exclusively for mounting the Rigid Industries 50” E-Series or SR-Series LED light bars. No guarantee is made regarding fitment of other brands of light bars.
• Routing of electrical cables is left to the installer’s discretion. We have seen several different methods of routing the cable, we encourage you to do a search on the web for ideas and tips for routing the cables.
• With the SR-Series (single row) light bar, If the light bar produces an annoying whistle or harmonics at highway speeds, try flipping it over. We have had the best results with the light bar flipped so that the cables route down the driver’s side.
