 FREE 1 to 3-Day Delivery on Orders $149+ Details

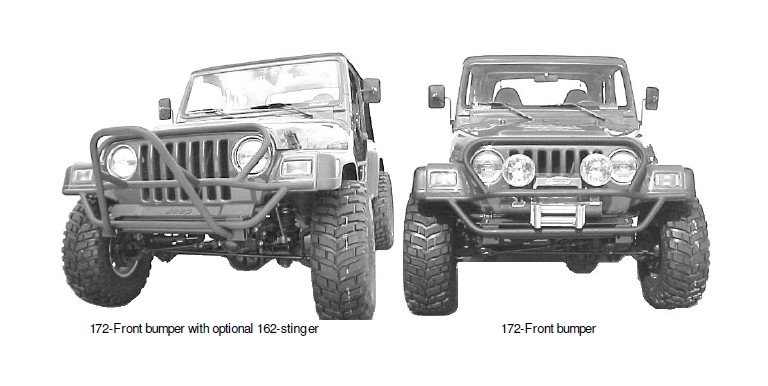
How to Install Olympic 4x4 A/T Rock Slider Front Bumper w/ Hoop - Textured Black on your Wrangler
Installation Time
1 hours
Tools Required
- #55 Torx bit socket
- 1/2” or 3/8” drive ratchet wrench
- Drill motor
- 1/8”, 1/4”, 3/8”, and 17/32” drill bit
- Socket size: 3/4”
- Combination wrench size: 3/4”
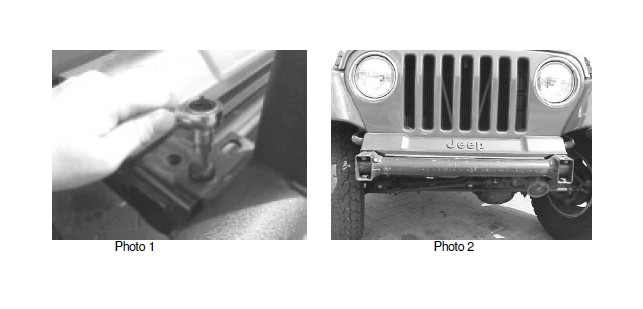
Step 1. Remove old bumper from vehicle frame using #55 Torx bit. Save the Torx bit bolts, they will be re-used to mount your new bumper. See photos 1&2.
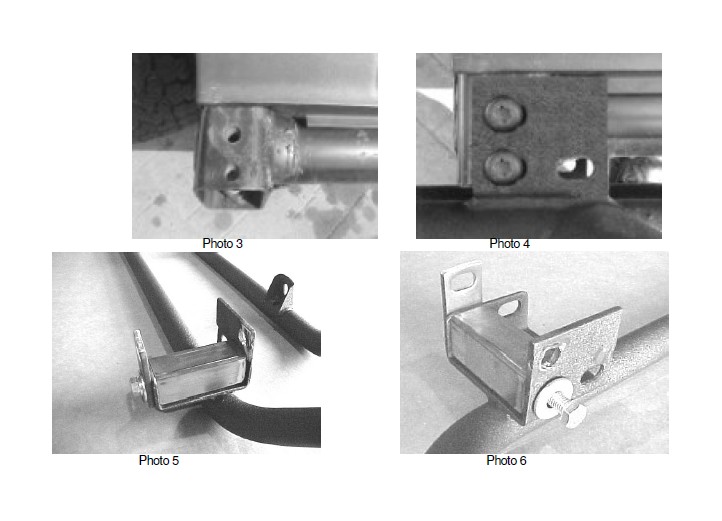
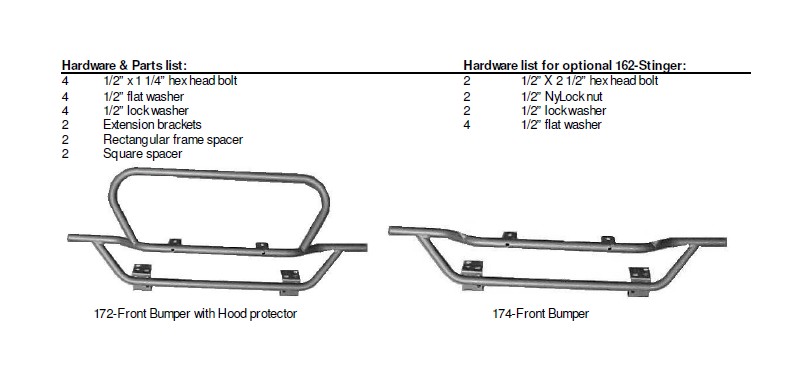
Note: If installing on a 1988-95 YJ Wrangler you will need to place the rectangular frame spacer inside the bumper mounting brackets and secure in place with 1/2” hex head bolts, lock washer and flat washer on the top of the bumper mounting bracket. The rectangular frame spacer has nut strips welded inside and will accept a 1/2” diameter bolt. Then you will bolt extension bracket on the bottom of the bumper mounting bracket using a 1/2” x 1 1/4” hex head bolt, lock washer, and flat washer. The bolt will pass through extension bracket, through bumper mounting bracket and into the rectangular frame spacer that has a nut strip inside it. Proceed with step 2 since the mounting of the bumper now is similar to the mounting on 1997-present TJ Wranglers. Do not fully tighten 1/2” hardware at this time. Photos above show how the YJ mounting brackets are assembled. See photos 5 & 6.
Step 2. Slide your new bumper over the vehicle frame and line up the mounting holes in the bumper with the mounting holes in the frame. See photos 3 &4. On TJ wranglers, the bumper will bolt to the top 2 mounting holes on the frame and one on the bottom of the frame on each frame rail. On YJ wranglers, the bumper will bolt to one hole on the top and one hole on the bottom of the frame rail and you will place the square spacer between the extension bracket and the bottom of the frame, so that the bumper mounting bolt will pass through extension bracket, through square spacer and then into the vehicle frame. You will re-use your OEM bumper mounting bolts on both model Wranglers.
Step 3. Secure bumper using the Torx bit bolts you removed in step 1. See photo 4. Photo 4 shows mounting on a TJ Wrangler, mounting on an YJ Wrangler will be different then photo 4.
Step 4. If the optional 162-Stinger was purchased install it by first completely drilling out the holes in the center tube of the bumper, there are holes in the backside of the tube you just need to drill them all the way through. Make sure that you drill straight inline through the bumper; start with a small drill bit and then gradually work your way to larger sized drill bits. Then line up stinger’s threaded mounting points with the bottom holes that are next to the frame rails on the bumper mounting brackets and sliding the threaded stud into those holes and securing with 1/2” flat washer and 1/2” NyLock nut. Do not fully tighten these bolts. Install 1/2” X 2 1/2” hex head bolts with lock washer and flat washer through front bumper and into the stinger where the threaded mounts are welded into place. Tighten all nuts and bolts at this time.
Step 5. After 500 miles or first off-road trip, re-check tightness on all nuts and bolts.

